‘AssistiveTouch’ also allows you to perform tasks that would normally require you to press one of the device’s physical buttons such as going back to the ‘Home’ screen, activating ‘Siri’, adjusting the volume or opening the multitasking window.
When ‘AssistiveTouch’ is enabled, a small icon appears on the screen (shown circled in the first panel of Fig 1). You can position the icon anywhere around the outer edge of the screen. When the ‘AssistiveTouch’ icon is tapped an overlay menu appears onscreen showing the actions that can be performed (see the second panel of Fig 1).

Fig 1
Enable AssistiveTouch
- Open the ‘Accessibility Settings’: Settings > General > Accessibility. (See the article Open Accessibility Preferences on this website for more information.)
- Under the ‘Interaction’ section, tap on ‘AssistiveTouch’. Fig 2.
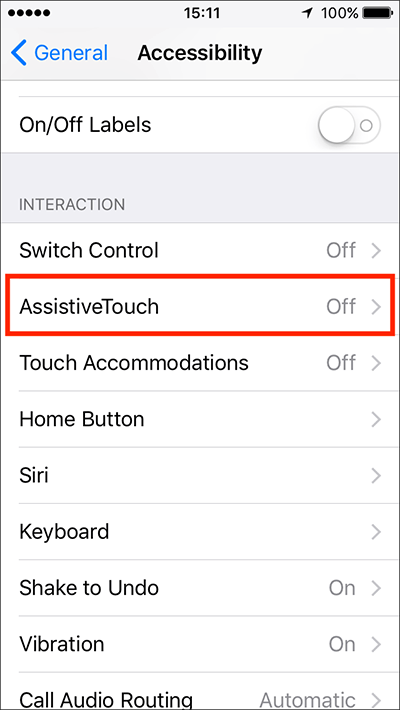
Fig 2 - Tap the toggle switch next to ‘AssistiveTouch’ to enable this feature. Fig 3.
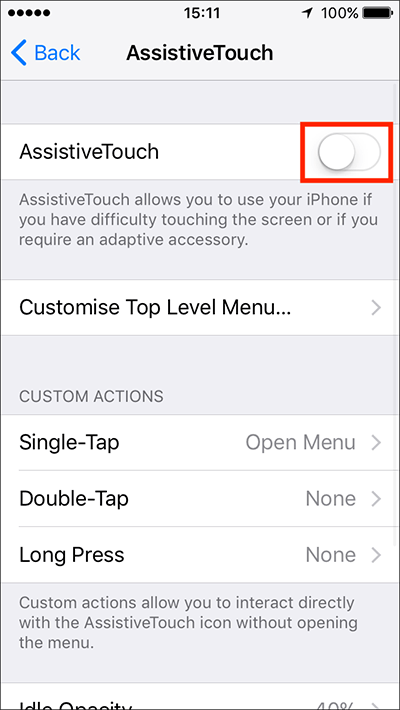
Fig 3
AssistiveTouch settings
Customise Top Level Menu
The ‘top-level menu’ is the menu that appears when you first tap the ‘AssistiveTouch’ icon. By default, the top level menu has six items:
- Notifications – opens the notifications screen
- Device – opens a sub-menu of controls for your device such as volume, rotate screen, mute, plus a sub-menu of further options.
- Control Centre – Opens the control centre
- Home – Return to the main ‘Home’ screen of apps.
- Custom – opens a sub-menu of custom controls that you can create
- Siri - activates the ‘Siri’ assistant.
You can have a maximum of eight items and a minimum of one item in the top level menu and you can change any of the top-level items:
- Tap ‘Customise Top Level Menu’. Fig 4.
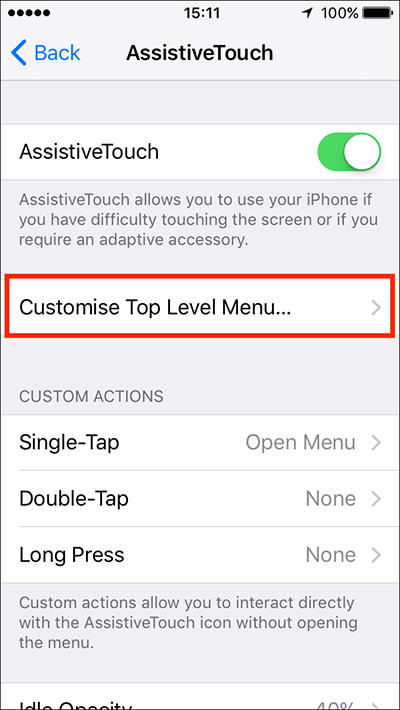
Fig 4 - To change an item in the menu, tap on its icon and choose a new action from the list. Fig 5. In our example we tapped on ‘Notifications’.

Fig 5 - To add more items to the menu, tap the ‘+’ (plus) button (Fig 6).
- A blank placeholder will appear in the menu (see panel one of Fig 6).
- To assign an action to the placeholder, tap it and select an action from the list that appears (see panel two of Fig 6).
- To remove an item from the menu, tap the ‘-‘ (minus) button (Fig 6). Note: items are removed in a set order (starting with the newest added item) so you may need to tap the remaining items to re-assign actions.
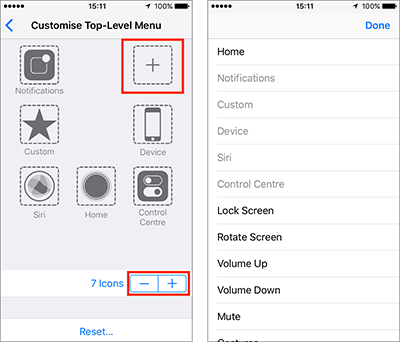
Fig 6 - If you want to reset the ‘AssistiveTouch’ menu to the default items and layout, tap ‘Reset’. Fig 7.
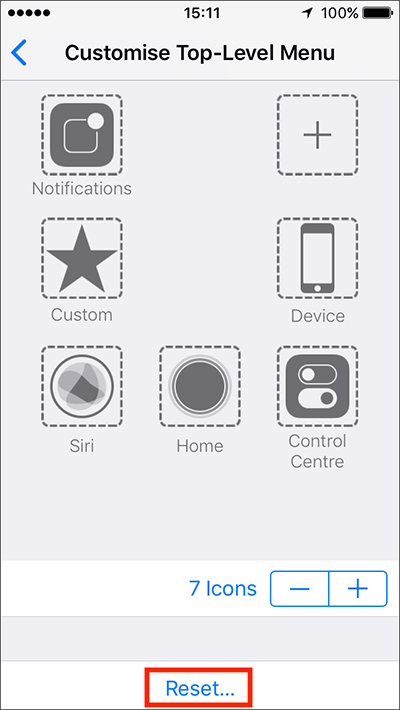
Fig 7
Custom Actions
Custom Actions’ enable you to do things with a single tap, double tap or long press on the ‘AssistiveTouch’ icon as a shortcut rather than having to open the menu. For instance, by default, a single tap on the icon opens the ‘AssistiveTouch’ menu.
You can set up different actions for Double-tap, Long press and if you have an iPhone with 3D Touch (iPhone 6s onwards) you can also assign an action to a 3D Touch on the icon.
- Tap on the ‘tap gesture’ you would like to assign an action to (in our example we tapped on ‘Double-Tap’). Fig 8.
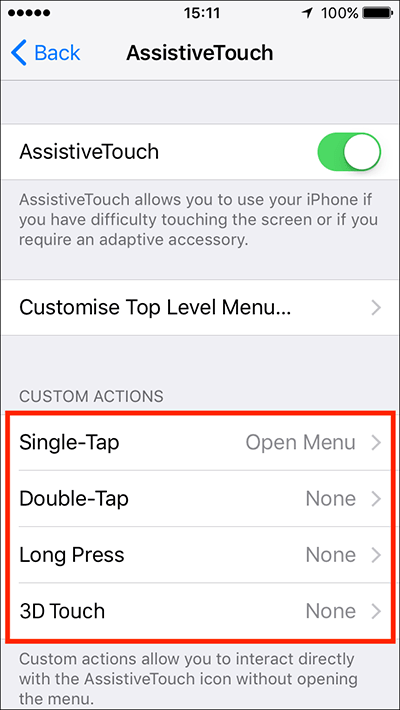
Fig 8 - Tap to select the action you would like this ‘tap gesture’ to perform (in our example we chose ‘Control Centre’). Fig 9.
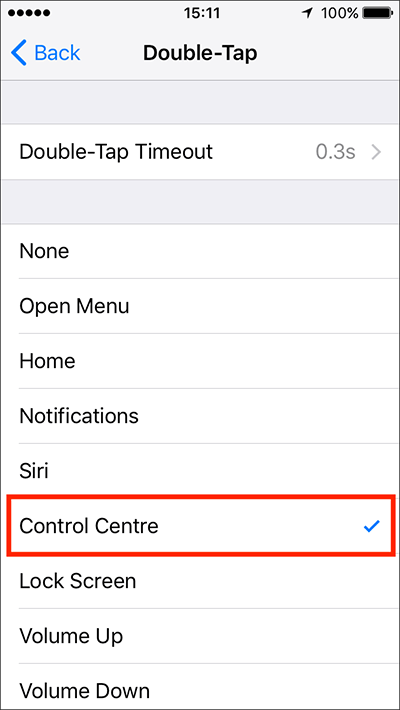
Fig 9 - You can adjust the timeout length that the tap gesture must occur within to trigger this action. Tap on ‘(Double-Tap) Timeout’, see the first panel of Fig 10.
- Tap on the ‘+’ (plus) or ‘-‘ (minus) buttons to set your preferred timeout length, see the second panel of Fig 10.When you’re happy with your settings, tap the ‘Back’ button in the top-left of the screen.

Fig 10
Idle Opacity
When you are using ‘AssistiveTouch’ you will notice that the opacity of the menu icon will reduce after about four seconds of idle time so that it doesn’t interfere, visually, with other tasks you are doing on your device. You can change how transparent the icon becomes, from between 15% to 100% opacity.
- Tap on ‘Idle Opacity’. Fig 11.
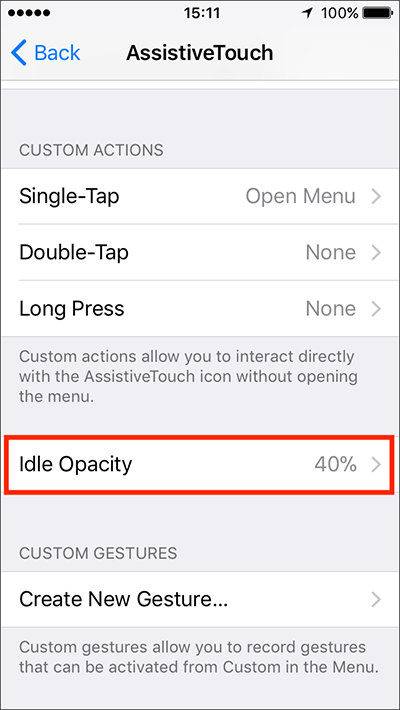
Fig 11 - Drag the slider to your preferred opacity. Fig 12.When you are happy with your settings, tap the ‘Back’ button in the top-left of the screen.

Fig 12
Custom Gestures
You can create your own gestures to use with ‘AssistiveTouch’. These gestures can be accessed via the ‘Custom’ button in the ‘AssistiveTouch’ menu.
Note: You can also assign your custom gestures to ‘Custom Actions’ for quick access to them. (see the Custom Actions section above)
- To create your own gestures, tap on ‘Custom Gestures’. Fig 13.
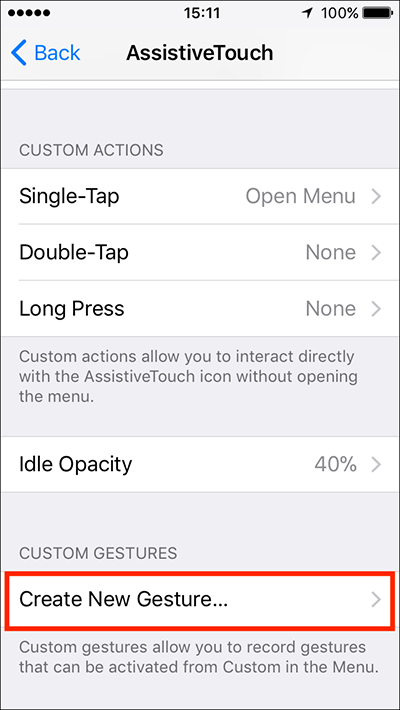
Fig 13 - Draw your gesture in the centre of the screen. If you draw more than one gesture they will be combined to create a single multi-touch gesture. See the first panel of Fig 14.
- When you have finished drawing your gesture, tap ‘Stop’ in the bottom-right corner. See the second panel of Fig 14.
- If you would like to see how your gesture will work when activated, tap ‘Play’ in the bottom-left corner. See the third panel of Fig 14.
- If you are happy with your gesture, tap ‘Save’ in the top-right, if not, tap ‘Record’ in the bottom-right corner to start again. See the third panel of Fig 14.
- Name your gesture and return to the ‘AssistiveTouch’ screen. See the fourth panel of Fig 14.
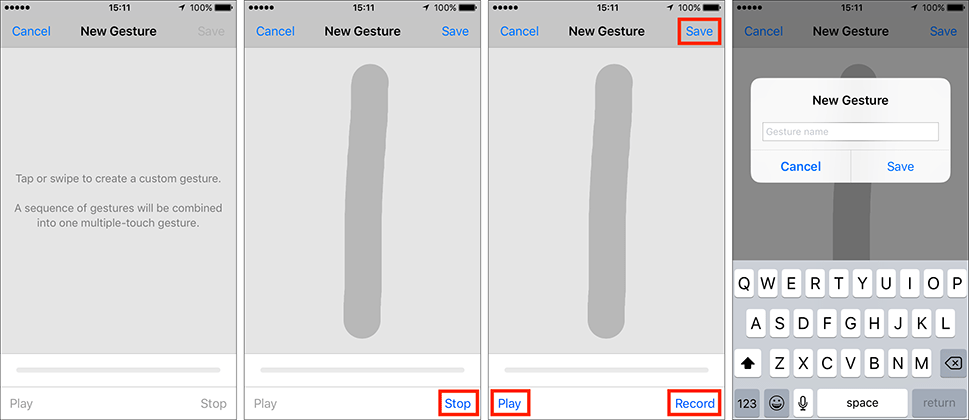
Fig 14
When you are happy with your ‘AssistiveTouch’ settings, either tap the back button in the top left of the screen to return to the main ‘Accessibility’ settings screen or press your device’s ‘Home’ button to return to the home screen.
Using AssistiveTouch
From any screen on your device, tap the ‘AssistiveTouch’ icon to open the menu. Fig 15.
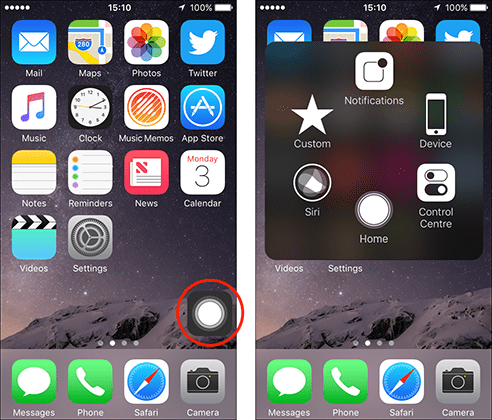
Fig 15
Need some more help?
Call our helpline 0300 180 0028 or email enquiries@abilitynet.org.uk
Need free IT Support at Home?
If you are older or disabled and need IT support at home, you can book a free home visit.