This guide explains how to make text larger in Google Chrome.
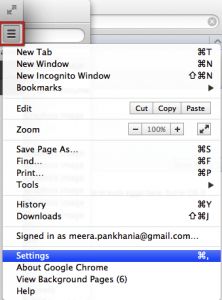
Press ‘cmd’ + ‘,’ to select ‘Settings’ represented by the ‘Menu’ icon, Fig 1.
Using the mouse
- Click on ‘-‘ to zoom out
- Click on ‘100%’ to return to default size
- Click on ‘+’ to zoom in

Fig 1
Using the keyboard press:
- ‘Cmd’ + ‘+’ (plus) to zoom in
- ‘Cmd’ + ‘-‘ (minus) to zoom out
- ‘Cmd’ + ‘0’ to return to default size
To permanently increase the font size for your browser
- Press ‘cmd’ + ‘,’ to select ‘Settings’ represented by the ‘Menu’ icon
- Once the settings tab is open, ‘Tab’ to the search box and type ‘Font’ and you will see Font Size and Customise fonts highlighted. Press ‘Tab’ until the Font Size drop down is highlighted and use the up and down arrow keys to select either Very Small, Small, Medium, Large and Very Large Font size, Fig 2 below.
To further customise the font size
- Press ‘Shift’ + ‘Alt’ + ‘T’ and ‘Tab’ to or click to select Customise and control Google Chrome represented by the ‘Menu’ icon.
- Click to select or Press ‘S’ to select ‘Settings’.
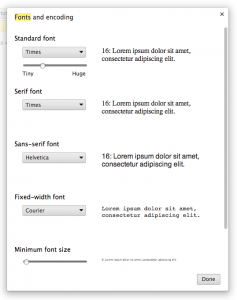
- ‘Tab’ to the search box and type ‘Custom’ you will see Customise fonts button is highlighted. Press ‘Tab’ until ‘Customise fonts…’ is select and press ‘Enter’, Fig 2.

Fig 2
- In the ‘Fonts and Encoding’ window, click and drag or ‘Tab’ to select the scroll bar under ‘Standard font’ or ‘Minimum font size’, and using the arrow keys you can increase or decrease the font size.
- Press ‘Esc’ or click ‘X’ in the top right hand corner to close the window, Fig 4.
- Press ‘Cmd’ +‘W’ or click ‘X’ to close the browser tab.
Fig 3
Note: If this does not work it could be because your computer settings cannot be changed due to local IT policies – contact your local IT support for further help.
Need some more help?
Call our helpline 0300 180 0028 or email enquiries@abilitynet.org.uk
Need free IT Support at Home?
If you are older or disabled and need IT support at home, you can book a free home visit.
