Call our helpline
0300 180 0028Our guide How to control you Apple Watch using hand gestures in watchOS 9 explains how to enable and use AssistiveTouch.
Our guide How to control you Apple Watch with wrist movements in watchOS 9 exlain how to use AssistiveTouch with Dwell Control.
This guide covers the settings you can change to make AssistiveTouch easier to use.
This guide gives you step by step instructions on how to change the settings for AssistiveTouch in watchOS 9, with pictures of the screens to help.
Access the AssistiveTouch settings
Find the Settings app
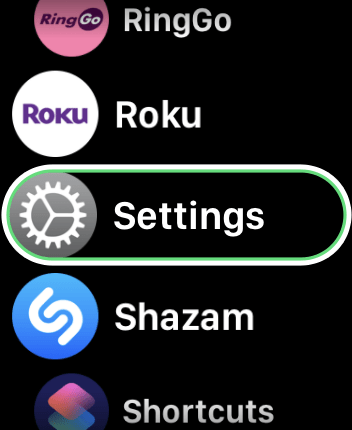
1. To access the Settings app, press the Digital Crown on your Apple Watch. If your apps are displayed as icons, tap the Settings icon ![]() . If your apps are displayed in a list, scroll down and tap Settings.
. If your apps are displayed in a list, scroll down and tap Settings.
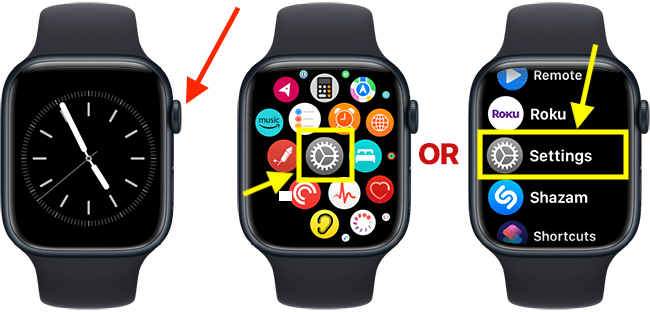
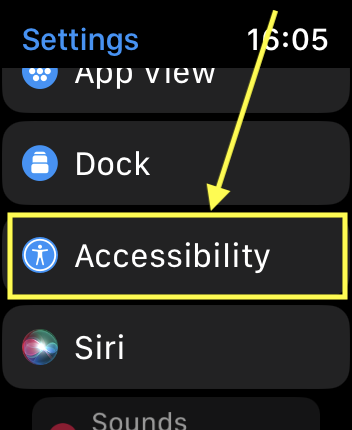
Open the Accessibility settings
2. On the Settings screen, scroll down and tap Accessibility.
Open the AssistiveTouch settings
3. On the Accessibility screen, scroll down and tap AssistiveTouch.

Changing the settings for AssistiveTouch
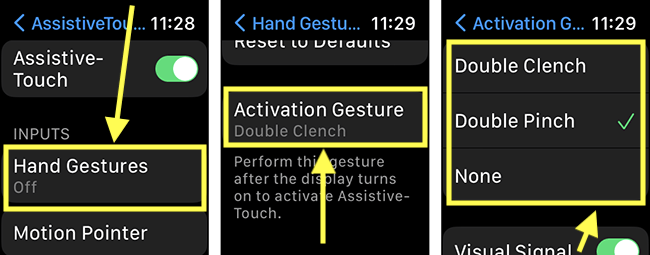
Activation Gesture
By default, you activate AssistiveTouch by double-clenching your fist quickly. You can change the activation gesure to Double Pinch or you can set it to None so that AssistiveTouch is active as soon as you wake your AppleWatch. Tap Hand Gestures. On the next screen, scroll down and tap Activation Gesture. Finally, choose how you want to activate AssistiveTouch.
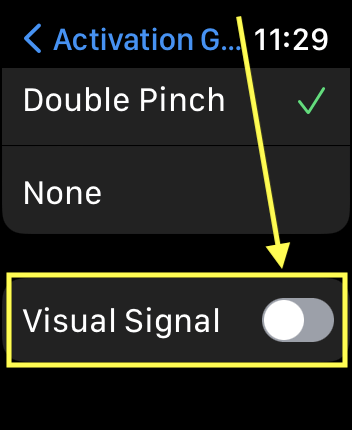
When you raise your wrist, a blue ring appears around your watch display (indicating that you can activate AssistiveTouch). To turn this off, tap the toggle switch for Visual Signal. Note: You will still see the blue highlight as you move from item to item.
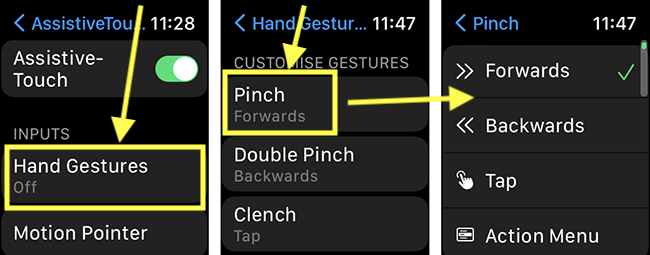
Hand Gestures
By default, AssistiveTouch uses the following hand gestures to navigate your AppleWatch:
- Pinch – Move forwards through the items on the screen.
- Double-pinch – Move backwards through the items on the screen.
- Clench (make a fist) – Perform a tap to select the highlighted item.
- Double-clench (when AssistiveTouch is active) – Bring up the Action Menu.
To change the action each gesture performs, tap Hand Gestures. On the next screen, under Customise Gestures, tap a gesture and choose a new action.
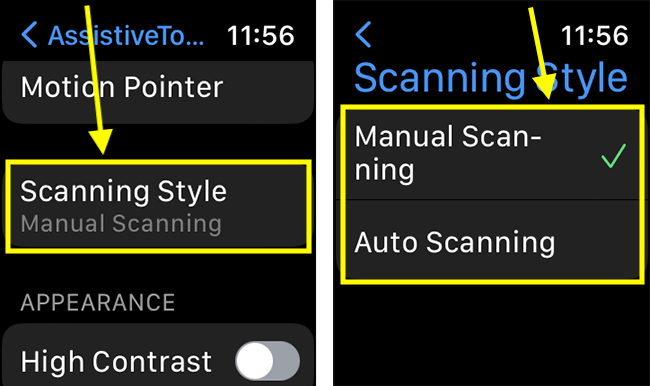
Scanning Style
AssistiveTouch offers two 'scanning' methods for moving between the items on the screen: Manual scanning, where you use pinch gestures to move between items and Automatic scanning, where the items are highlighted one after the other.
To change the scanning style, tap Scanning Style. On the next screen, choose Manual Scanning or Automatic Scanning.
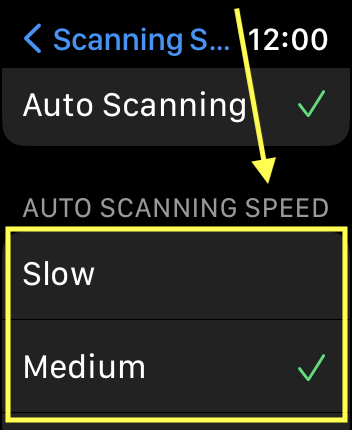
If you enable Automatic Scanning, choose a scanning speed from: Slow, Medium, or Fast.
Appearance
By default, AssistiveTouch uses a blue ring highlight to indicate the item that can be selected. You can change the ring colour. You can also make the highlight more noticeable by adding a thick white border to it.
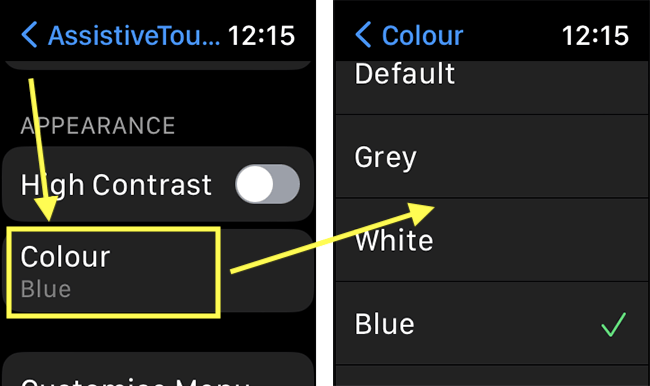
Change the colour of the highlight
To change the colour, tap Colour and choose from the options on the next screen.
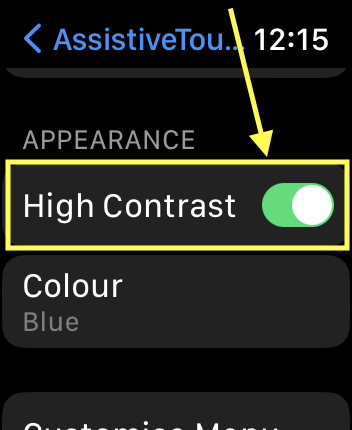
Make the highlight more noticeable
To make the highlight more noticeable, tap the toggle switch for High Contrast to turn it on.
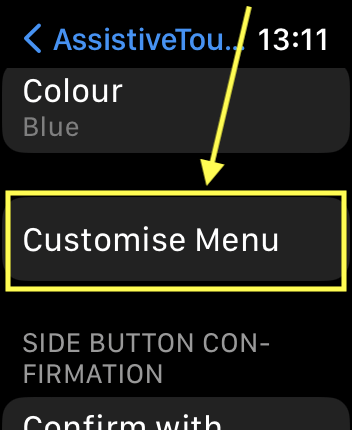
Customise the Action Menu
The Action Menu contains a variety of actions for interacting with your AppleWatch. Actions such as pressing and rotating the Digital Crown, scrolling the screen, opening the Notification Centre, and showing the list of apps.
The Action Menu also contains app-specific actions. For example, when you open the Action Menu whilst viewing the watch face, the menu contains actions for changing to a different watch face, editing the watch face, and speaking the time.
To customise the Action menu, tap Customise Menu.
Add actions to the Action Menu
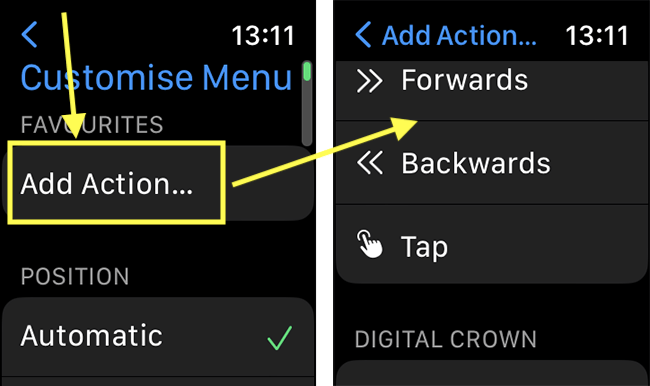
You can add more actions to the top-level menu of the Action Menu. The actions you add will appear at the beginning of the menu after the Press Crown action. Tap Add Action, then choose the actions you want to add to the menu.
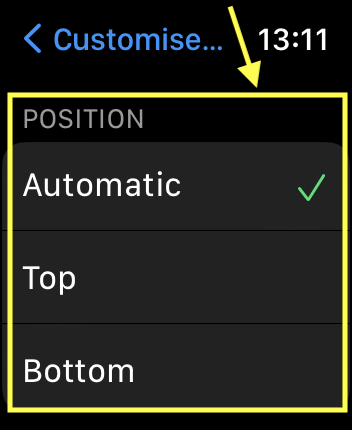
Change where the Action menu appears on the screen.
By default, the Action Menu appears at the top or bottom of the screen, depending on what else is on the screen at the time. If you would like the menu to always appear in the same place, choose Top or Bottom in the Position section.
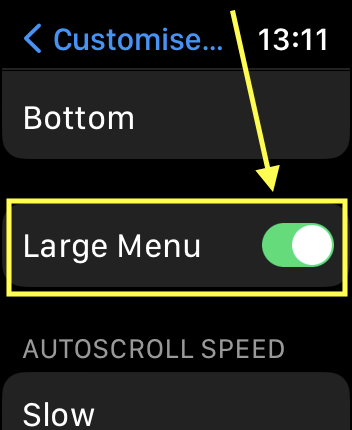
Make the Action Menu larger
To make the buttons in the Action menu larger, tap the toggle switch for Large Menu to turn it on.
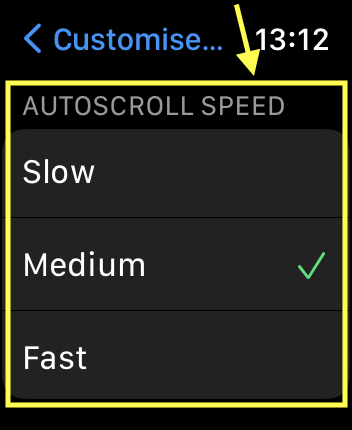
Change the scroll speed
If you are using Automatic Scanning (see the Scanning Style section above), you can set how fast your watch moves from one action to another. Scroll down to the Autoscroll Speed section and choose from: Slow, Medium, and Fast.
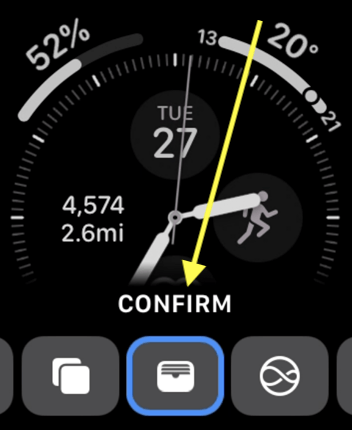
Confirm with AssistiveTouch
You can use AssistiveTouch to double-press the side button - for example, when confirming Apple Pay purchases.
To set this up, scroll to the bottom of the AssistiveTouch settings and tap the toggle switch for Confirm with AssitiveTouch. On the next screen, scroll to the bottom of the confirmation notice and tap Continue. Next, double-click the side button when instructed and enter your passcode. Double-click the side button again to confirm.
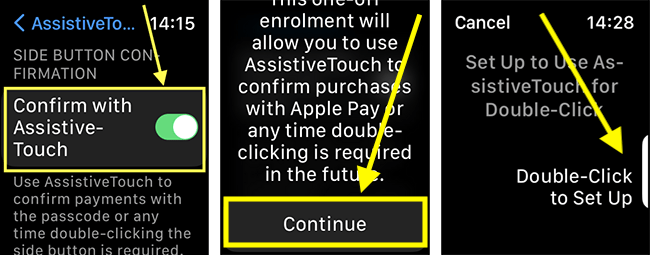
Once Confirm with AssitiveTouch is set up, you can confirm Apple Pay payments using the Confirm action in the System menu within the Action Menu.
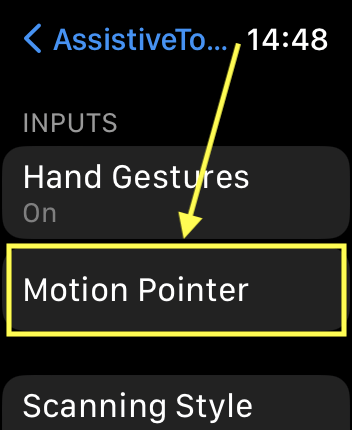
The Motion Pointer
With the Motion Pointerl, you navigate the screen by titling your wrist to control an on-screen pointer. You can open Motion Control from within the Action Menu or use it as part of Dwell Control.
You can customise the Motion Pointer settings to make it easier to control the pointer. Tap Motion Pointer to access the following settings:
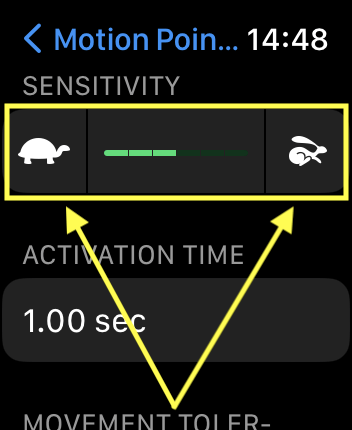
Sensitivity
'Sensitivity' is how far and fast the Motion Pointer moves across the screen when you tilt your wrist.
To slow down the Motion Pointer, tap the 'Tortoise' button (on the left). You will need to tilt your wrist further to move the pointer across the screen.
To speed up the Motion Point, tap the 'Hare' button (on the right). You will need to tilt your wrist less far to move the pointer across the screen.
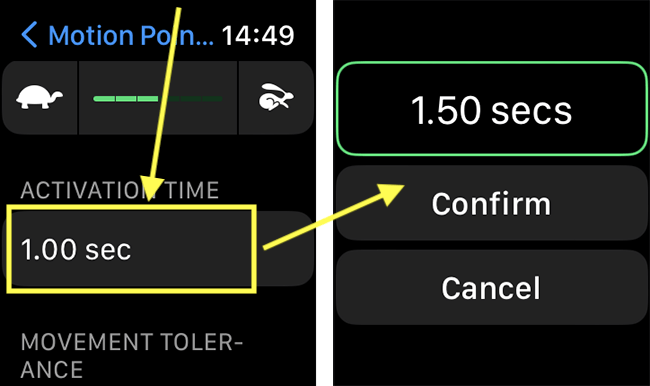
Activation Time
The activation time is how long you need to hover over an item before it is selected.
Tap the time shown under Activation Time. On the next screen, use the digital crown to change the time delay. Tap Confirm to set the new time delay.
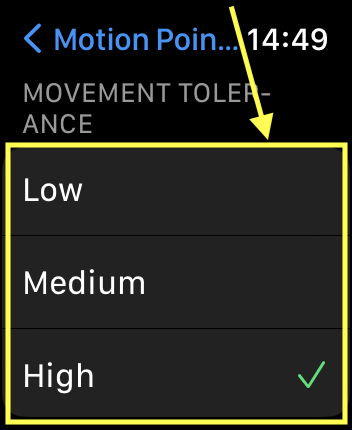
Movement Tolerance
'Movement Tolerance' is the distance the Motion Pointer can move whilst hovering over an item for the item to still be selected. Choose from Low, Medium, and High.
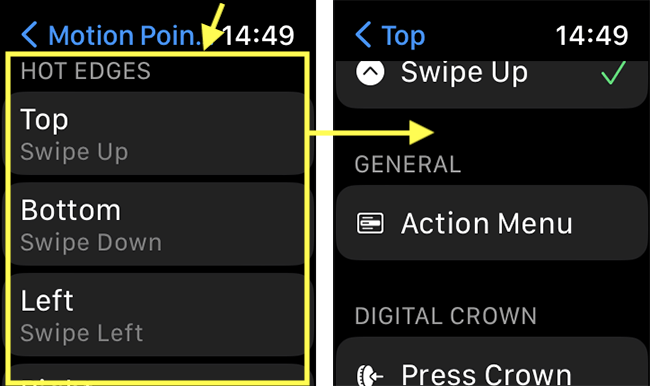
Hot Edges
By default, when you hover over the edge of the screen, a swipe gesture is performed in that direction. The screen edges can be set to perform different actions. Tap on an edge in the list (Top, Bottom, Left, Right) and choose a new action.
Need some more help?
Call our helpline 0300 180 0028 or email enquiries@abilitynet.org.uk
Need free IT Support at Home?
If you are older or disabled and need IT support at home, you can book a free home visit.