Call our helpline
0300 180 0028Short guide:
- Click the Apple icon
 in the top left corner of the screen and select System Settings.
 - Click Accessibility in the sidebar.
- Select Pointer Control from the list of Accessibilty options.
- Turn on the toggle switch for Mouse Keys.
- To change the settings for Mouse Keys, click the i (show detail) button
 next to the toggle switch.
Before and after
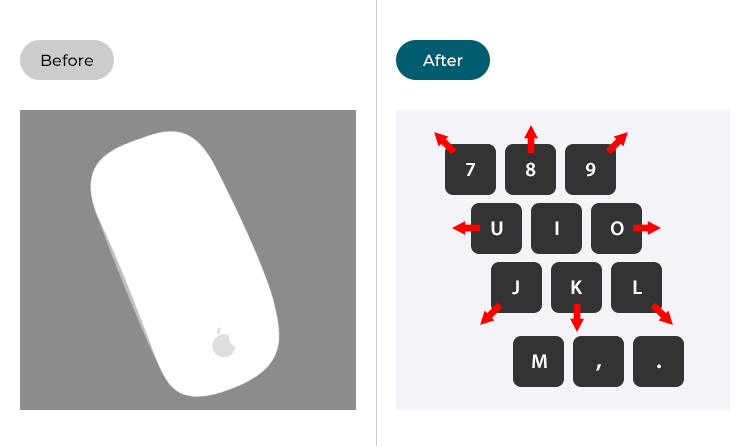
This section gives you step by step instructions on how to control the mouse pointer using the keyboard in macOS 13 Ventura, with pictures of the screens to help.
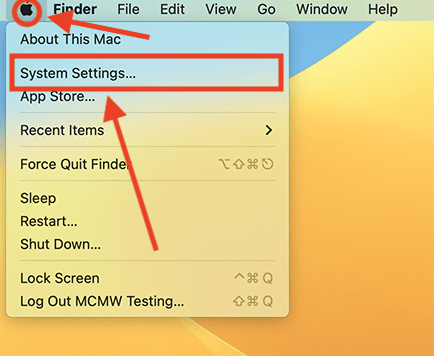
Open System Settings
1. Click the Apple icon ![]() in the top left corner of the screen and choose System Settings from the menu.
in the top left corner of the screen and choose System Settings from the menu.
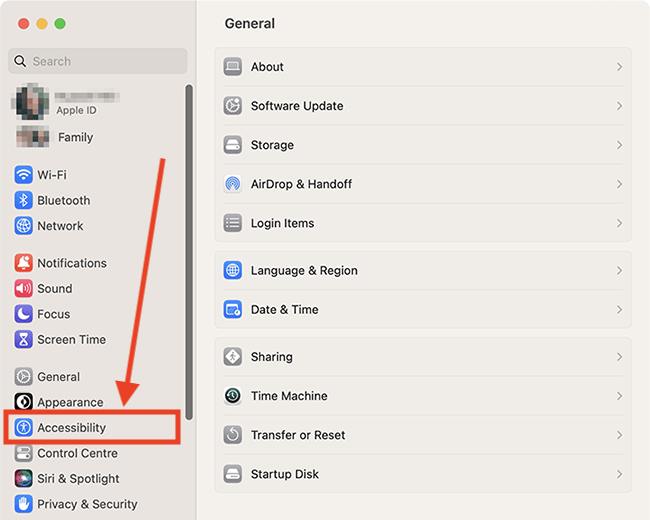
Open the Accessibility settings
2. In the System Settings window, click Accessibility in the sidebar.
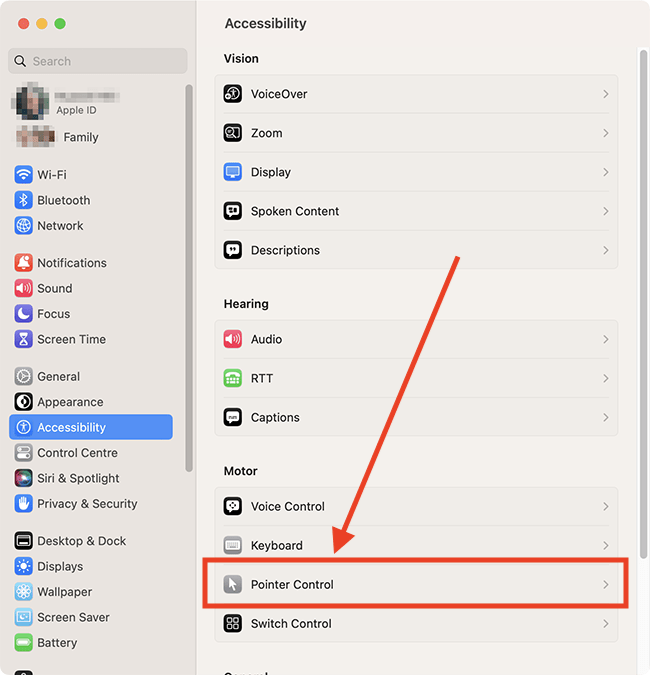
Find the Pointer Control settings
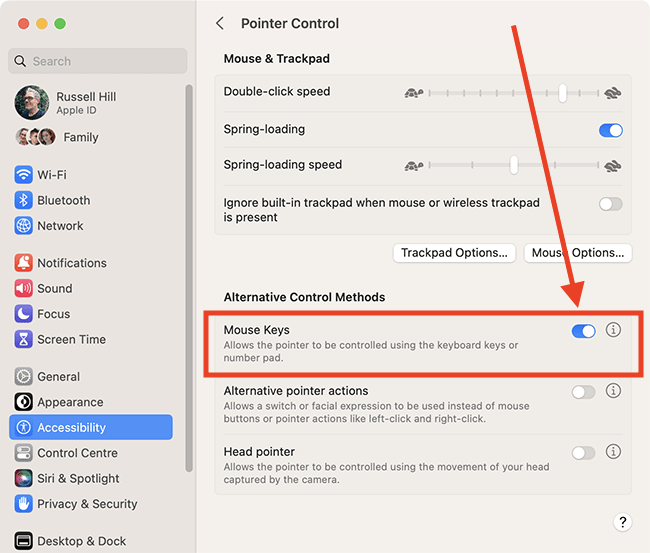
3. Select Pointer Control from the list of Accessibilty options on the right.
Enable Mouse Keys
4. Click the toggle switch for Mouse Keys to turn it on.
Customise Mouse Keys
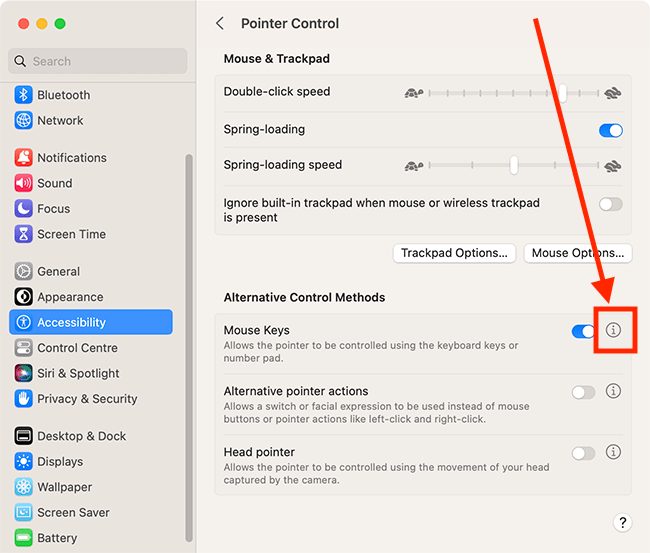
5. To customise Mouse Keys, click the i (show detail) button ![]() next to the toggle switch.
next to the toggle switch.
Turn Mouse Keys on and off using the Option key
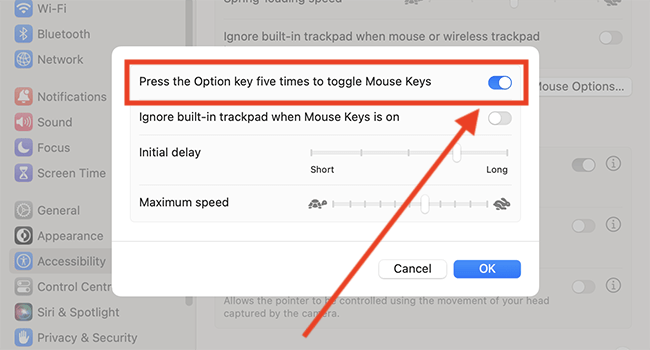
6. If you want to turn Mouse Keys on and off using the Option key, click the toggle switch Press the Option key five times to toggle Mouse Keys to turn it on.
Disable the built-in trackpad when Mouse Keys is on (laptops)
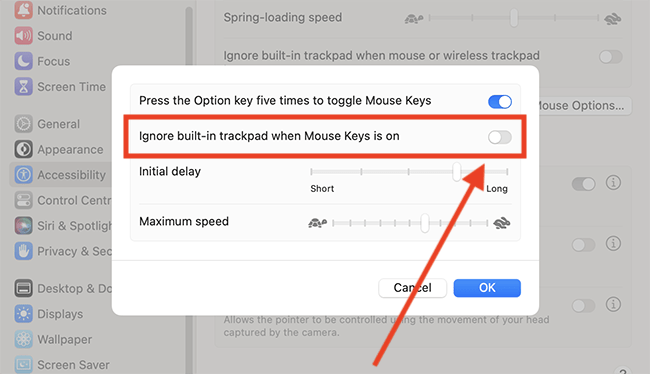
7. If your computer has a built-in trackpad you can disable it when Mouse Keys is on. To do so, click the toggle switch for Ignore built-in-trackpad when Mouse Keys is on.
Change the delay before a key starts moving the pointer
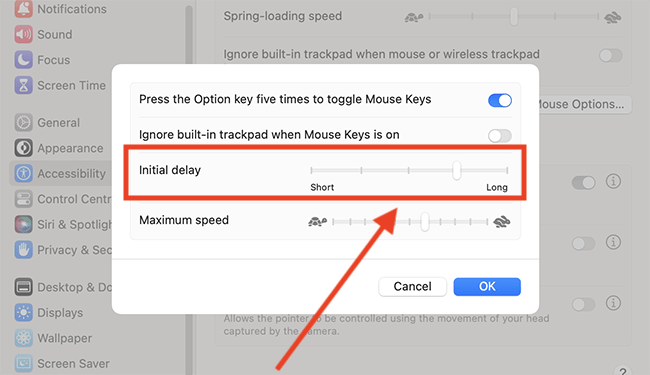
8. Adjust the slider for Initial Delay to change the amount of time between pressing a key and the cursor moving.
Change how fast the pointer moves
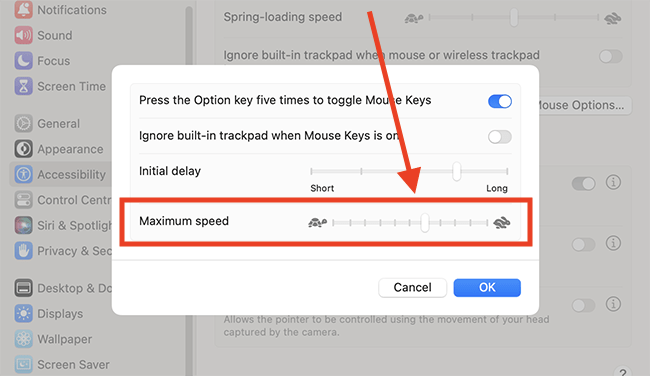
9. Adjust the slider for Maximum Speed to change how fast the pointer moves across the screen.
Save your Mouse Keys settings
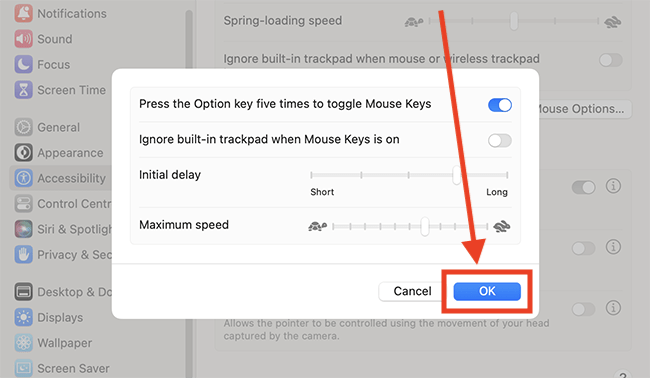
10. Click OK to save your settings.
Add alternative pointer actions
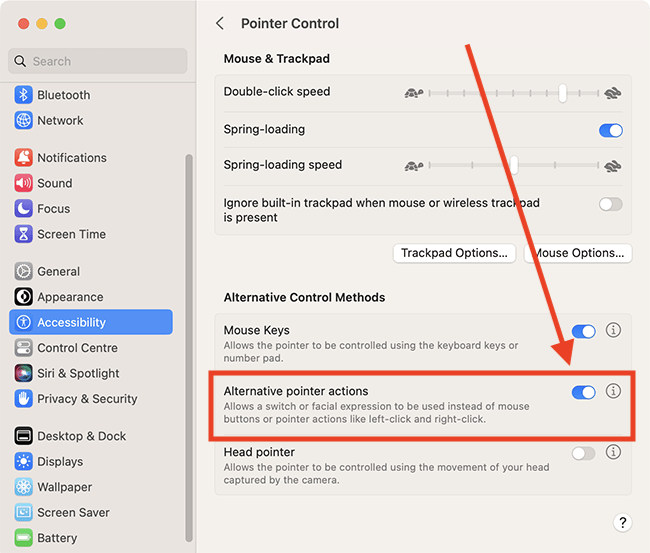
When using Mouse Keys, you can perform a left-click by pressing I on a keyboard or 5 on a numeric keypad. You can set up alternative keys to perform a left-click, and you can also set up keys to perform right-click, double-click, and drag and drop actions. To do so:
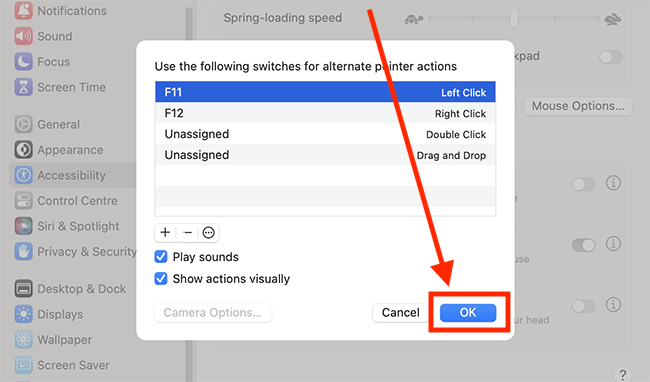
11. Tick the checkbox for Alternative Pointer Actions. By default, the keys assigned to alternative pointer actions are:
- Left-click: F11
- Right-click: F12
- Double-click: unassigned
- Drag and Drop: unassigned
Customise alternative pointer actions
12. To change the keys assigned to alternative pointer actions, click the i (show detail) button ![]() next to the toggle switch..
next to the toggle switch..
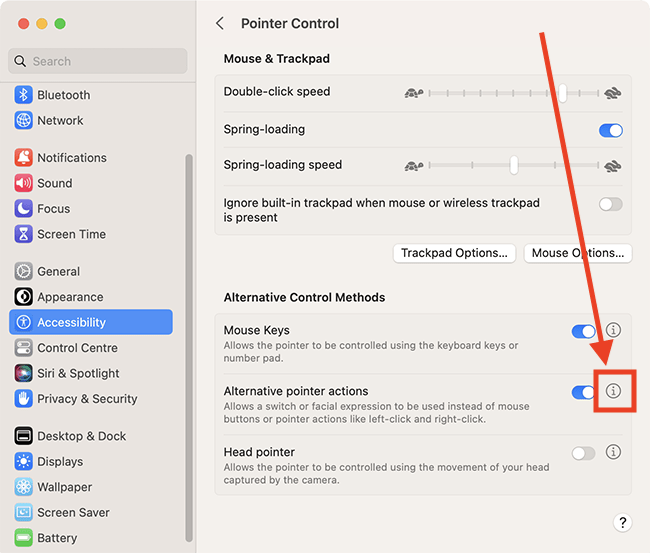
Assign keys to Double-click and Drag and Drop
13. To assign a key to Double-click or Drag and Drop, Select the action in the list then click the options (···) button. Choose Physical Switch, then press the key you wish to use. Click Done to save your changes.
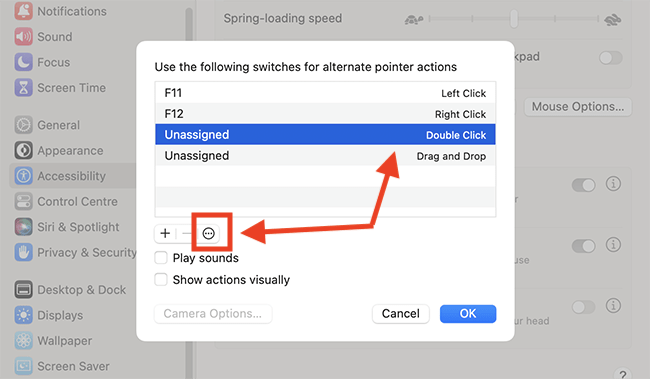
Change the key associated with an action
14. To change the key associated with an action, select the action in the list then click the options (···) button.
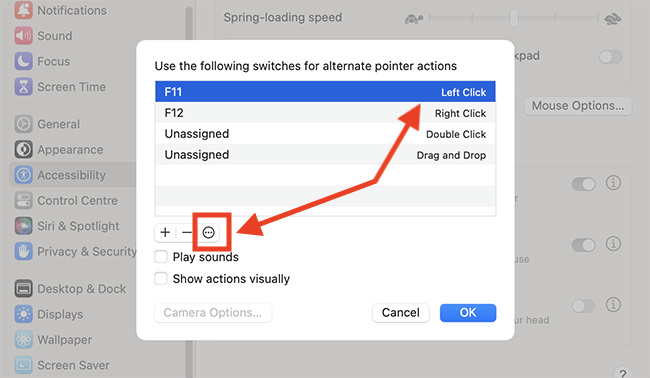
15. Next, click Reassign, then press the key you wish to use. Click Done to save your changes.
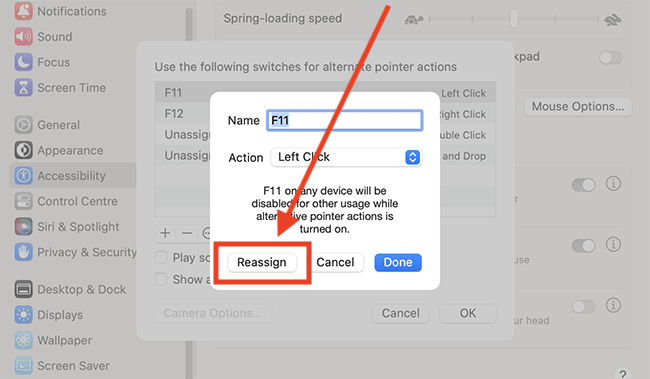
Add a new key to perform an action
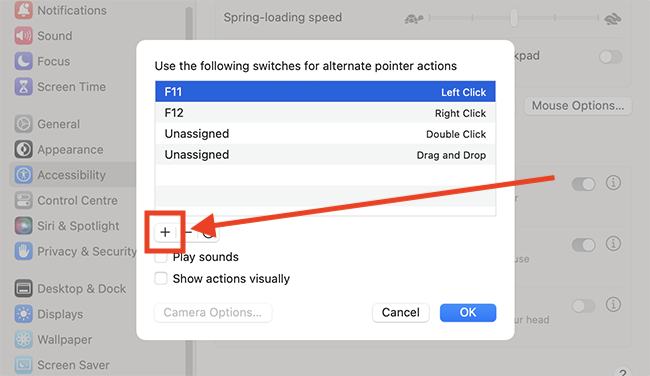
16. To add a new key to perform one of the actions, click the + (add) button. Choose Physical Switch, then press the key you wish to use.
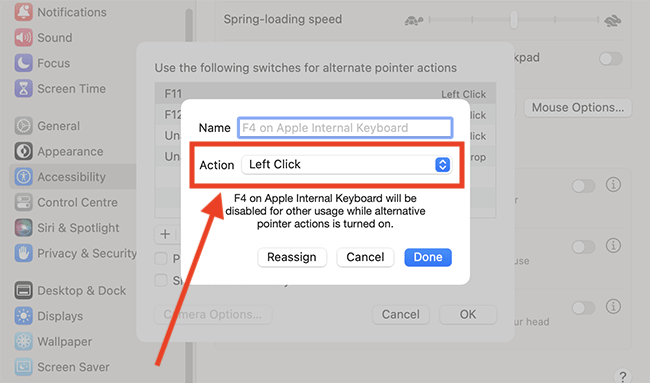
17. Next, choose the Action you want this key to perform, then click Done.
Hear a sound when a key is pressed
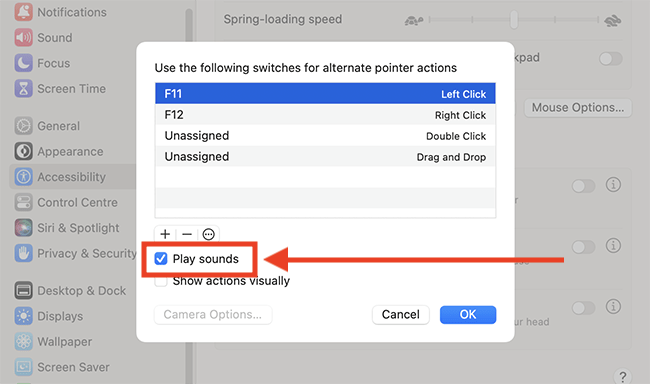
18. If you’d like to hear a sound when you press one of the alternative pointer action keys, tick the checkbox for Play sounds.
Receive visual feedback when a key is pressed
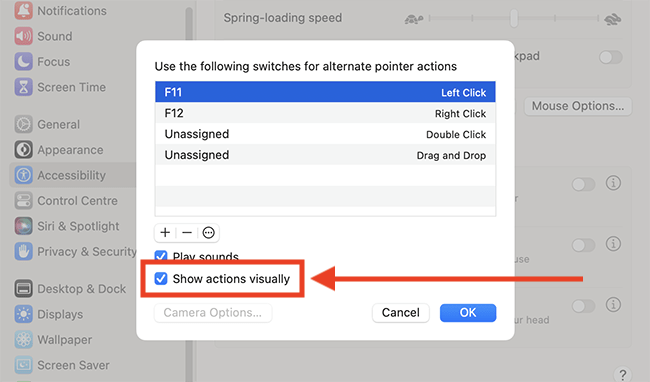
19. If you’d like visual feedback when you press one of the alternative pointer action keys keys, tick the checkbox for Show actions visually. Once enabled, you will see a circular halo around the pointer when you press one of the alternative pointer action keys.
Save your alternative pointer action settings
20. Click OK to save your changes.
Close System Settings
21. When you are happy with your settings, close System Settings by clicking the Close button (red circle) in the top-left corner of the window or using the Cmd + W keyboard shortcut.
Using Mouse Keys
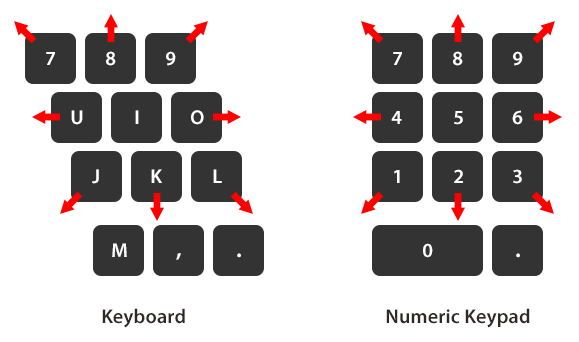
22. When Mouse Keys is on, you can move the mouse pointer by holding down the following keys on a keyboard and on a numeric keypad (if you have one).
To move the mouse pointer:
Using the keyboard: 7, 8, 9, U, O, J, K, L
Using the numeric keypad: 7, 8, 9, 4, 6, 1, 2, 3
To perform a left click:
Using the keyboard: I
Using the numeric keypad: 5
Press and hold the mouse button:
Using the keyboard: M
Using the numeric keypad: 0 (zero)
To release the mouse button:
Using the keyboard: . (full stop / period)
Using the numeric keypad: . (decimal point)
To perform alternative pointer actions (see steps 9-13, above, to see how to assign different keys to perform these actions):
Left click: F11 or user assigned
Right click: F12 or user assigned
Double click: user assigned
Drag and Drop: user assigned
Note: If this does not work it could be because your computer settings are managed by someone else (an IT department or administrator for example). If so, you will need to contact them to access these settings or for help.