Call our helpline
0300 180 0028VoiceOver works with all the built-in applications that come with iPhone and iPad, including Safari, Mail, Music, Calendar, and Notes, and many of the third-party apps available in the App Store.
Short guide:
- Open the Settings app
 and tap Accessibility.
 - Tap VoiceOver
- Tap the toggle switch for VoiceOver to turn it on.
- To navigate your device, slide a finger over the screen or tap an item. VoiceOver will announce the item under your finger. Double-tap anywhere on the screen to activate the selected item.
- Scroll the screen by swiping up or down with three fingers.
- Use the VoiceOver settings screen to customise how VoiceOver behaves.
Before and after
This section gives you step by step instructions on how to set up VoiceOver, the screen reader in iOS 18, with pictures of the screens to help.
Find the Accessibility settings
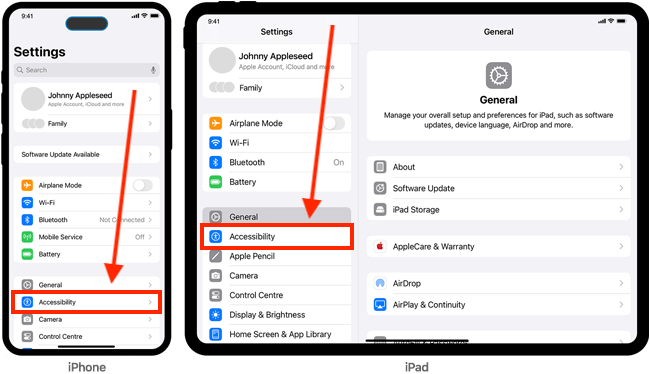
1. Tap the Settings ![]() icon on your Home screen to open the Settings app. Scroll down and tap Accessibility.
icon on your Home screen to open the Settings app. Scroll down and tap Accessibility.
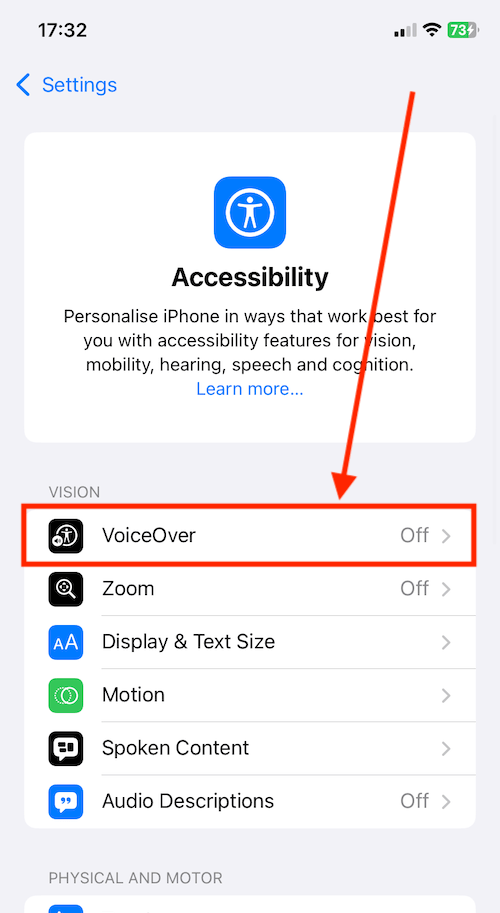
Open VoiceOver settings
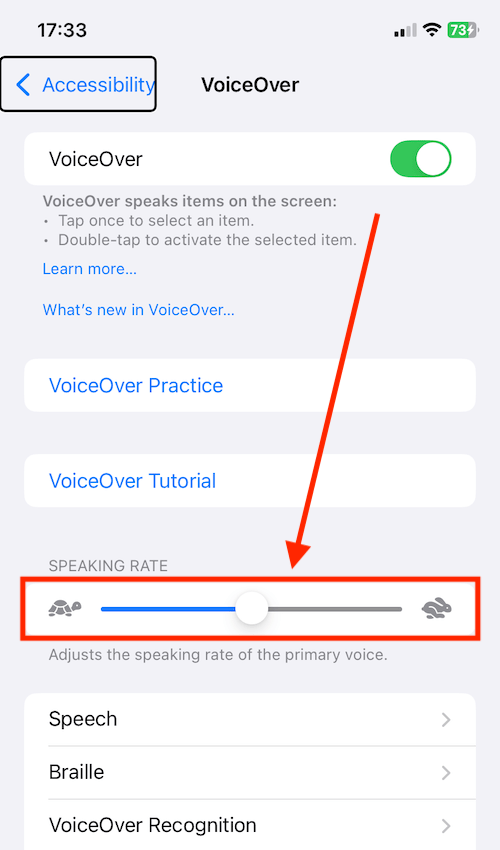
2. On the Accessibility screen, tap VoiceOver.
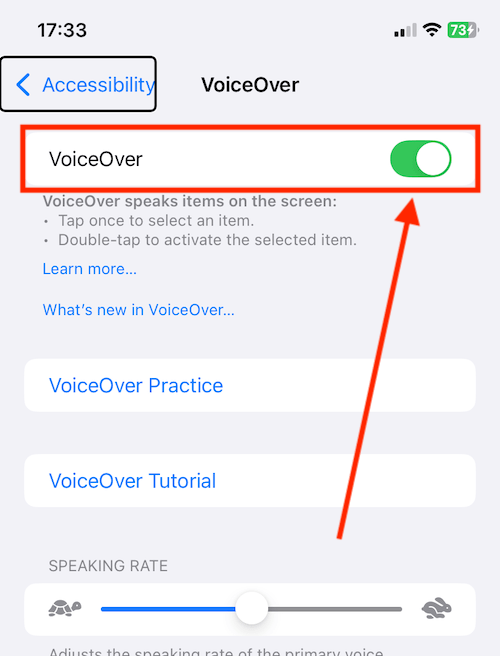
Enable VoiceOver
3. On the VoiceOver screen, tap the toggle switch for VoiceOver to turn it on.
Using VoiceOver gestures to navigate your device
4. To navigate your device, slide a finger over the screen or tap an item. VoiceOver will announce the item under your finger. Double-tap anywhere on the screen to activate the selected item.
You can use the following gestures to navigate your device and activate items:
Note: You can access a tutorial on using these gestures on the VoiceOver settings page. You can also practice these gestures, see step 6 below.
| VoiceOver gestures | |
| Action | Gesture |
| Explore the screen | Drag your finger over the screen. VoiceOver reads out the of name each item that you touch. Lift your finger to select an item. |
| Select (and speak an item) | Single tap |
| Activate an item | When an item has been selected, double-tap anywhere on the screen to activate it. Alternatively, you can use a split-tap gesture – touch and hold an item, then tap anywhere on the screen with another finger. |
| Scroll the page | Swipe up or down with three-fingers |
| Go to the Home screen | Slide one finger up from the bottom edge until you feel the first vibration, then lift your finger. |
| Open the App Switcher | Slide one finger up from the bottom edge until you feel a second vibration, then lift your finger. |
| Open the Control Centre | Slide one finger down from the top edge until you feel the first vibration, then lift your finger. |
| Open the Notification Centre | Slide one finger down from the top until you feel a second vibration, then lift your finger. |
| Pause or continue speaking | Double-tap |
| Toggle speech on and off | Three-finger double-tap |
| Stop or restart the current action | Two-finger double-tap |
| Read a page starting at the top | Two-finger flick up |
| Read a page starting at the selected item | Two-finger flick down |
| Toggle screen curtain on and off (hide the screen) | Three-finger triple-tap |
| Copy last spoken text to the clipboard | Three-finger quadruple tap |
| Scroll up one page | Three-finger flick down |
| Scroll down one page | Three-finger flick up |
| Scroll back one page | Three-finger flick right |
| Scroll forward one page | Three-finger flick left |
| Move to the first element | Four-finger tap near the top of the screen |
| Move to the last element | Four-finger tap near the bottom of the screen |
| Switch to the next app | Four-finger swipe right |
| Switch to the previous app | Four-finger swipe left |
| Open the quick settings menu | Two-finger quadruple tap |
| Toggle VoiceOver help | Four-finger double tap |
| For a full list of VoiceOver gestures visit: https://support.apple.com/en-gb/guide/iphone/iph3e2e2281/ios | |
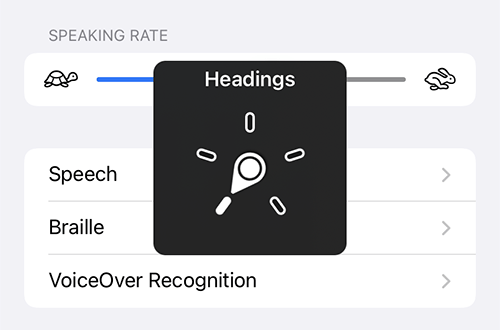
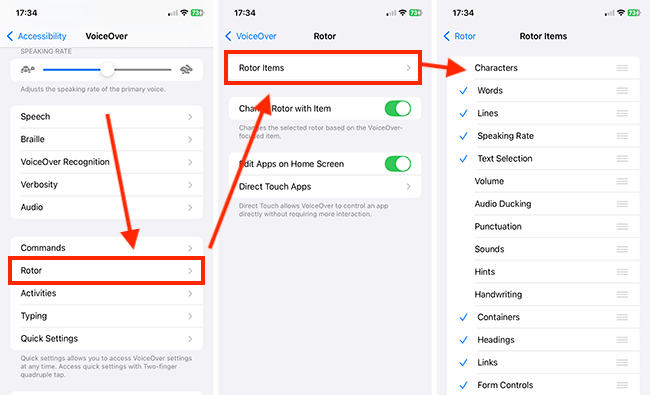
The Rotor
5. The Rotor is an onscreen menu that allows you to change how you navigate and interact with the screen. For instance, if you choose Heading from the Rotor menu, you can then move from one heading on the page to the next heading using a flick gesture. You can change VoiceOver settings such as the speaking rate and volume, and activate special input methods such as Braille Screen Input or Handwriting (useful for silently entering passwords or your iPhone passcode).
You can open the Rotor by rotating two fingers on the screen (clockwise or anti-clockwise) as if you were turning a physical dial. You can also open the Rotor by simultaneously dragging one finger up and one finger down the screen.
Keep turning (or dragging) until you hear the setting you require. You can now use this setting by swiping a finger up or down the screen.
You can change which items appear in the Rotor so that it contains only the items you require. In VoiceOver settings, tap Rotor. On the next page, tap Rotor Items. Finally, tap items to add or remove them from the Rotor menu. To reorder items, drag the list icon ![]() to a new position.
to a new position.
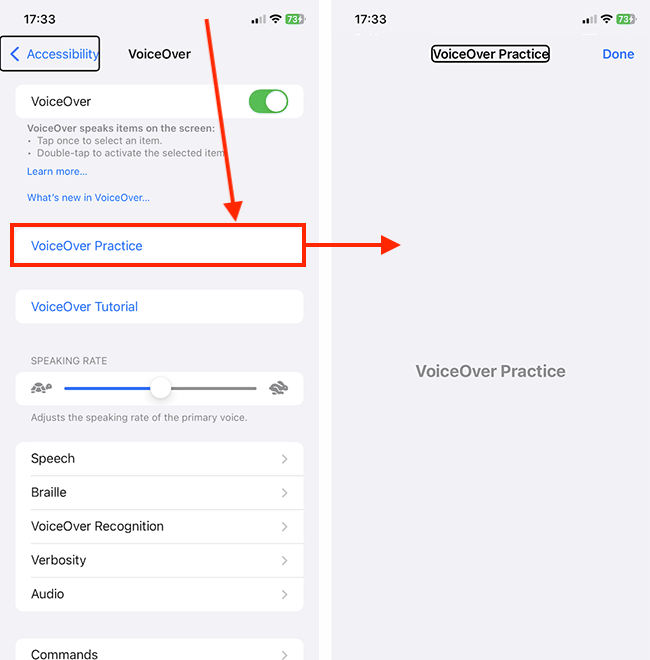
Practise using VoiceOver
6. When VoiceOver is enabled, you will see an option for VoiceOver Practice. This is not a guided practice session but simply a screen where you can try out different gestures.
Select VoiceOver Practice.
On the VoiceOver Practice screen, tap in the middle of the screen to activate the practice area. Try tapping and swiping with different numbers of fingers to hear what action each gesture performs. Try using the Rotor as well.
The following steps cover many of the options available to you to customise VoiceOver.
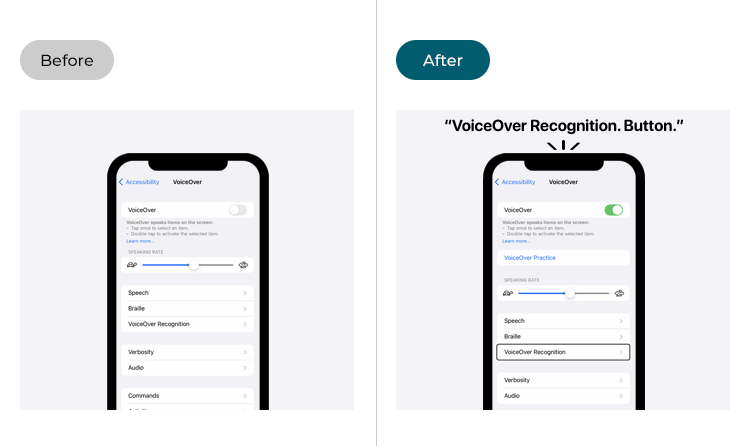
Using VoiceOver recognition to describe images, text, and unlabelled items
7. With VoiceOver Recognition options enabled, your device can recognize images and text in apps and on websites.
Tap VoiceOver Recognition. The features you can customise are described after the image below.
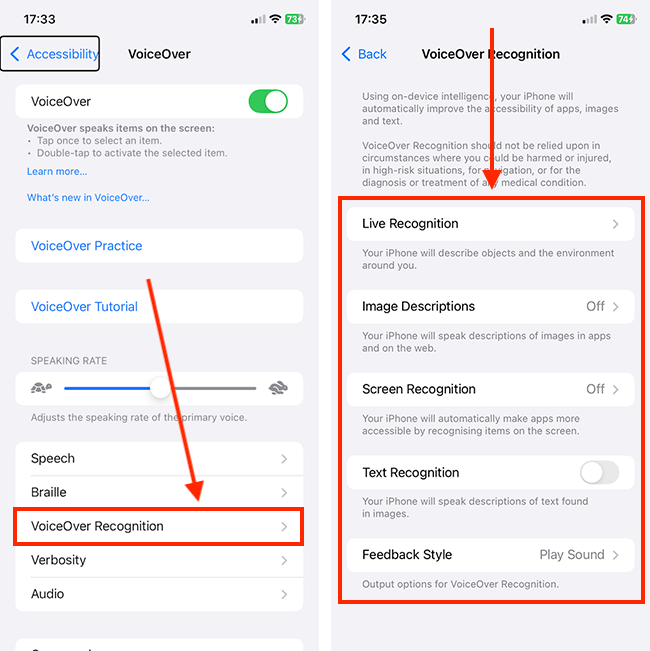
| VoiceOver Recognition settings | |
| Feature | Description |
| Live Recognition | Live Recognition describes objects and the environment around you. Tap Live Recognition to choose which items appear in the Live Recognition Rotor. |
| Image Descriptions | VoiceOver speaks descriptions of images in apps and on websites. When using the camera to take a photo, VoiceOver describes what is visible in the viewfinder. |
| Screen Recognition | VoiceOver recognises items within apps, such as navigation controls, to make them more accessible. |
| Text Recognition | VoiceOver speaks the text it finds within images and icons. |
| Feedback Style | Tap Feedback Style and choose how Voiceover announces unlabelled icons and images: Speak VoiceOver says “possibly”, then describes what it recognises. Play Sound VoiceOver plays a short beep, then describes what it recognises. Nothing VoiceOver describes what it recognises without alerting you first. |
Adjust the VoiceControl speaking rate
8. To change the VoiceOver speaking rate, adjust the slider for Speaking Rate. Adjust the slider to the left to slow it down and to the right to speed it up. Note: If VoiceOver is on, you will need to select the slider, then double-tap and hold until you hear a sound. When you hear the sound, drag left and right to adjust the slider.
Change how VoiceControl sounds
9. To change how VoiceOver sounds, tap Speech. The features you can customise are described after the image below.

| Speech settings | |
| Voice | You can choose a different voice for VoiceOver to use and adjust the settings for how the voice sounds. Note: The enhanced and premium voices are more realistic but use more storage space. |
| Add Rotor Voice | Add extra voices that can be accessed from the Rotor. |
| Pitch Change | VoiceOver can use a higher pitch for the first item in a group. To enable this, set the toggle switch for Pitch Change to On. |
| Detect Languages | VoiceOver will switch voices when text in another language is detected. To enable this, set the toggle switch for Detect Languages to On. |
| Pronunciations | Add you own pronunciations for words that VoiceOver doesn't pronounce correctly. |
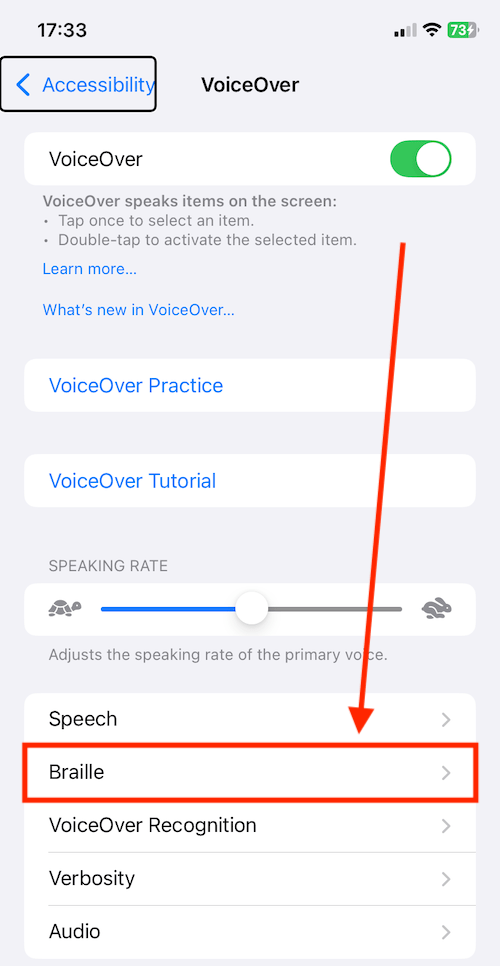
Use a refreshable braille display with VoiceOver
10. You can use a Bluetooth refreshable braille display to read VoiceOver output in braille. In addition, braille displays with input keys and other controls can be used to control an iPhone when VoiceOver is on.
For more information on using Braille, see the Apple guide: https://support.apple.com/en-gb/guide/iphone/iph73b8c43/ios
For a list of common Braille commands, you can use on your device, see the Apple guide: https://support.apple.com/en-gb/HT202132
For a list of supported devices, see: https://support.apple.com/en-gb/HT202514
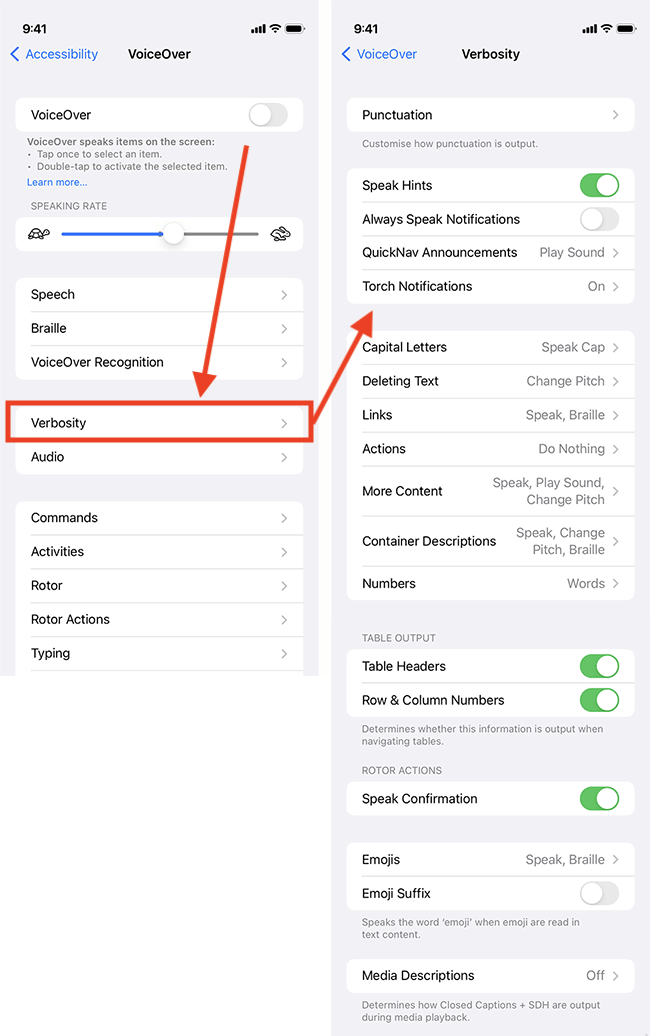
Change how much spoken detail you receive while navigating the screen
11. VoiceOver gives you a lot of information as you navigate a screen. If you find you’re getting bombarded with too much detail, you can customise the level of spoken feedback you receive.
Tap Verbosity and adjust the settings to your preferences.
Adjust the audio settings
12. You can change the sounds you hear while navigating the screen and change how VoiceOver interacts with media and calls. Tap Audio. The features you can customise are described after the image below.
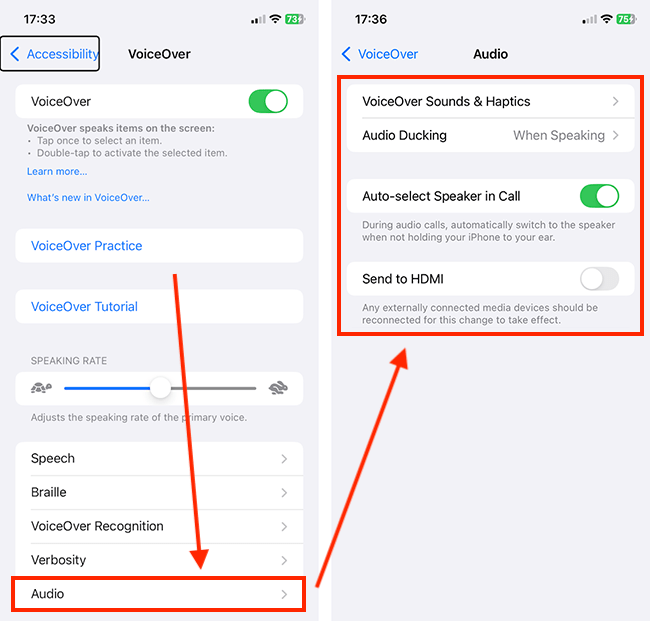
| Audio settings | |
| VoiceOver Sounds & Haptics | You can turn off all sounds and haptics or choose which actions you want to hear sounds and/or haptics for. |
| Audio Ducking | Reduce the volume of audio (music, etc.) while VoiceOver is talking. |
| Auto-select Speaker in Call | During audio calls, if you are not holding the phone to your ear it will automatically switch to your device speaker. |
| Send to HDMI | Send audio to an external device connected via an HDMI cable. Note: If your external device is already connected, you should reconnect it for this to take effect. |
Customise commands
13. You can view and change the gestures and keyboard shortcuts that activate VoiceOver commands. Tap Commands. The features you can customise are described after the image below.
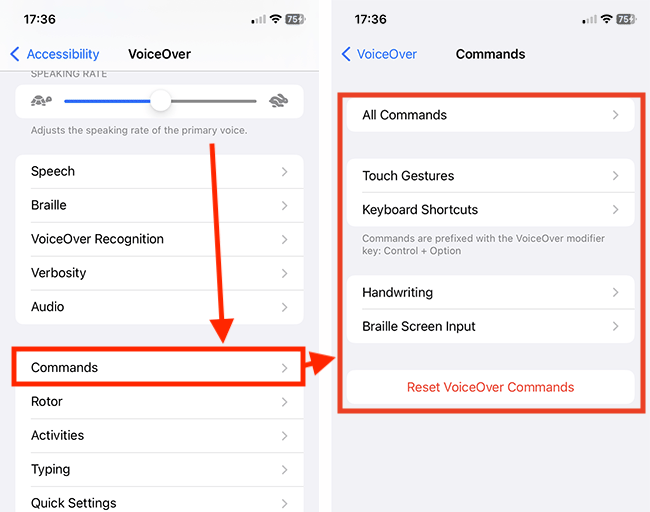
| Commands settings | |
| All Commands | Add a gesture or keyboard shortcut to activate a command. |
| Touch Gestures | View or edit the gestures associated with commands. |
| Keyboard Shortcuts | View or edit the keyboard gestures associated with commands. |
| Handwriting | View or edit the gestures for handwriting and the associated commands. |
| Braille Screen Input | View or edit the gestures for Braille Screen Input and the associated commands. |
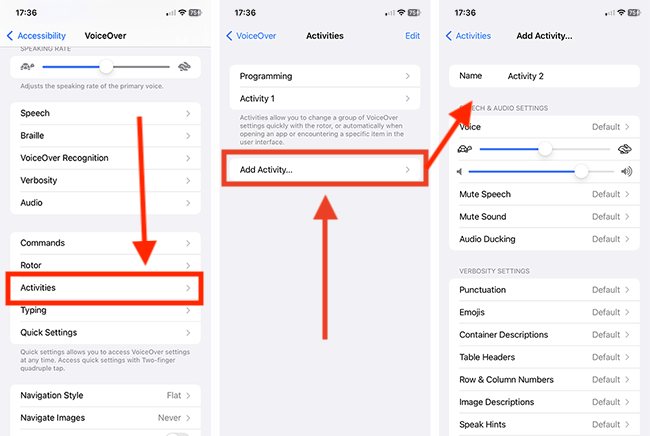
Set up app or activity-specific groups of settings
14. You can create groups of VoiceOver settings that are specific to an app or an activity. You can set VoiceOver to apply these settings when opening a particular app and add them to the Rotor.
Tap Activities, then tap Add Activity. On the next screen add the settings that you would like to apply when using a specific app or performing a particular activity.
Customise how VoiceOver behaves when you are typing
15. To change how VoiceOver behaves when you are typing, tap Typing. The features you can customise are described after the image below.
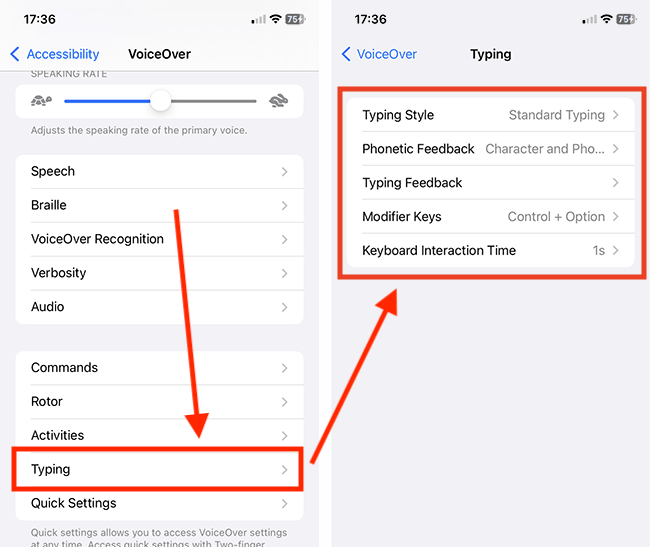
| Typing settings | |
| Typing Style | Choose from Standard Typing, Touch Typing, Direct Touch Typing. |
| Phonetic Feedback | By default, VoiceOver speaks the character, then speaks its phonetic equivalent. For example, "A", then "alpha". You can choose from Off, Character and Phonetics, or Phonetics Only. |
| Typing Feedback | By default, you’ll hear characters and words read aloud as you type them. This is the default setting for software and hardware keyboards, but you can choose a different setting for each keyboard. You can choose from Nothing, Characters, Words, or Characters and Words. |
| Modifier Keys | Modifiers are the keys that must be pressed on a hardware keyboard to activate VoiceOver keyboard shortcuts. |
| Keyboard Interaction Time | This is the amount of time to wait before VoiceOver can start Slide to Type or use alternative keys on the onscreen keyboard. |
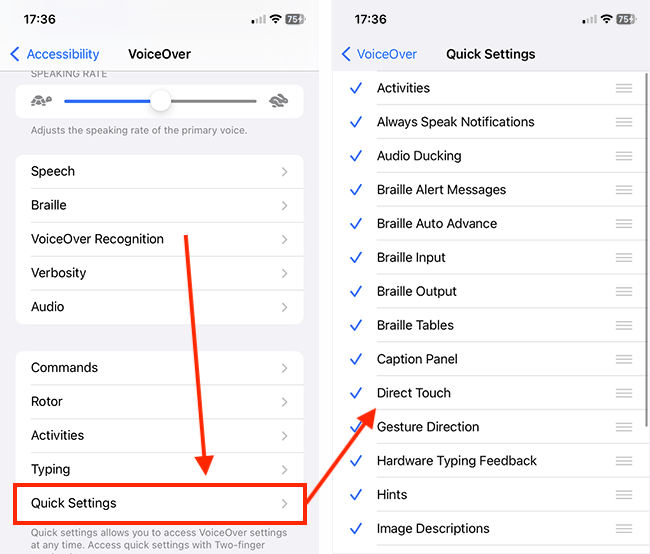
Customise which items appear in the quick settings menu
16. You can access the settings menu at any time by performing a two-finger quadruple tap. To change which items appear in the menu, tap Quick Settings. On the next screen, tap items to add or remove them from the Rotor menu. To reorder items, drag the list icon ![]() to a new position.
to a new position.
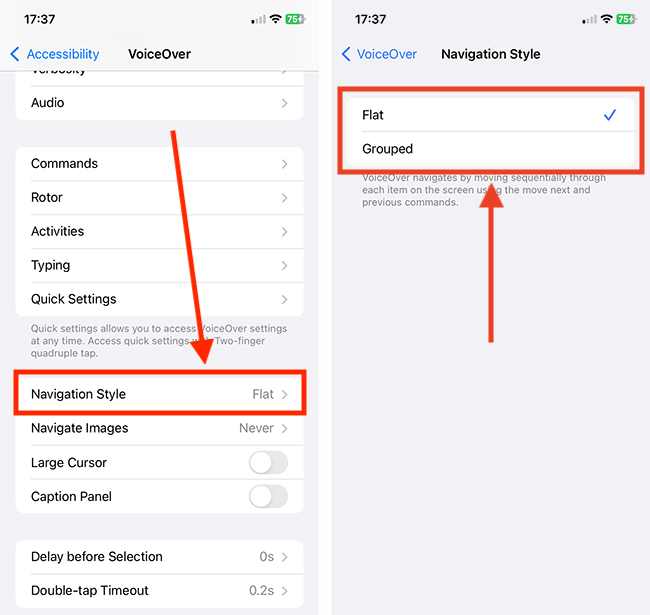
Choose the Navigation Style
17. There are two navigation styles for moving through the items on the screen, Flat and Grouped. To change the navigation style, tap Navigation Style. On the next screen, choose from:
- Flat – VoiceOver moves through items one at a time, using the move next and previous commands.
- Grouped – VoiceOver navigates by moving through items and groups of items on the screen. To move into a group, use a Two-finger swipe right. To leave a group, use a Two-finger swipe left.
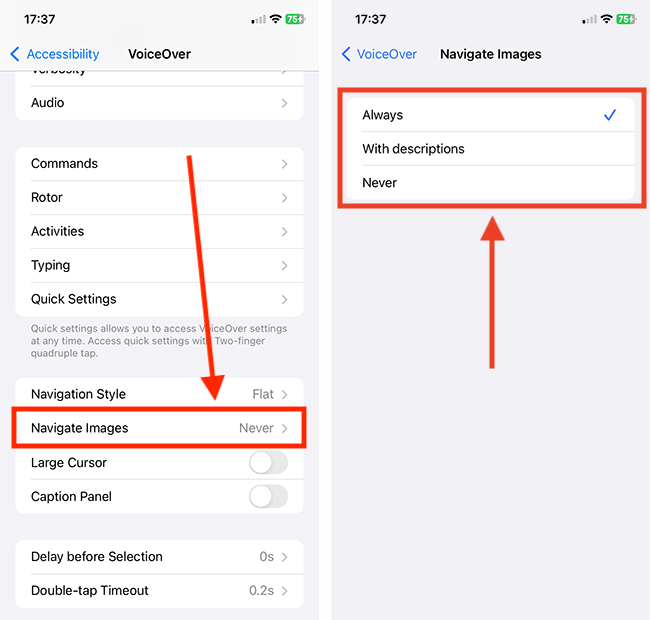
Customise how VoiceOver treats images
18. By default, VoiceOver will read out the information associated with images. To how VoiceOver treats images, tap Navigate Images and choose from:
- Always – image information will always be spoken.
- With descriptions – only images with an alternative text description will be spoken.
- Never – image information will not be spoken.
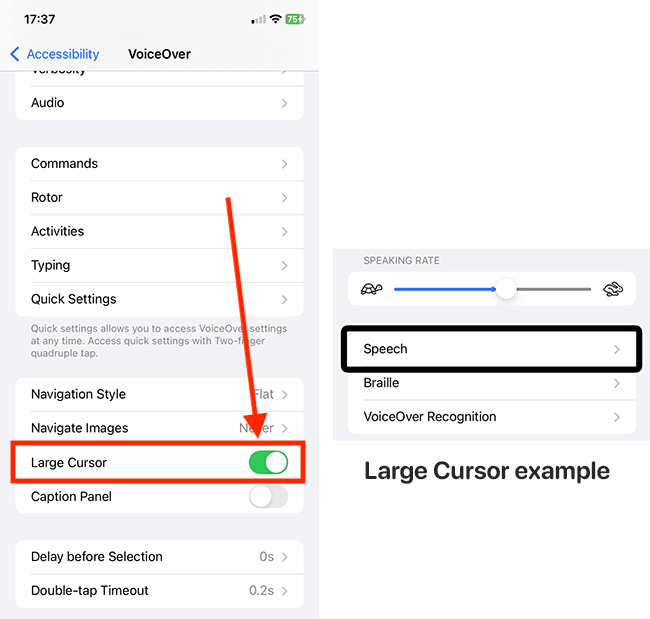
Enable a larger cursor
19. The cursor is the rectangular border that highlights the selected item. To make the border thicker so that it is easier to see, tap the toggle switch for Large Cursor to turn it on.
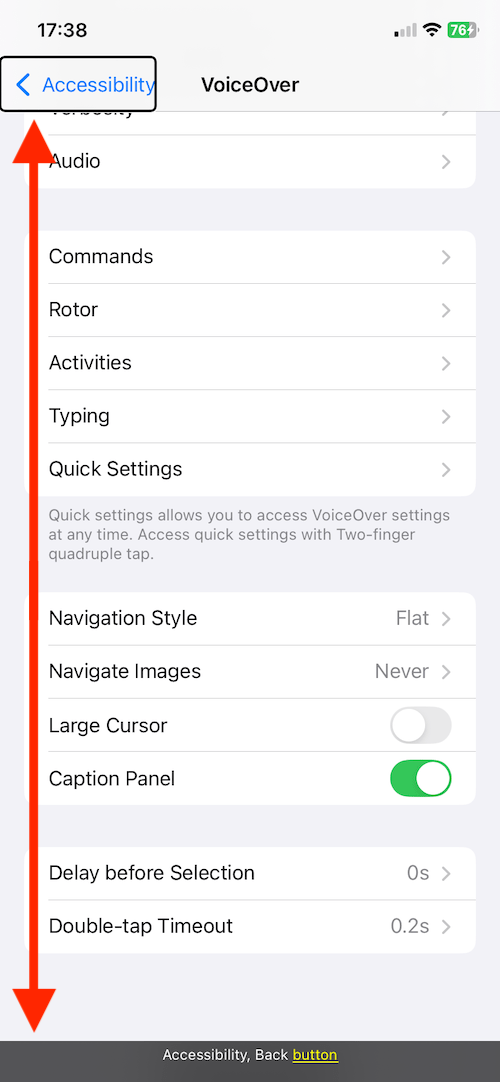
Turn on the Captions Panel
20. The Caption Panel allows a sighted assistant to follow exactly where the user is on the screen. Tap the toggle switch for Caption Panel to turn it on. The Captions Panel appears at the very bottom of the screen.
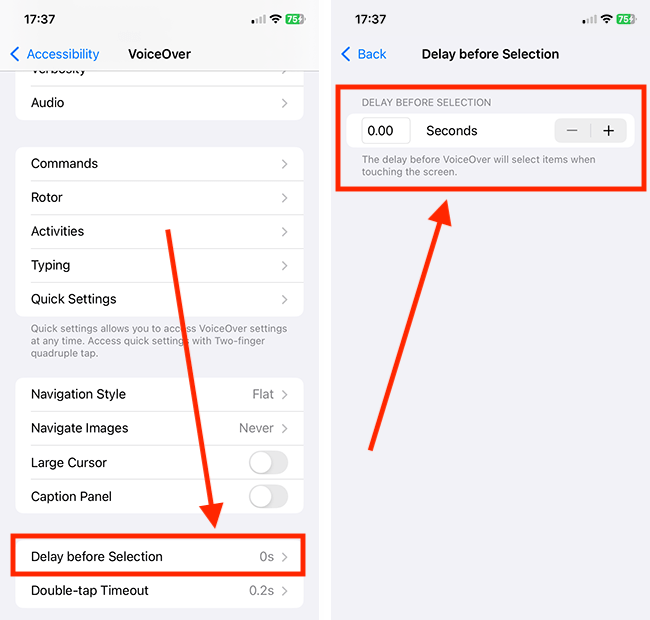
Set a delay before a selection is made
21. You can set a delay before VoiceOver selects an item when you touch the screen. This can help avoid making selections accidentally.
Tap Delay before Selection. Use the + (plus) and – (minus) buttons to set the delay time.
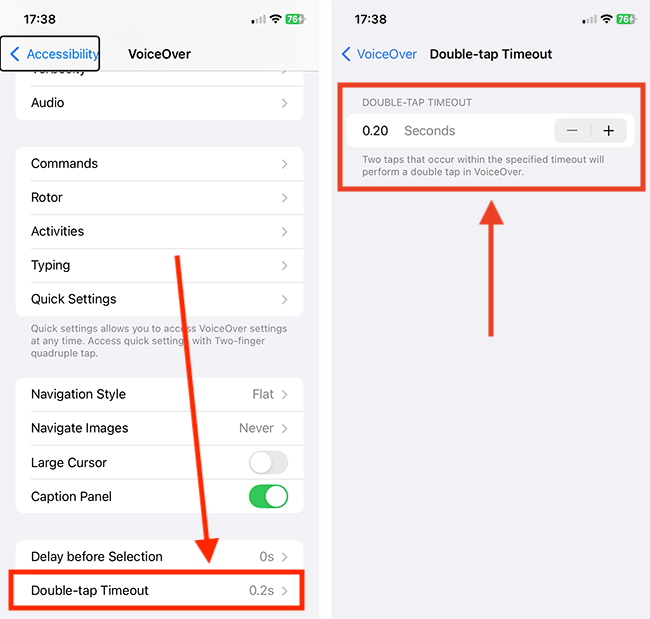
Change the double-tap timeout length
22. When VoiceOver is enabled, you have to double-tap the screen to activate an item. You can adjust the length of time in which the two taps must occur. The timeout can be set between 0.20 seconds and 0.50 seconds.
Tap Double-tap Timeout. Use the + (plus) and – (minus) buttons to adjust the timeout.
Return to the Home screen
23. When you are happy with your settings, you can return to the Home screen by swiping up from the bottom of the screen or by pressing the Home button on devices with a physical Home button.
Need some more help?
Call our helpline 0300 180 0028 or email enquiries@abilitynet.org.uk
Need free IT Support at Home?
If you are older or disabled and need IT support at home, you can book a free home visit.