Call our helpline
0300 180 0028- Hold Duration: You can adjust the length of time you need to press the screen before a touch is recognised.
- Ignore Repeat: If you tend to touch the screen a few times in quick succession when attempting a touch gesture, you can set the duration in which multiple touches are counted as a single gesture.
- Tap Assistance: If your finger moves after you touch the screen where you intended to you can change the ‘Tap Assistant’ setting so that a touch should be recognised at the initial touch position. If you have trouble placing your finger onto the intended target you can change the ‘Tap Assistance’ setting so that it recognises the final touch position. This means you can move you finger to the target after you touch the screen elsewhere and the final position will be used.
- Tap Assistant Gesture Delay: When one of the ‘Tap Assistance’ options is enabled you can set a time limit within which you need to lift your finger for a ‘Tap’ gesture to be recognised.
Enable ‘Touch Accommodations’
- Open the ‘Accessibility Settings’: Settings > General > Accessibility. (See the article Open Accessibility Preferences on this website for more information.)
- Under the ‘Interaction’ section, tap on ‘Touch Accommodations’. Fig 1.

Fig 1 - Tap ‘Touch Accommodations’ to enable this setting. See the first panel of Fig 2.Note: You will see a notice warning that enabling ‘Touch Accommodations’ will change the gestures used to control your device. Click ‘OK’ to proceed or press the ‘Home’ button to cancel. Fig 2.
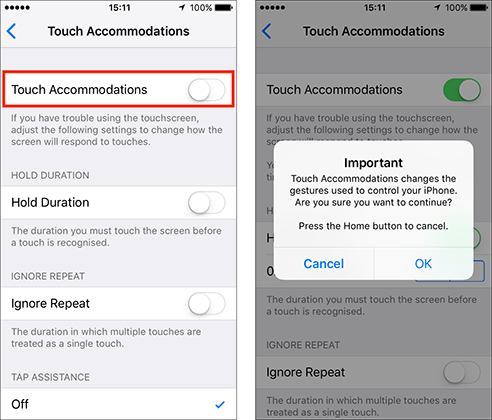
Fig 2
Touch Accommodation settings:
Hold Duration
You can adjust the length of time you need to press the screen before a touch is recognised.
- Tap on the toggle switch next to ‘Hold Duration’ to enable this feature. See the first panel of Fig 3.
- Once enabled, tap on the ‘+’ (plus) and ‘-‘ (minus) buttons that appear to set the length of time you need to touch the screen for before a touch is recognised. See the second panel of Fig 3.
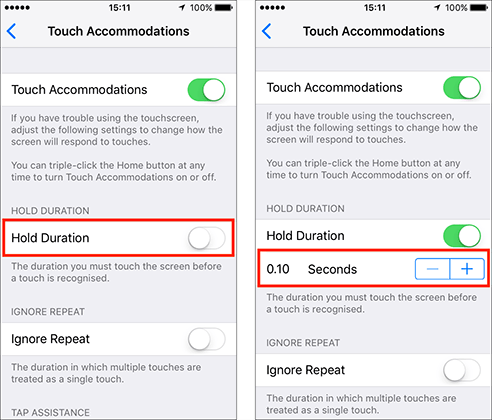
Fig 3 - Note: Once you have enabled both ‘Touch Accommodations’ and ‘Hold Duration’ you will need to touch the screen for the length of time you set in 2 (above) for a touch to be recognised. You will see a visual indicator under your finger - a grey circle with a white line - indicating the length of time that has passed since touching the screen. Fig 4.
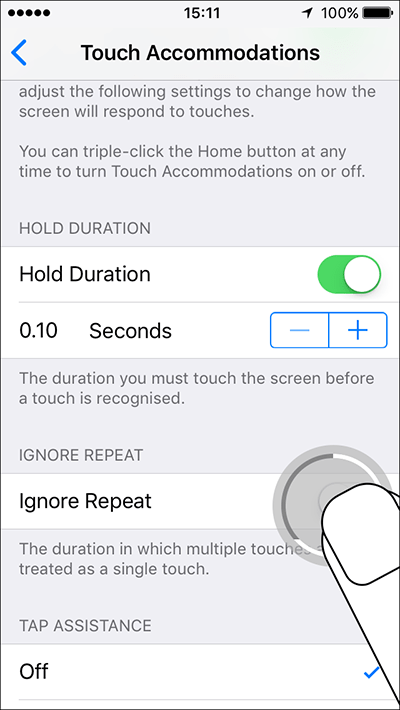
Fig 4
Ignore Repeat
If you tend to touch the screen a few times in quick succession when attempting a touch gesture, you can set the duration in which multiple touches are counted as a single gesture.
- Tap the toggle switch next to ‘Ignore Repeat’ to enable this feature. See the first panel of Fig 5.
- Once enabled, you can adjust the duration within which multiple touches are counted a single touch. Tap the ‘+’ (plus) and ‘-‘ (minus) buttons that appear to set the duration. See the second panel of Fig 5.
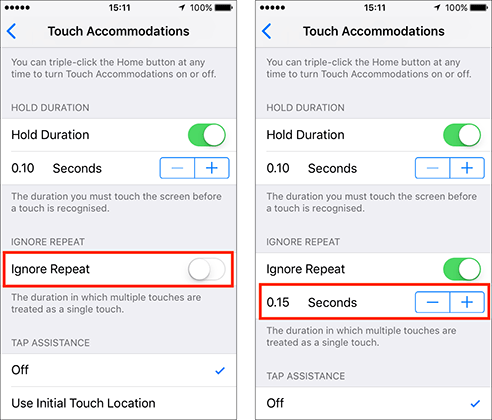
Fig 5
Tap Assistance
Tap on one of the following to choose (see Fig 6):
- Off: The default setting.
- Use Initial Touch Location
If your finger moves after touching the screen in the right place you can change the ‘Tap Assistant’ so that a touch is recognised at your initial touch position. - Use Final Touch Location
If you have trouble touching the right place on first contact you can change the ‘Tap Assistance’ setting so that it recognises your final touch position. This means you can move you finger to the target after touching the screen and only the final spot will be used.

Fig 6
Tap Assistant Gesture Delay
When one of the ‘Tap Assistance’ options (above) is enabled you can set a time limit within which you need to lift your finger for a ‘Tap’ gesture to be recognised.
- Tap the ‘+’ (plus) and ‘-‘ (minus) buttons to set the time limit. Fig 7.

Fig 7
Note: To perform touch gestures other than a tap, touch the screen, wait for the timeout to expire, then perform the desired gesture.
When happy with your settings, either tap the back button in the top left of the screen to return to the main ‘Accessibility’ settings screen or press your device’s ‘Home’ button to return to the home screen.
Need some more help?
Call our helpline 0300 180 0028 or email enquiries@abilitynet.org.uk
Need free IT Support at Home?
If you are older or disabled and need IT support at home, you can book a free home visit.