Sighted assistance will be required to turn on TalkBack if not turned on during setup.
Note: If you would like to customise the spoken voice or the speed and pitch at which text is spoken see the article: Android 7 Nougat - Text-to-speech output
This article is split into two sections:
To enable ‘TalkBack’:
- Tap on the ‘Settings’ icon on the home screen, Fig 1.Note: If the ‘Settings‘ icon doesn’t appear on your home screen, slide-up from the bottom of the screen to open the ‘app drawer’ and locate it.
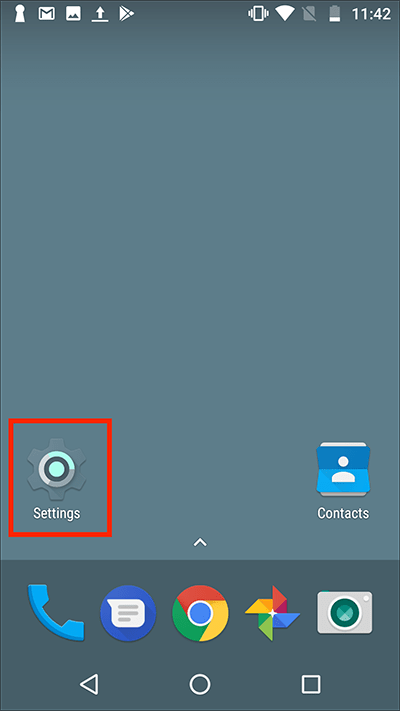
Fig 1 - Scroll down to the ‘System’ section and tap on ‘Accessibility’, Fig 2.
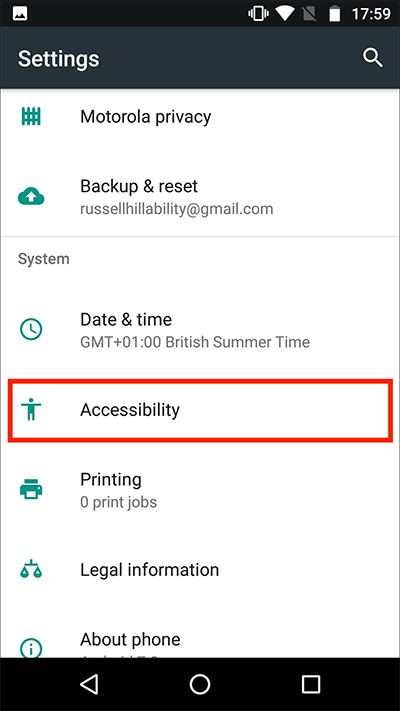
Fig 2 - Under the ‘Services’ section, tap on ‘TalkBack’. Fig 3.
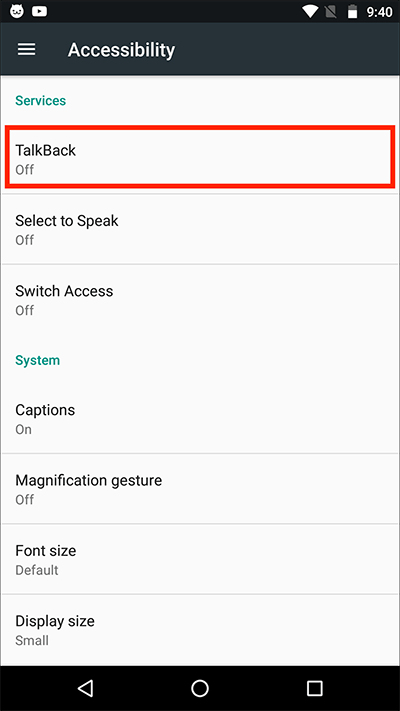
Fig 3 - On the ‘Select to Speak’ screen, tap on the toggle switch to the right of ‘Off’ to activate TalkBack, Fig 4.
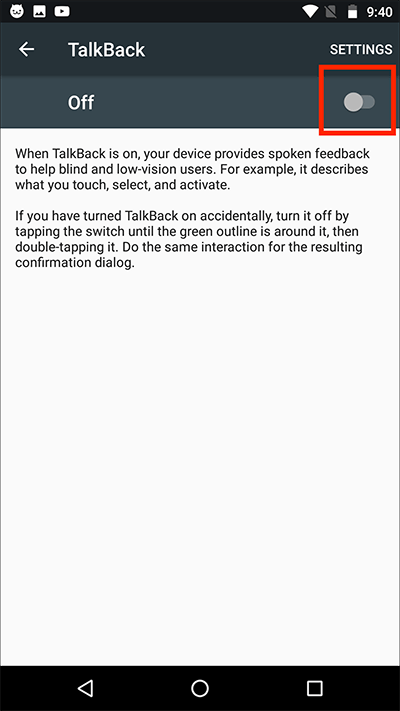
Fig 4 - An alert box will appear on the screen asking permission for TalkBack to perform certain actions on your device, see Fig 5 You will need to agree to this in order to activate Talkback.
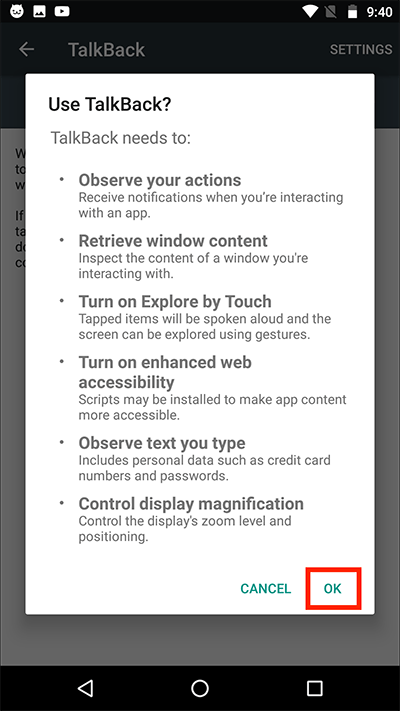
Fig 5 - If this is the first time you have enabled TalkBack you will be presented with a tutorial screen. The tutorial consists of five lessons which will teach you how to operate TalkBack effectively, see Fig 6. Tap on ‘LEARN’ for an explanation of each feature.Tap on ‘PRACTICE’ to try out the features covered by each tutorial.

Fig 6 - Once you have completed a lesson you can jump to the next or previous lesson using the navigation buttons at the bottom of the window. Fig 7.
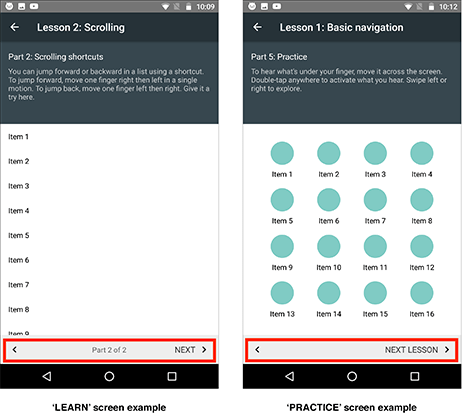
Fig 7 - If you wish to return to the main tutorial window (Fig 6, above), tap on the back arrow next to the lesson name at the top of the screen. Fig 8.
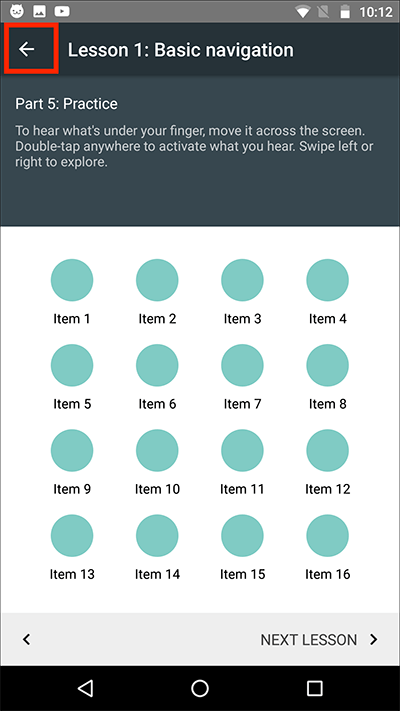
Fig 8
Note: If you would like to revisit the TalkBack tutorial at a later time you can access it through the settings menu by selecting: ‘Touch Exploration’ then ‘Launch TalkBack tutorial’. (see the 'Touch Exploration' section below under 'TalkBack Settings'.
TalkBack settings:
This section gives an explanation of all the TalkBack settings you can customise.
The following steps assume you are viewing the TalkBack screen within the Accessibility settings. (see steps 1-3 of ‘How to enable TalkBack’ above)
Tap on ‘SETTINGS’ at the top of the screen. Fig 9.

Fig 9
The settings options are broken down into the following categories:
Speech settings
- Speech Volume
By default, the ‘Speech volume’ will match the current media volume on your device. To change it, tap ‘Speech Volume’. Fig 10.
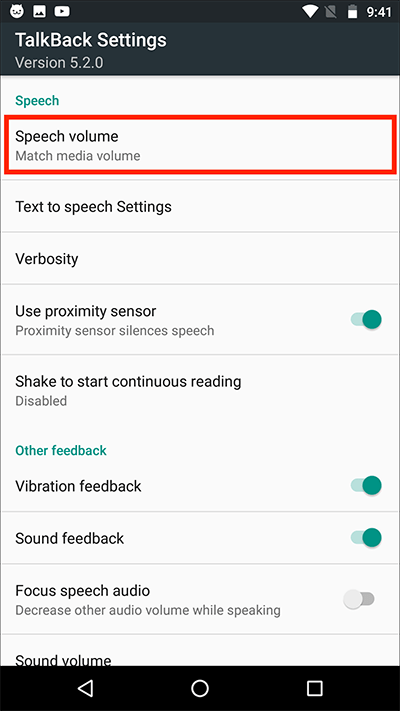
Fig 10
There are four options:
‘Match media volume’
‘75% of media volume’.
‘50% of media volume’
‘25% of media volume’Tap on a volume setting to select it or tap ‘CANCEL’ to return to the settings screen. Fig 11.
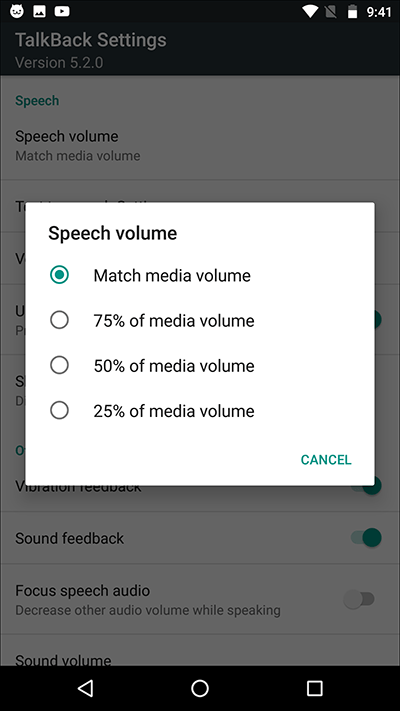
Fig 11
- Text-to-speech Settings
You can change how the voice used for feedback sounds via the text-to-speech settings. Tap ‘Text-to-speech Settings’. Fig 12.
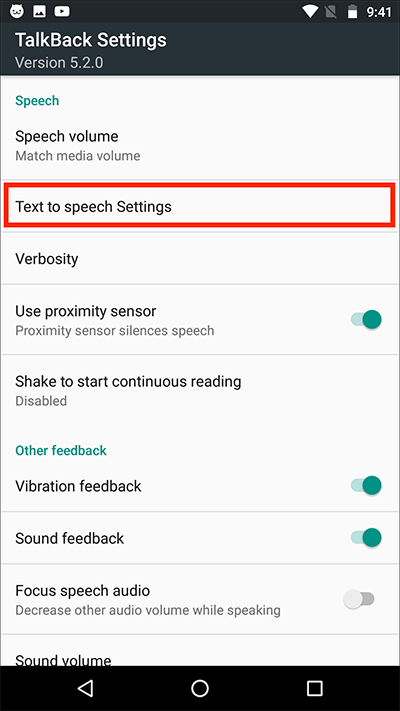
Fig 12
You can alter the speed and pitch of the spoken voice by dragging the slider left and right on the ‘Speech rate’ and ‘Pitch’ slider bars. Fig 13.

Fig 13
Note: For further information on changing ‘Text-to-speech settings’ see the article: ‘Android 7 Nougat – Text-to-speech output’.
- Verbosity
Google Assistant has three preset levels of spoken feedback – ‘High’, ‘Custom’ and ‘Low’. By default, ‘Verbosity’ is set to ‘Custom’ giving you various options that you can toggle on and off.To change the settings tap on ‘Verbosity’. Fig 14.
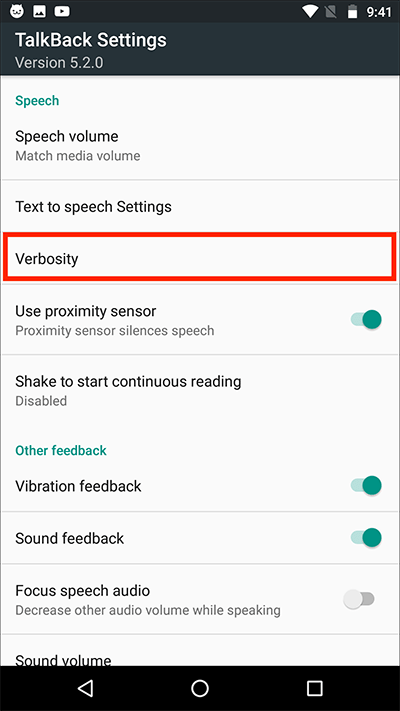
Fig 14
To change the spoken feedback preset, tap on ‘Choose a preset’, Fig 15.
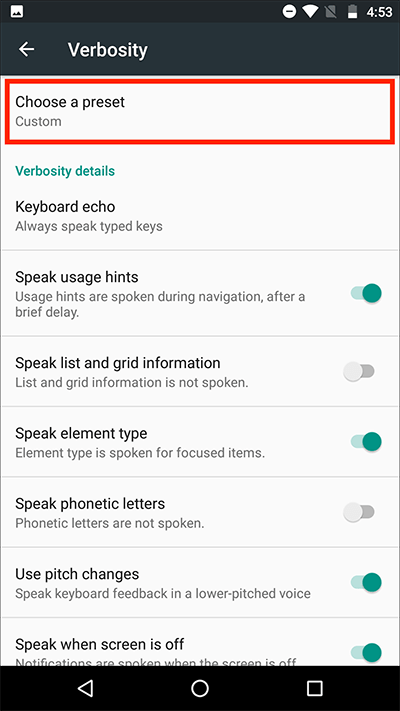
Fig 15
Select, ‘High’, ‘Custom’ or ‘Low’ or press ‘Cancel’ to return to the ‘Verbosity’ settings screen. Fig 16.
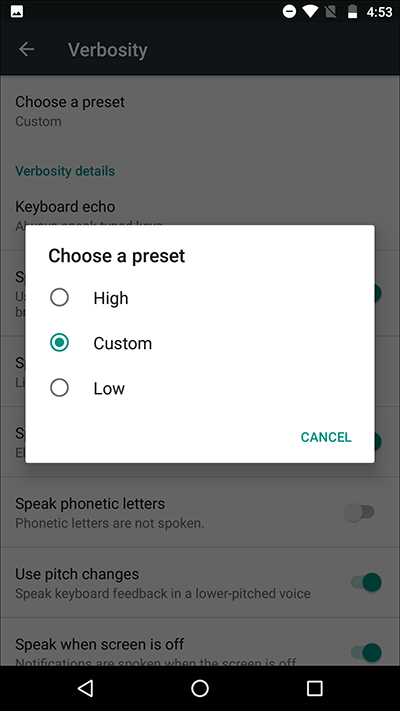
Fig 16
If you have selected ‘custom’ you will be able to customise a range of settings relating to how much spoken feedback is provided. Fig 17.
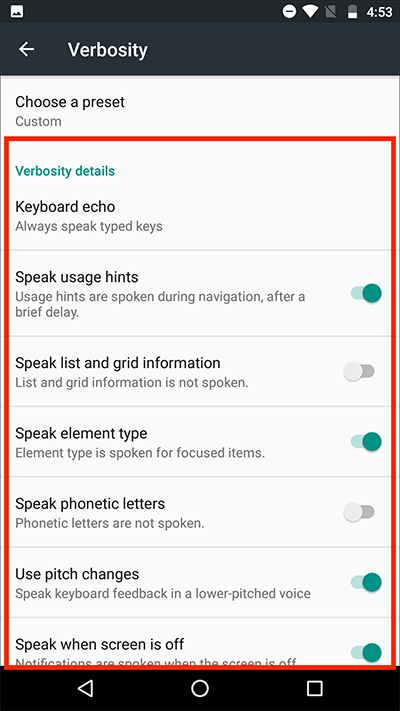
Fig 17
Keyboard Echo
By default TalkBack will always speak keys as they are typed, to change this setting tap on ‘Keyboard Echo’. Fig 18.

Fig 18
Choose from:
‘Always speak typed keys’
‘Only for on-screen keyboard’
‘Never speak typed keys’
or tap ‘CANCEL’ to return to the Verbosity Fig 19.
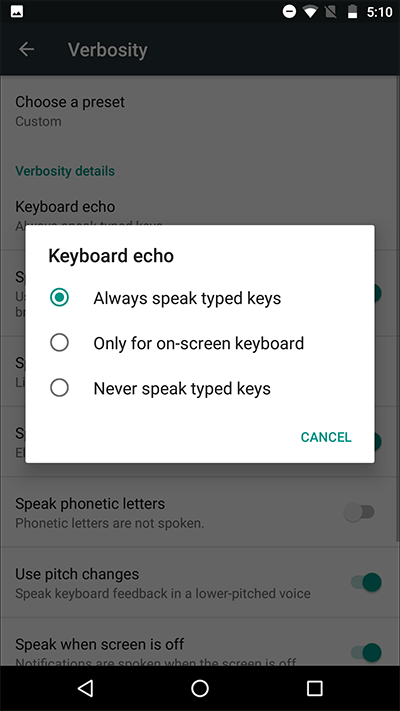
Fig 19
Item description order
You can change the order in which TalkBack speaks the items it is giving feedback for. By default the order is ‘State, name, type’. To change this setting tap on ‘Item description order’ at the bottom of the Custom presets options. Fig 20.
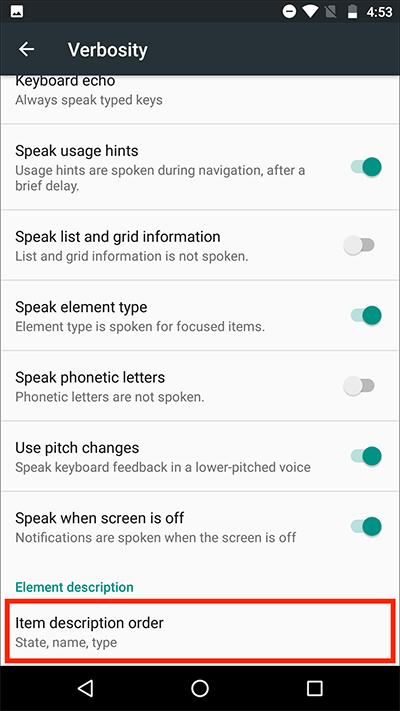
Fig 20
Choose from:
‘State, Name, Type‘
‘Type, Name, State’
‘Name, Type, State‘
or tap ‘CANCEL’ to return to the Verbosity screen. Fig 21.
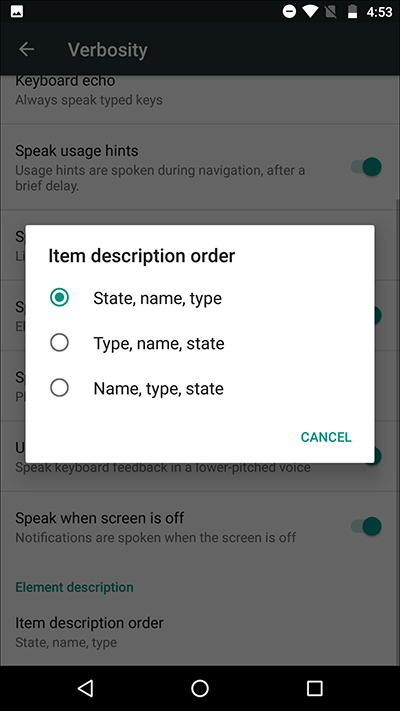
Fig 21
The other Verbosity settings (see Fig 17 above) can be turned on or off by tapping on their respective toggle switches.
- Use proximity sensor
If your device has a proximity sensor you can set TalkBack to be silenced when it is touched or picked up.Tap the on/off toggle switch next to ‘Use proximity sensor’ Fig 22.
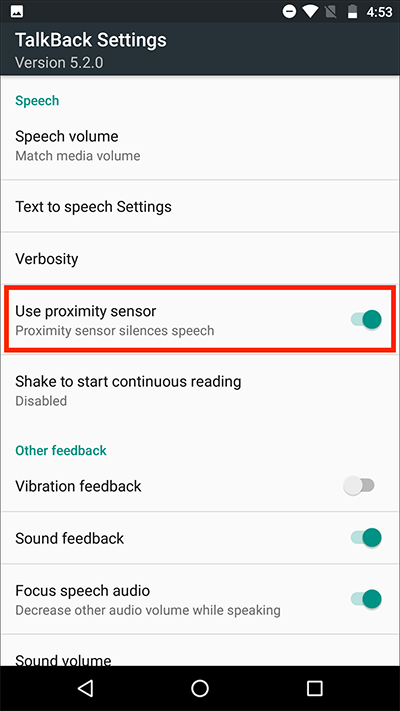
Fig 22
- Shake to start continuous reading
You can set TalkBack to start continuously speaking the items on the screen when you shake your device. By default this is disabled. To enable this setting tap on ‘Shake to start continuous reading’. Fig 23.
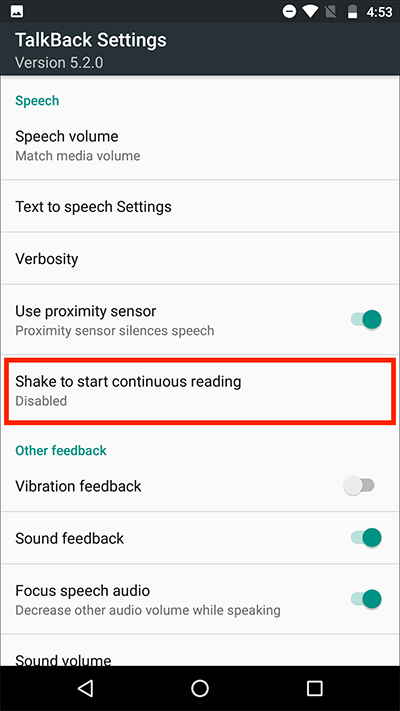
Fig 23
Choose how hard you need to shake the device to start continuous reading. The options are:‘Disabled’
‘Very light’
‘Light’
‘Medium’
‘Hard’
‘Very hard’
or tap ‘CANCEL’ to return to the Settings Fig 24.
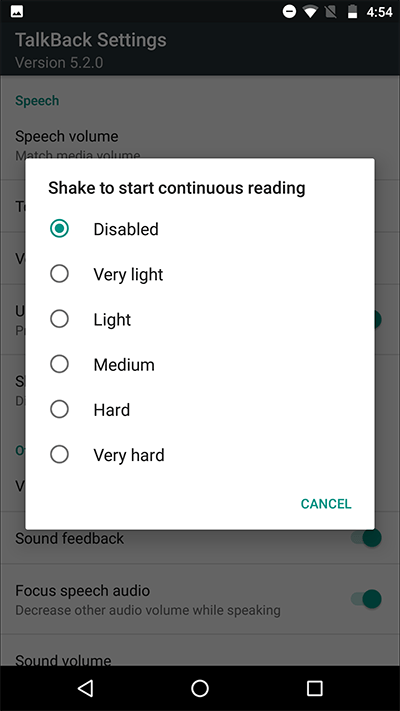
Fig 24
Other Feedback settings
- Vibration feedback
You can set your device to vibrate whenever you tap an object or navigate the screen. To switch on ‘Vibration feedback’ tap the toggle switch next to ‘Vibration feedback’. Fig 25.
- Sound feedback
Get feedback sounds when you are navigating the screen: e.g. you’ll hear a sound that changes in pitch as you scroll up (lower pitch) or down (higher pitch) the screen. To turn this feature on or off, tap the toggle switch next to ‘Sound feedback’. Fig 25.Note: You can adjust the volume of ‘Sound feedback’ under the ‘Sound volume’ option (see below).
- Focus speech audio
You can decrease the volume of any other audio that is playing on your device so that spoken feedback is easier to hear. To turn this feature on or off, tap the toggle switch next to ‘Focus speech audio’ Fig 25.
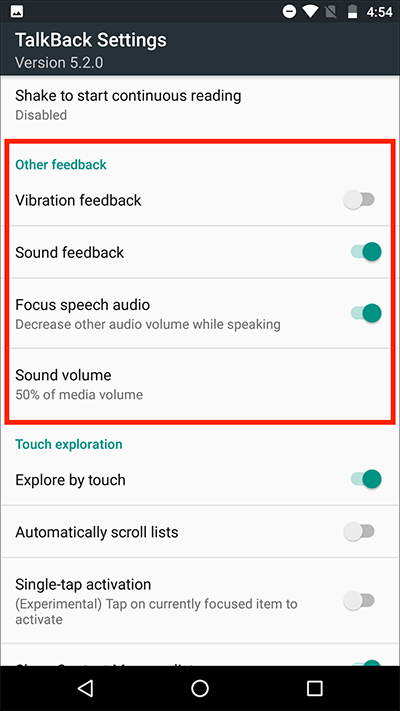
Fig 25
- Sound volume
You can adjust the volume of ‘Sound feedback’ (if enabled, see above) in relation to the system volume. By default, the feedback volume is set to 50% of the current media volume.To change this setting tap on ‘Sound volume’. Fig 25.Choose from:
‘Match media volume’
‘75% of media volume’
‘50% of media volume’
‘25% of media volume’
or tap ‘CANCEL’ to return to the Settings screen. Fig 26.
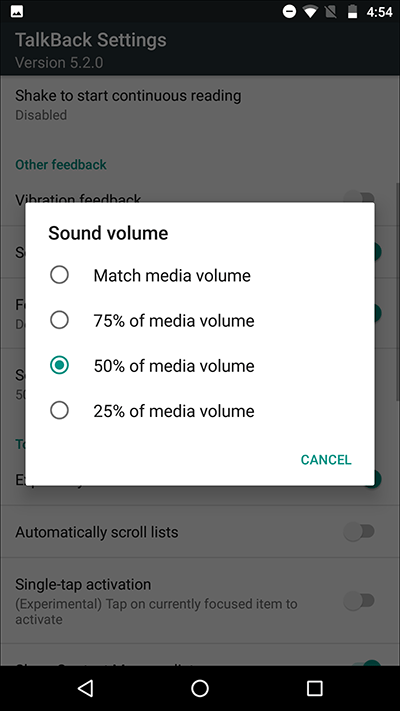
Fig 26
Touch exploration settings
- Explore by touch
By slowly dragging your finger around the screen you can receive spoken feedback of what your finger is touching. This setting is enabled by default. To change the setting tap the on/off toggle switch next to ‘Explore by touch’, see Fig 27 below.If you turn ‘Explore by touch’ off, an alert will appear asking you to confirm that you want to proceed. Tap ‘OK’ to confirm or ‘CANCEL’ to return to the Settings screen.For more information about ‘Explore by touch’ see the Google help article: https://support.google.com/accessibility/android/answer/6006598
- Automatically scroll lists
When this setting is enabled, lists will scroll by themselves. This setting is enabled by default.To change the setting tap the on/off toggle switch next to ‘Automatically scroll lists’, see Fig 27
- Single-tap activation
By default you have to double-tap on a selected item to activate it. To enable single-tap activation, tap the on/off toggle switch next to ‘Single-tap activation’, see Fig 27
Note: ‘Single-tap activation’ is an experimental feature and may not work correctly everywhere on your device.
- Show context menu as list
There are two types of menu in TalkBack. One type contains settings that will work anywhere on your device, this is called the Global menu. The other type contains items related to whatever you have open, so can vary; this is called the Local menu. By default these menus are circular with options at the North, East, South and West points. To change the setting to a list view, tap the on/off toggle switch next to ‘Show context menu as list’. Fig 27.For more information about global and local context menus see the Google help article: https://support.google.com/accessibility/android/answer/6007066
- Launch TalkBack tutorial
The TalkBack tutorial consists of five lessons which will teach you how to operate TalkBack effectively. See step 6 – 8 of ‘How to enable ‘TalkBack’ above.Tap on ‘Launch TalkBack tutorial’ to begin, see Fig 27
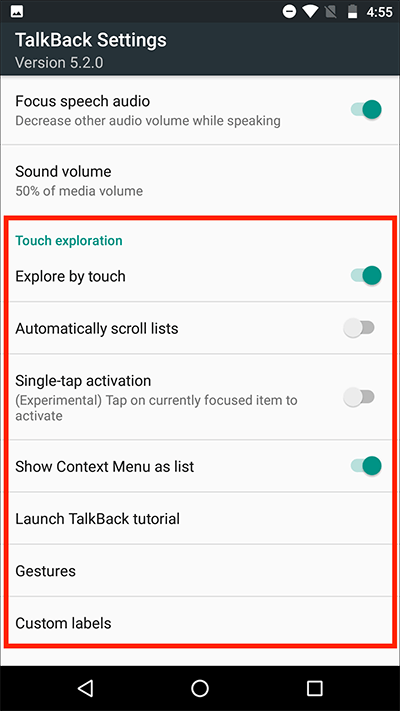
Fig 27
- Gestures
Gestures enable you to navigate your device by swiping your finger in different directions across the screen.If you would like to change the action associated with a particular TalkBack gesture, tap on ‘Gestures’, see Fig 27. A list of all gestures will appear. Fig 28.
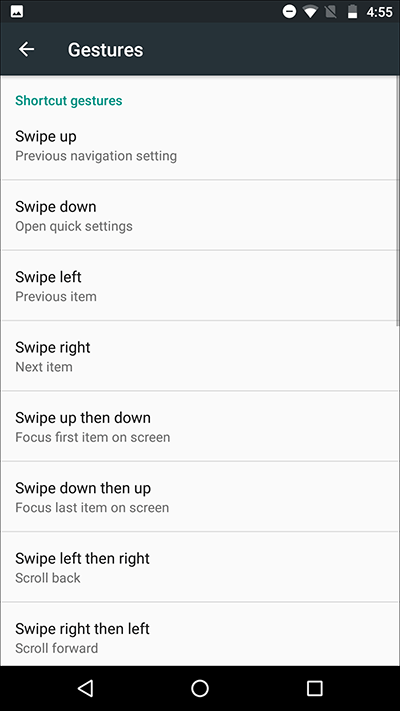
Fig 28To change the action that will be carried out when you perform the gesture, tap on a gesture (see Fig 28, above) to bring up a list of available actions. Fig 29.In our example we tapped on ‘Swipe up’. Tap on an item in the list to select a new action for this gesture or tap ‘CANCEL’ to return to the list of gestures. Fig 29.
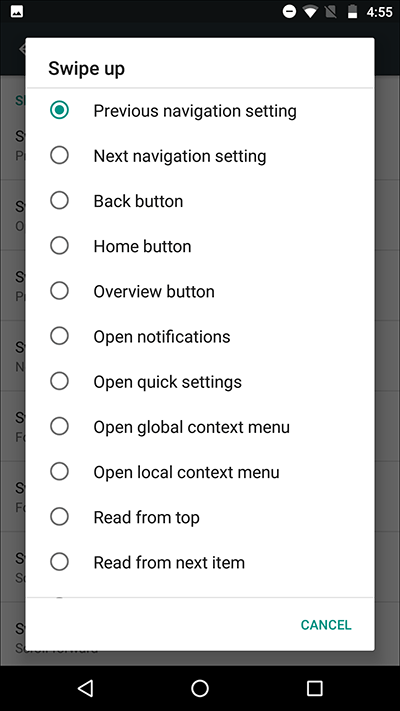
Fig 29
For more information and a full list of TalkBack gestures see the Google help article: https://support.google.com/accessibility/android/answer/6151827
- Custom Labels
You can manage any custom labels you have created using the local context menu. You can also import or export existing labels. To manage, import or export labels, tap on ‘Custom labels’. Fig 27.
Other settings
- Keyboard shortcuts
If you have a keyboard connected to your device you can use keyboard shortcuts such as pressing ‘Alt’ + ‘Left Arrow’ to move to the next item on the screen these key combinations are called ‘keymaps’ and you can chose between two sets; ‘Default’ and ‘Classic’ although most Android devices use the ‘Default keymap’ which has more shortcuts available.You can also change the key used when performing keyboard shortcuts, called the ‘modifier’. The default modifier is the ‘Alt’ key but you can change this to the ‘Search’ key if you prefer.To change either of these settings:
- Tap on ‘Keyboard shortcuts’. Fig 30.
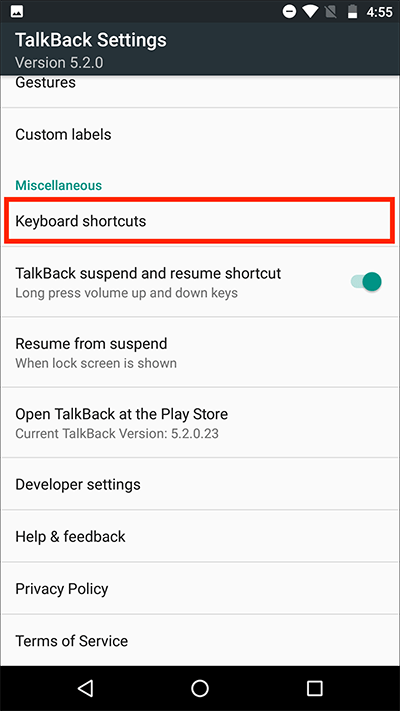
Fig 30 - To change the keymap, tap on ‘Choose a keymap’ Fig 31.
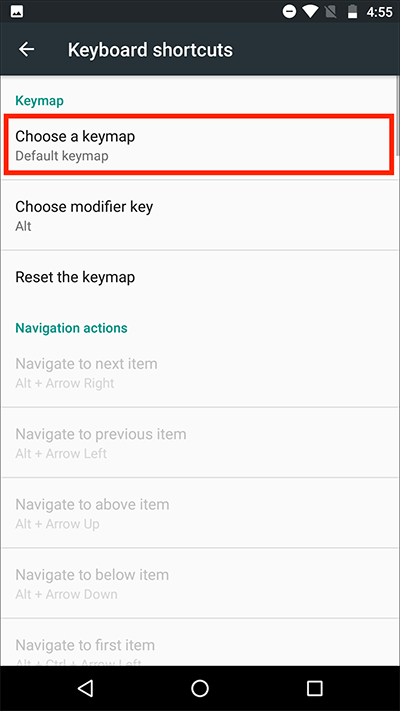
Fig 31 - Tap on either ‘Classic keymap’ or ‘Default keymap’ to select a different keymap - or tap ‘CANCEL’ to return to the ‘Keyboard shortcut’ screen. Fig 32.
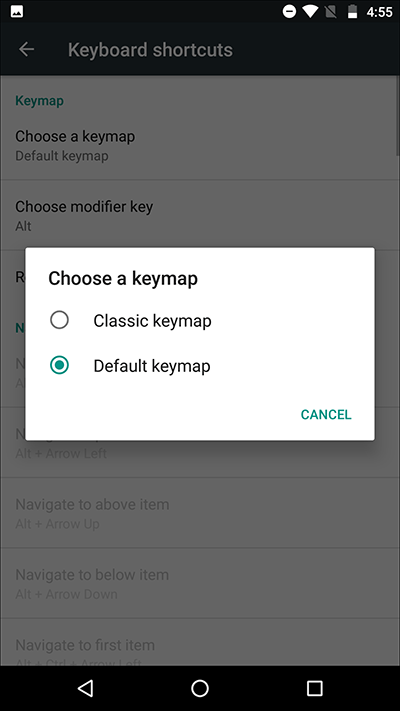
Fig 32 - To change the modifier key used for keyboard shortcuts, tap on ‘Choose modifier key’. Fig 33.

Fig 33 - Tap on the key you would like to use as the modifier – ‘Alt’ or ‘Search’ - or tap ‘CANCEL’ to return to the ‘Keyboard shortcut’ screen. Fig 34.
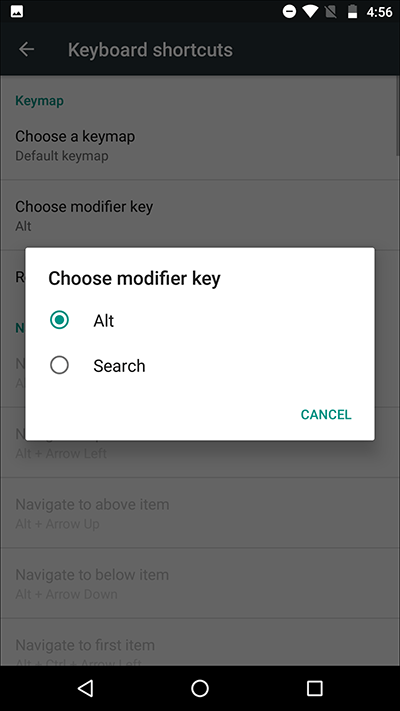
Fig 34
For more information and a full list of TalkBack keyboard shortcuts see the Google help article: https://support.google.com/accessibility/android/answer/6110948
- TalkBack suspend and resume shortcut
With this setting enabled you can suspend (and resume) TalkBack by long pressing on the volume up and down keys at the same time.To change the setting tap the on/off toggle switch next to ‘TalkBack suspend and resume shortcut’. Fig 35.
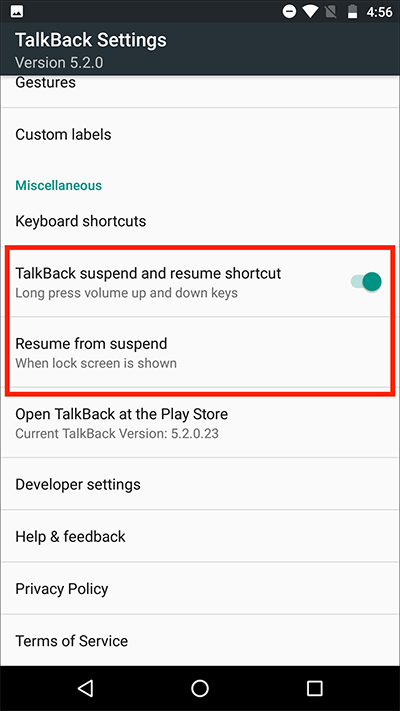
Fig 35
When you long-press on the volume up and down keys at the same time you will get an alert confirming that you would like to suspend Talkback. Click ‘OK’ if you would like to proceed or click ‘CANCEL’ if not. Fig 36.If you would prefer not to see this alert again, tap on the checkbox next to ‘Always show this warning’ to deselect it. Fig 36.
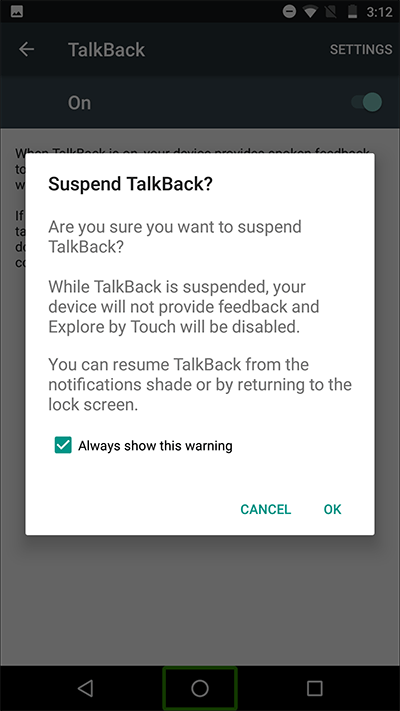
Fig 36
- Resume from suspend
You can choose how TalkBack automatically resumes after you have suspended it. Tap on ‘Resume from suspend’, see Fig 35 above.Choose from the following options:
‘When screen turns on’
‘When lock screen is shown’
‘From notification only’
or tap ‘CANCEL’ to return to the Settings screen. Fig 37.
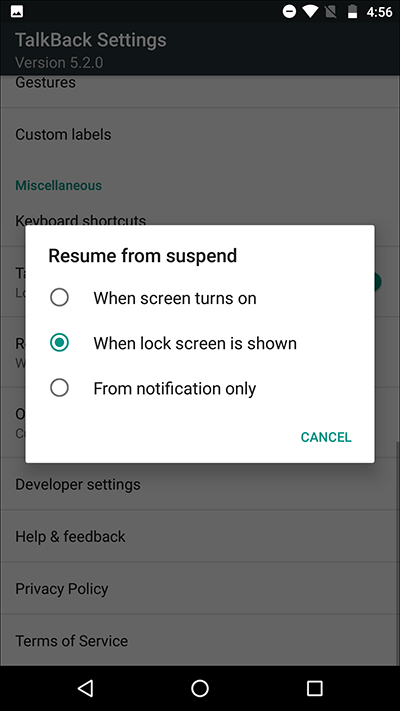
Fig 37
Note: These instructions apply to the stock version of Android 7 Nougat. Please be aware that many device manufacturers add their own customisations to the Android operating systems so you may find minor differences from the steps shown.
Related information:
To customise the 'TalkBack' voice, speed and pitch settings see:
android-7-nougat-text-to-speech-output
Google’s TalkBack overview:
https://support.google.com/accessibility/android/answer/6283677?hl=en-GB&ref_topic=3529932
For more information about ‘Explore by touch’ see the Google help article:
https://support.google.com/accessibility/android/answer/6006598
For more information about ‘Show context menu as list’ see the Google help article: https://support.google.com/accessibility/android/answer/6007066
For more information and a full list of TalkBack gestures see the Google help article: https://support.google.com/accessibility/android/answer/6151827
For more information and a full list of TalkBack keyboard shortcuts see the Google help article:
https://support.google.com/accessibility/android/answer/6110948
Need some more help?
Call our helpline 0300 180 0028 or email enquiries@abilitynet.org.uk
Need free IT Support at Home?
If you are older or disabled and need IT support at home, you can book a free home visit.