Note: Mac key convention: ‘Ctrl’ is used for ‘Control’, ‘Apple’ is used for ‘Command’ (⌘) and ‘Alt’ is used for the ‘Option’ (⌥) key.
Note: For keyboard access make sure ‘Full keyboard access’ is turned on – you can turn it on or off; by pressing ‘Ctrl’ + ‘F1’ at any time.
Step 1
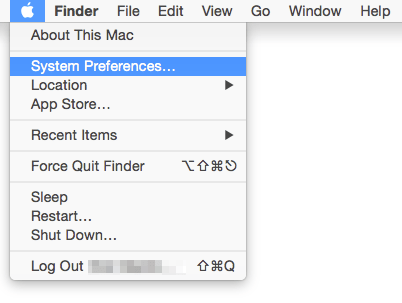
- Open the ‘Apple Menu’ by clicking on the Apple icon () in the Menu Bar, or by pressing ‘Ctrl’ + ‘F2’
- Click to select ‘System Preferences…’ as shown in Fig 1 or press the down arrow key to highlight it and then press ‘Enter’.
Step 2
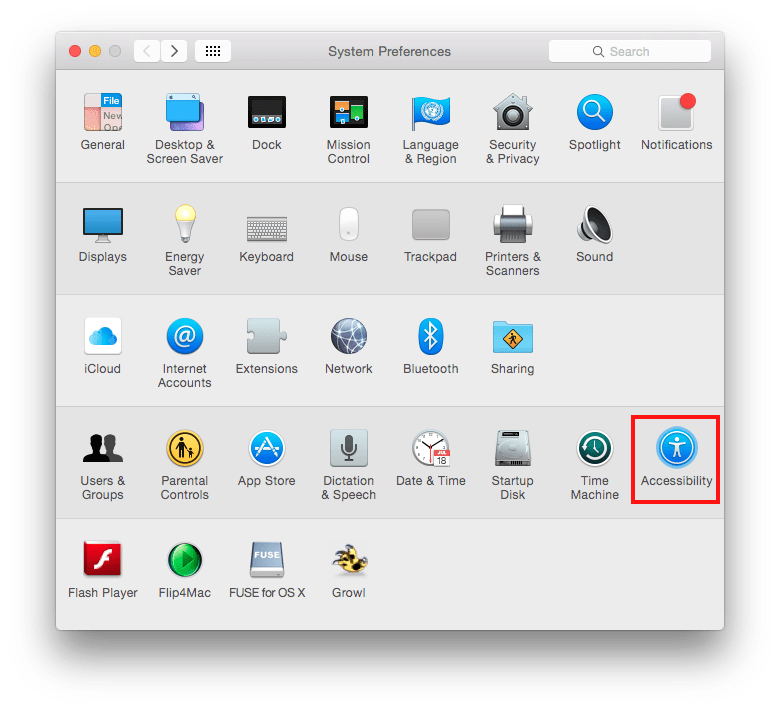
- Click on the ‘Displays’ icon or press ‘Tab’ repeatedly (you might need to press ‘Ctrl’ + ‘F7’ first) to cycle through the icons until the ‘Displays’ icon is highlighted, see Fig 2 and then press the ‘Spacebar’.
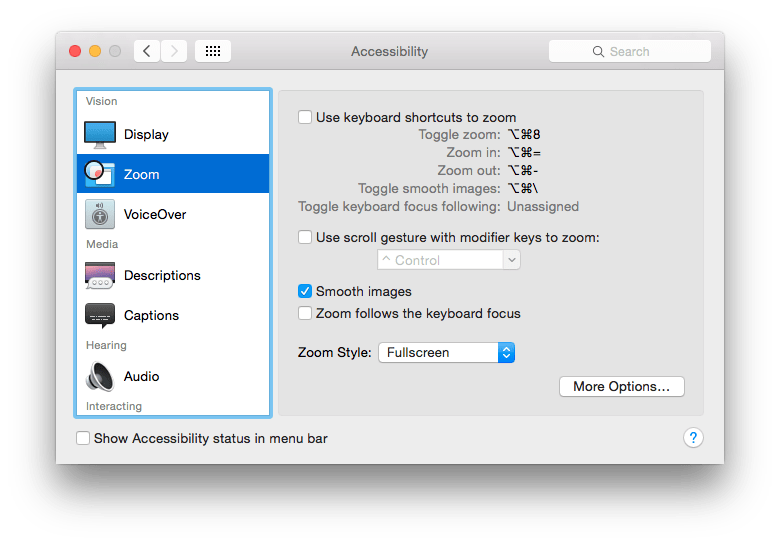
- Click on the ‘Zoom’item under the ‘Vision area or press ‘Ctrl’ + ‘F7′ (once or twice) to highlight one of the options for example ‘Display’ and then press the up or down arrow key to select the ‘Zoom’ item (highlighted in blue), see Fig 3.

Fig 3.
- To enable you to use keyboard shortcuts to zoom click the ‘Use keyboard shortcuts to zoom’checkbox or press the ‘Tab’ key until the checkbox is highlighted and the press the ‘Spacebar’.
- To zoom in press ‘Alt’ + ‘Apple’ + ‘=’ , this zooms to your maximum level of magnification set in ‘More Options…’ . To step back or zoom out press ‘Alt’ + ‘Apple’ + ‘-‘ (minus). Move your mouse around the screen to view the magnified page.
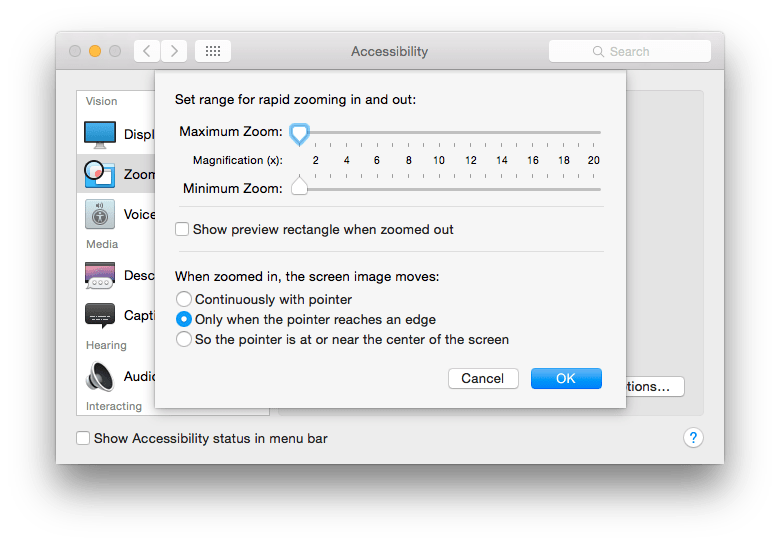
- To change the Maximum and Minimum Zoom settings click on ‘More Options…’ or press ‘Tab’ until ‘More Options…’ is highlighted and then press the ‘Spacebar’.
- Click on the ‘Maximum Zoom:’ gauge bar to increase or decrease the Magnification level or press ‘Tab’ (you might need to press ‘Ctrl’ + ‘F7′ first) to highlight the ‘slider’ on the gauge bar, Fig 4 and use the ‘left’ and ‘right’ arrow keys to increase or decrease the maximum magnification level.
- Click on the ‘Minimum Zoom:’ gauge bar to increase or decrease the Magnification level or press ‘Tab’ (you might need to press ‘Ctrl’ + ‘F7′ first) to highlight the ‘slider’ on the gauge bar and use the left and right arrow keys to increase or decrease the minimum magnification level.
Step 3
- When you have finished click on the ‘Done’ button or press ‘Tab’ until it is selected and then press ‘Enter’.
- Finally click the ‘Close’ (red) button at the top of the ‘Accessibility’ window or press ‘Apple’ + ‘W’ to close the window and return to the Finder desktop.
- To turn magnification on or off at any time press ‘Alt’ + ‘Apple’ + ‘8’.
Note: If this does not work it could be because your computer settings cannot be changed due to local IT policies – contact your local IT support for further help.
Need some more help?
Call our helpline 0300 180 0028 or email enquiries@abilitynet.org.uk
Need free IT Support at Home?
If you are older or disabled and need IT support at home, you can book a free home visit.


