Note: Mac key convention: ' Ctrl ' is used for 'Control', ' Apple ' is used for 'Command' and ' Alt ' is used for the 'Option' key.
Note: For keyboard access make sure ' Full keyboard access ' is turned on - you can turn it on or off; by pressing ' Ctrl ' + ' F1 ' at any time.
Step 1
Make sure you are in ' Finder ' - press ' Apple ' + ' Tab ' if necessary to cycle through open applications until you return to ' Finder '.
Click on the 'Apple ' menu or press ' Ctrl ' + ' F2 '.
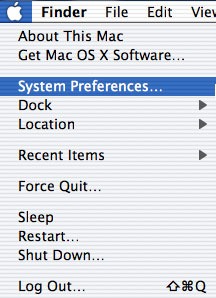
Click on ' System Preferences... ' as shown in Fig 1 or press the ' down ' arrow key to highlight it and then press ' Enter '.

Fig 1
Step 2
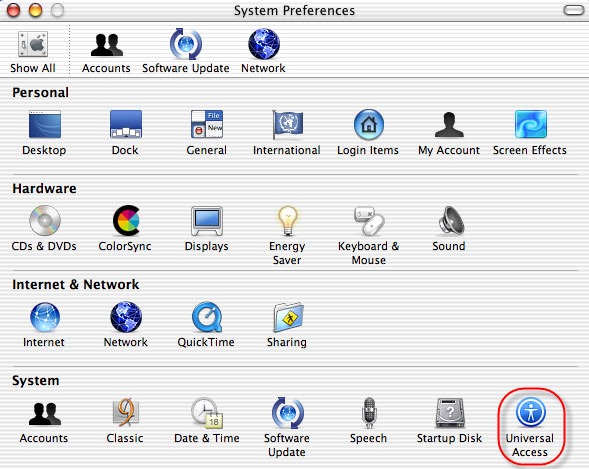
Click on the 'Universal Access ' icon or press ' Tab ' repeatedly (you might need to press ' Ctrl ' + ' F7 ' first) to cycle through the icons until the ' Universal Access ' icon is highlighted and then press the ' Spacebar '. Fig 2

Fig 2
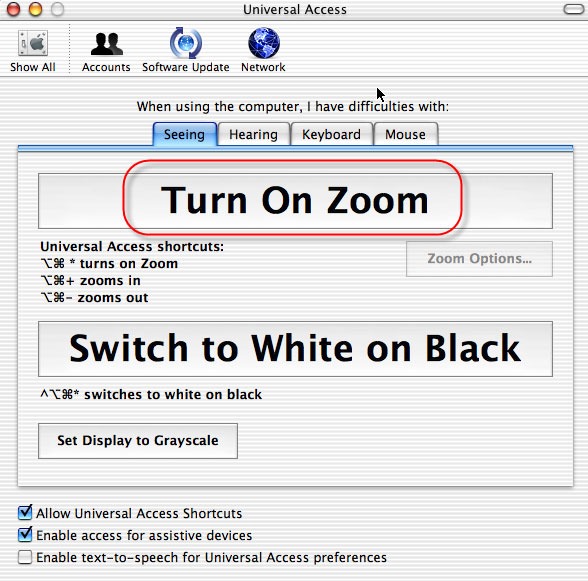
- Click on the ' Seeing ' tab or press ' Ctrl ' + ' F7 ' (once or twice) to highlight one of the four tabs for example ' Keyboard ' and then press the left or right arrow key to select the ' Seeing ' tab (highlighted in blue).
- Click on the ' On ' button, Fig 3 or press ' Tab ' to highlight and use the left and right arrow keys to select the ' On ' button.

Fig 3
- To zoom in press ' Alt ' + ' Apple ' + ' = ' , this zooms to your maximum level of magnification set in ' Options... ' . To step back or zoom out press ' Alt ' + ' Apple ' + ' - ' (minus). Move your mouse around the screen to view the magnified page.
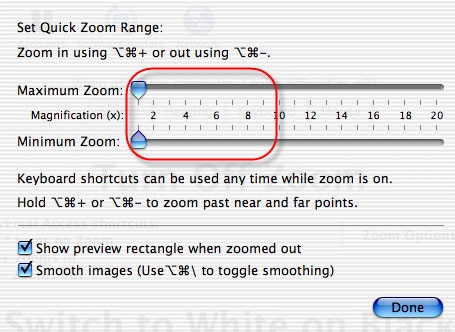
- To change the Maximum and Minimum Zoom settings click on ' Options... ' or press ' Tab ' until ' Options... ' is highlighted and then press the ' Spacebar '.
- Click on the ' Maximum Zoom:' gauge bar to increase or decrease the Magnification level or press ' Tab ' (you might need to press ' Ctrl ' + ' F7 ' first) to highlight the 'slider' on the gauge bar, Fig 4 and use the ' left ' and ' right ' arrow keys to increase or decrease the maximum magnification level.
- Click on the ' Minimum Zoom:' gauge bar to increase or decrease the Magnification level or press ' Tab ' (you might need to press ' Ctrl ' + ' F7 ' first) to highlight the 'slider' on the gauge bar and use the left and right arrow keys to increase or decrease the minimum magnification level.

Fig 4
Step 3
- When you have finished click on the ' Done ' button or press ' Tab ' until it is selected and then press ' Enter '.
- Finally click the ' Close ' (red) button at the top of the ' Universal Access ' window or press ' Apple ' + ' W ' to close the window and return to the Finder desktop.
- To turn magnification on or off at any time press ' Alt ' + ' Apple ' + ' 8 '.
Note: If this does not work it could be because your computer settings cannot be changed due to local IT policies - contact your local IT support for further help.