Note: Mac key convention: ‘ Ctrl ‘ is used for ‘Control’, ‘ Apple ‘ is used for ‘Command’ and ‘ Alt ‘ is used for the ‘Option’ key.
Note: For keyboard access, make sure ‘ Full keyboard access ‘ is turned on – you can turn it on or off by pressing ‘ Ctrl ‘ + ‘ F1 ‘ at any time.
Step 1
- Make sure you are in ‘ Finder ‘ - press ‘ Apple ‘ + ‘ Tab ‘ if necessary to cycle through open applications until you return to ‘ Finder ‘.
- Click on the ‘Apple ‘ menu or press ‘ Ctrl ‘ + ‘ F2 ‘.
- Click on ‘ System Preferences… ‘ as shown in Fig 1 or press the down arrow key to highlight it and then press ‘ Enter ‘.
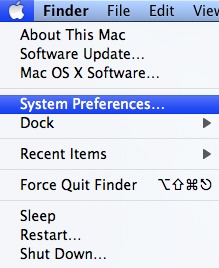
Fig 1
Step 2
Click on the ‘ Accessibility ‘ icon or press ‘ Tab ‘ repeatedly to cycle through the icons until the ‘ Accessibility ‘ icon is highlighted with a blue border as shown in Fig 2 and then press the ‘ Spacebar ‘.
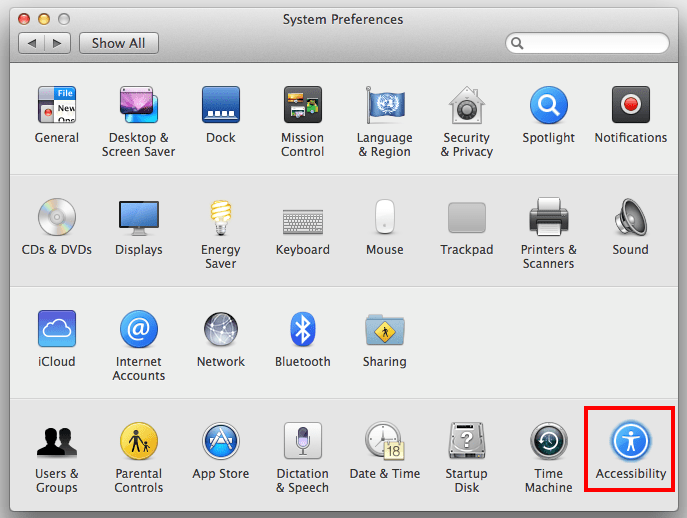
Fig 2
Step 3
Click on ‘Switch Control’ or press ‘ Tab ‘ to highlight one of the items of the left-hand list and then press the up and down arrow key to select the ‘Switch Control’ tab (Fig 3).
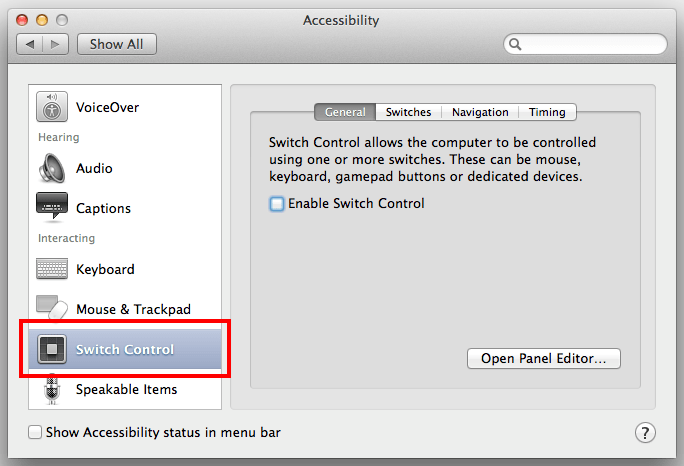
Fig 3
To see the available switches, select the tab ‘Switches’. There is a default switch, which is used to select an item and is activated through the ‘Space’ key (Fig 4). You can change its name or its key by double clicking on it. If you use a keyboard, use the ‘Tab’ key to select the switch and then press the icon below represented with a cog.
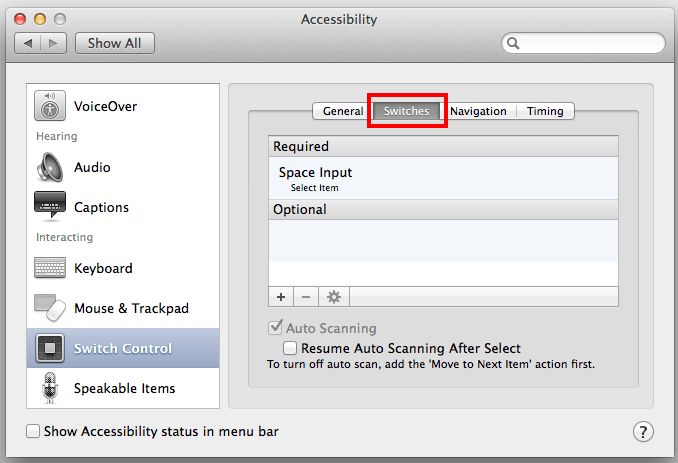
Fig 4
It is possible to control the whole computer with just one switch, but it is more convenient to have two or more.
To add a new switch:
- Select the tab ‘Switches’.
- Click or press the ‘+’ button (Fig 5). The system will ask you to press the switch, which can be a button of the mouse, a key of the keyboard, or a key of any other device. Choose, for example, the right arrow key of your keyboard.
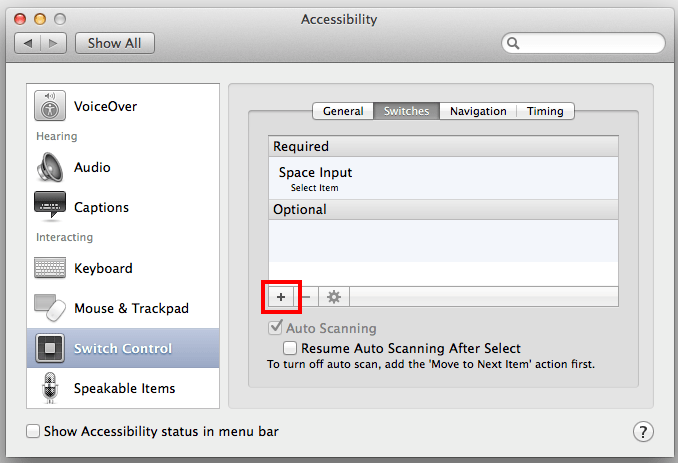
Fig 5
- Give a name to the switch – for example, ‘Next’ (Fig 6).
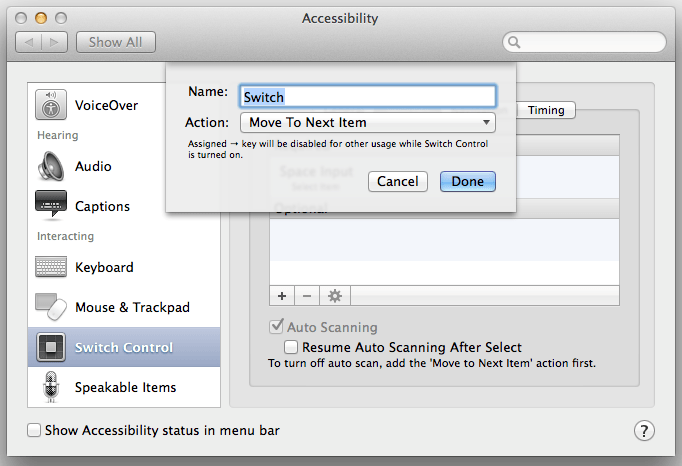
Fig 6
- Select the action it will perform when it is triggered – for example, ‘Move to the next item’.
- Click or press ‘Done’.
To enable switch control, go to the tab ‘General’ and check the option with the same name (Fig 7).
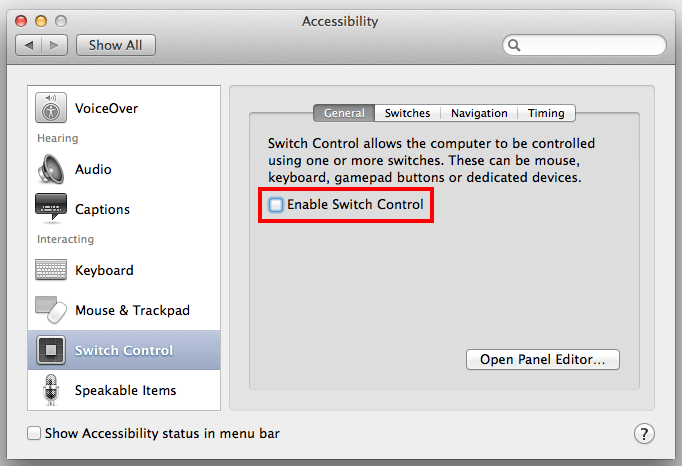
Fig 7
A menu with several options will appear (Fig 8), which you can control with the switch keys defined before – in the example above, ‘Space’ to select, and the right arrow key to go to the next item.

Fig 8
Options of the Switch Control menu:
- Keyboard – allows controlling an on-screen keyboard.
- Pointer – allows changing the location of the pointer and doing different types of clicks.
- App – allows controlling the application in use.
- Dock – allows selecting applications of the dock.
- Menu bar – allows using the menu bar (File, Edit, View, and so on) of the application in use.
- System – allows adjusting the volume, the playback of media, the brightness of the screen, and eject a DVD.
- Custom – allows using the panels defined with the Panel Editor.
- Location – allows moving the Switch keys menu to different locations of the screen.
When an option is selected, sometimes new sub options appear. You can always come back to the initial menu selecting the 'Home' button, represented with a house icon (Fig. 9).
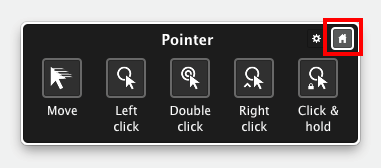
Fig 9
You can add your own options to the Switch Control menu by using the Open Panel Editor. To open it, go to the 'General' tab and click or select 'Open Panel Editor…' (Fig 10) With this editor you can create buttons and associate specific actions to them such as entering text, opening an application, or performing mouse actions. Those buttons will be shown under the 'Custom' option of the Switch Control menu. You can create as many panels as you need.
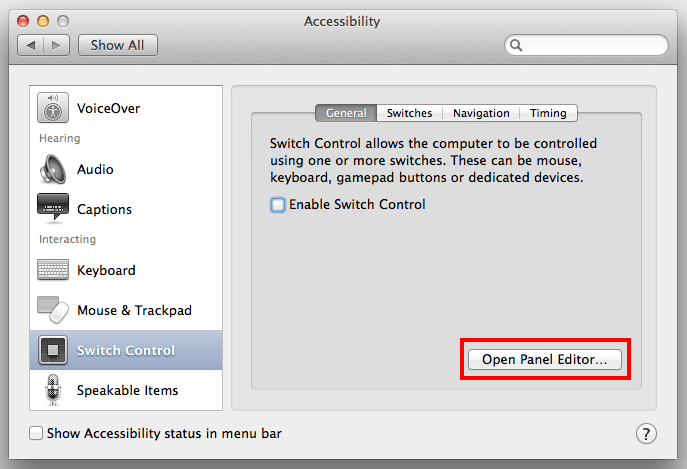
Fig 10
To adjust the navigation of the menus, use the options of the tabs ‘Navigation’ and ‘Timing’ (Fig 11). We recommend, however, spending some time using the switches before modifying their default behaviour.
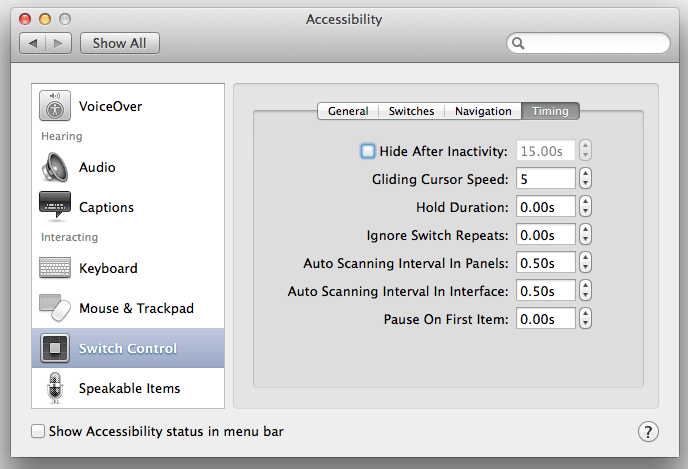
Fig 11
Note: If this does not work it could be because your computer settings cannot be changed due to local IT policies – contact your local IT support for further help.