Call our helpline
0300 180 0028To learn how to connect a Bluetooth mouse or trackpad to your device, see our guide How to use a mouse or trackpad with your iPhone or iPad in iOS 26.
For more information about the AssistiveTouch feature, see How to control your device using AssistiveTouch in iOS 26 on your iPhone or iPad.
Short guide:
- Tap or click the Settings icon to launch the Settings app.
- Select Accessibility.
- Tap or click Touch.
- On the Touch screen, tap or click AssistiveTouch. Set the toggle switch for AssistiveTouch to on.
- To customise your device’s buttons, scroll down to the Pointer Devices section and tap or click Devices. Select the mouse or touchpad you want to customise.
- Tap or click Customise Additional Buttons. Press a button on your mouse or touchpad. Select the action you would like that button to perform. Repeat as necessary for any remaining buttons.
- To use Dwell Control, go back to the Assistive Touch settings and tap or click the toggle switch next to Dwell Control.
- Use the Fallback Action and Movement Tolerance settings to customise how Dwell Control operates.
- Tap Hot Corners to set which actions you can perform by dwelling in the corners of the screen. Select a corner, then choose an action from the list.
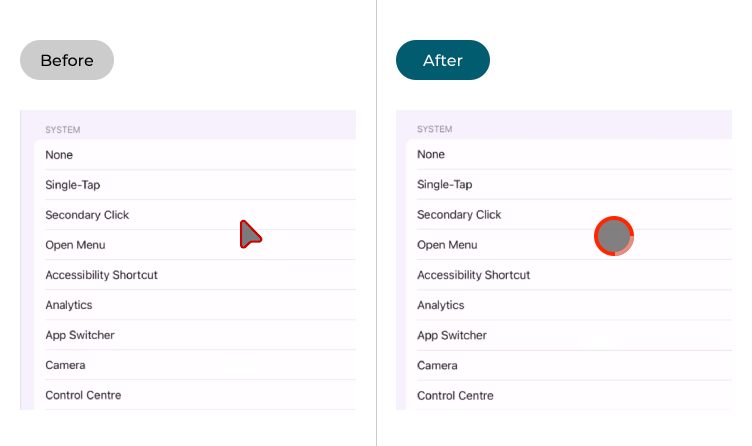
Before and after
This section explains how AssistiveTouch features can make it easier to use a mouse or trackpad with your device in iOS 26. This is a step-by-step guide with pictures of the screens to help.
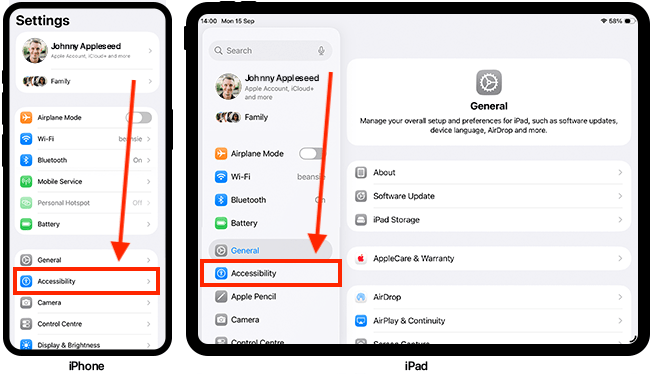
Open the Accessibility settings
1. Tap or click the Settings icon to launch the Settings app. Scroll down and select Accessibility from the list.
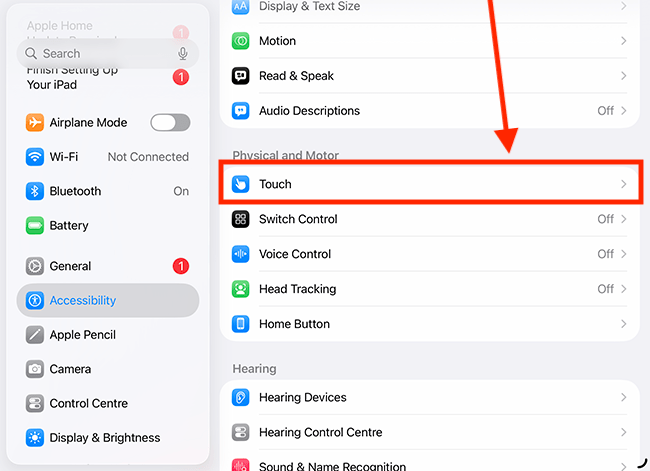
Select Touch
2. On the Accessibility screen, look under Physical and Motor and tap or click Touch.
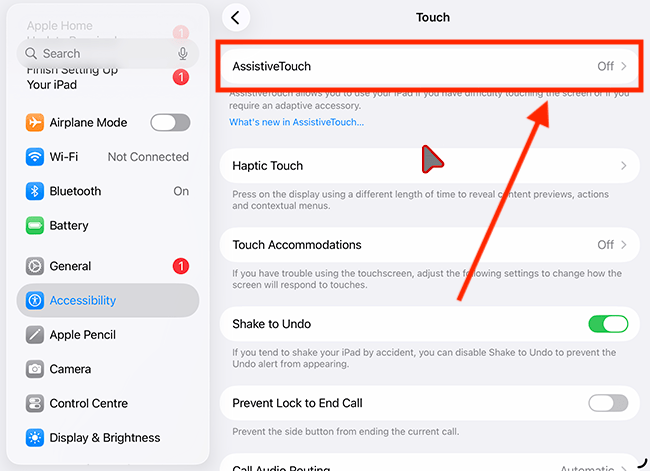
Enable AssistiveTouch
3. On the Touch screen, tap or click AssistiveTouch.
4. On the next page, tap the toggle switch for AssistiveTouch to turn it on. Note: When you turn AssistiveTouch on, the pointer will change from an arrow to a circle.

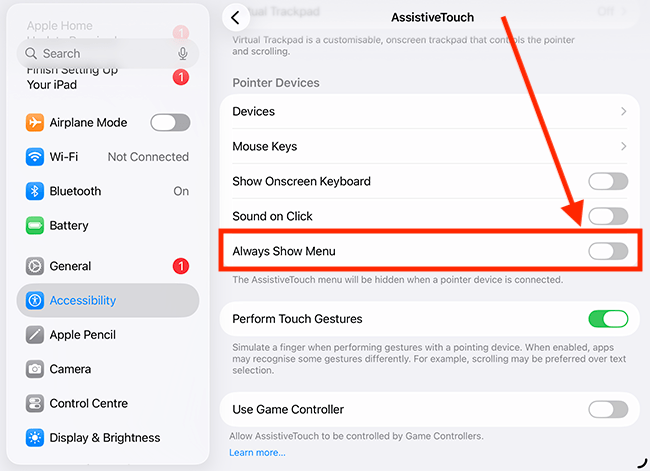
Hide the AssistiveTouch button
5. By default, when AssistiveTouch is enabled, the AssistiveTouch menu appears on the screen. This enables you to perform a variety of tasks on your device, but if you don’t want to show the AssistiveTouch button all the time, tap or click the toggle switch next to Always Show Menu to turn it off. You can still use the AssistiveTouch menu by assigning a button to trigger it.
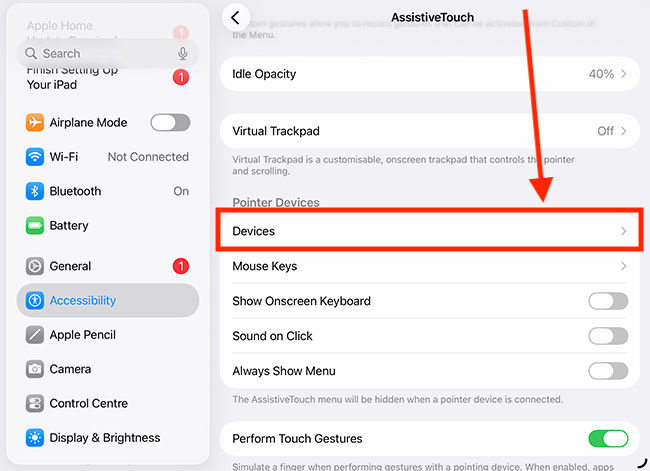
Customise your buttons
6. You can customise what any buttons on your touchpad or mouse will do. Scroll down to the Pointer Devices section and tap or click Devices.
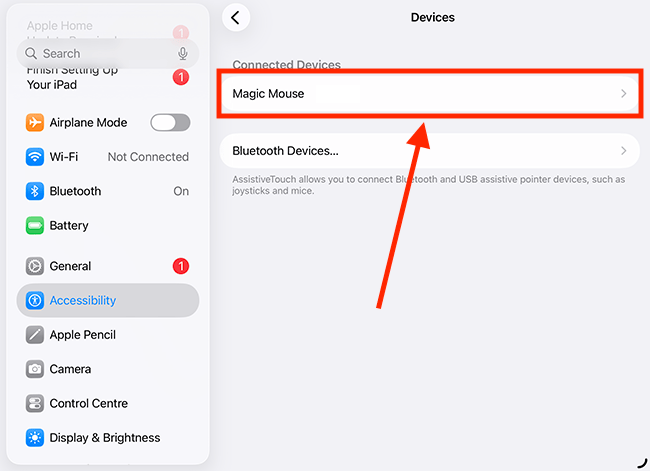
7. On the next page, you will see a list of all your connected devices. Select the one you want to customise the buttons for – in our example, we have chosen the Magic Mouse.
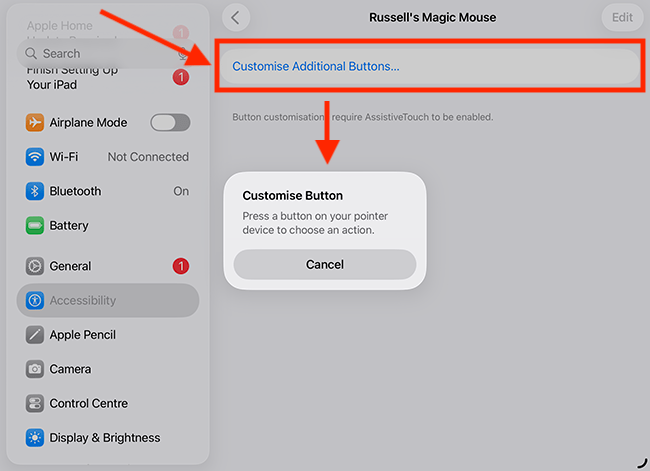
Press a button
8. Tap or click Customise Additional Buttons. You will see a pop-up notification instructing you to press the button you wish to customise. Press a button on your device now. By default, the standard left and right buttons are already set up to perform Single-Tap and Right-Click gestures. However, these buttons can also be customised to perform other actions.
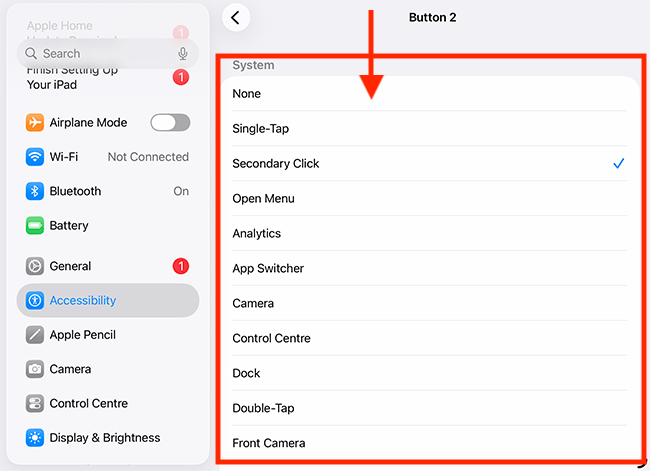
Select an Action
9. On the next screen, select the action you would like that button to perform. Repeat as necessary for any remaining buttons.
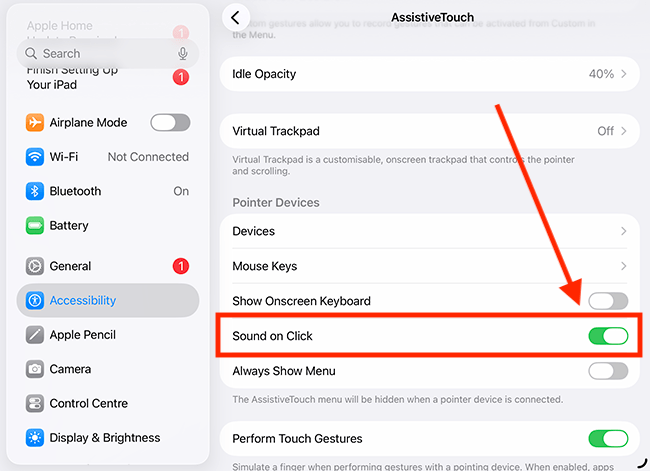
Play a sound when you click a button
10. To hear a sound when you click the mouse or trackpad, tap the toggle switch for Sound on Click to turn it on.
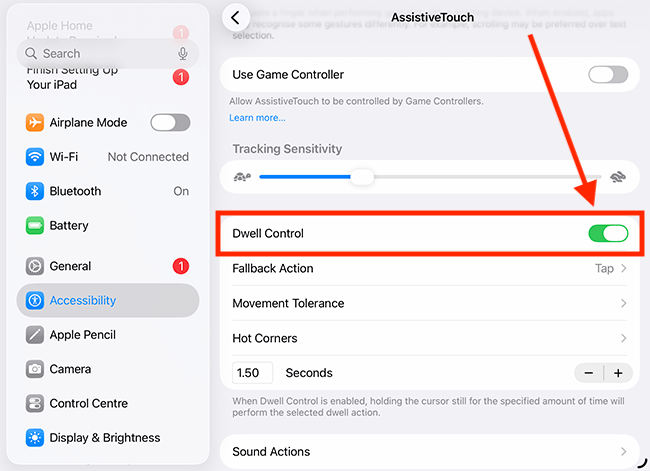
Enable Dwell Control
11. Dwell control is a useful feature that allows you to click just by hovering your mouse pointer over the same spot on the screen. To enable it, go back to the AssistiveTouch settings by clicking or tapping the blue back links near the top of the screen. Tap or click the toggle switch next to Dwell Control.
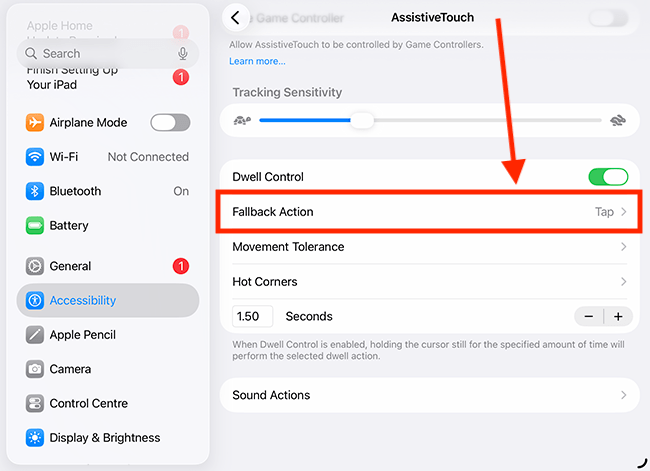
Customise Dwell Control
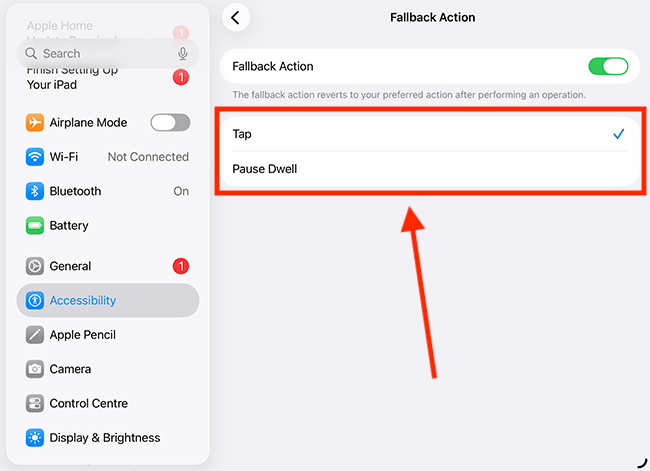
12. Dwell Control has its own useful settings. Fallback Action sets the action that Dwell Control reverts to after you have performed an operation. By default, this is turned off. Tap Fallback Action.
13. On the next page, you can choose between Tap (the default setting) or Pause Dwell. Selecting Pause Dwell can help if you find yourself clicking twice on icons or buttons by mistake.
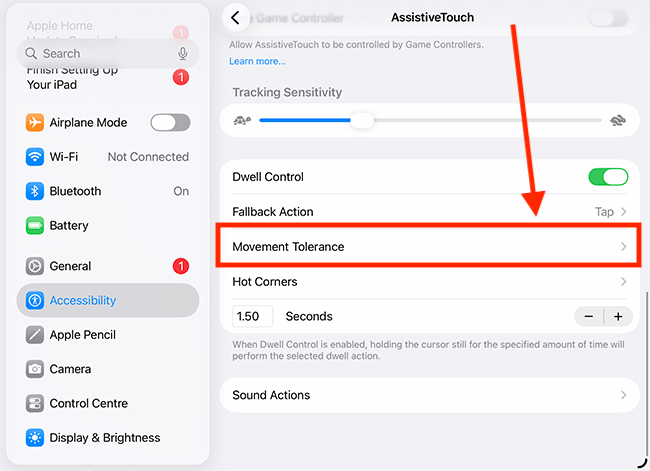
Set Movement Tolerance
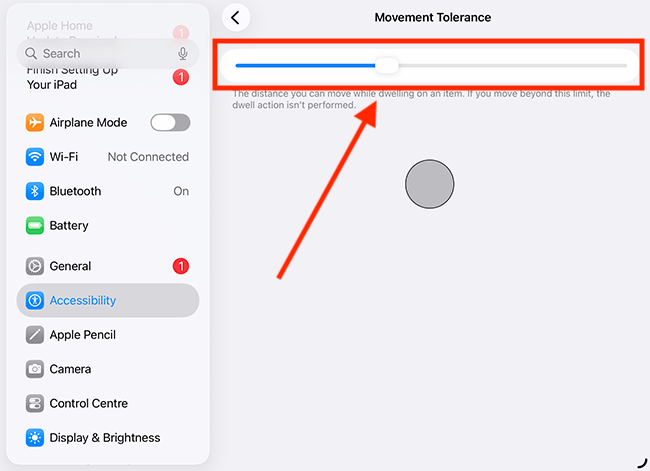
14. Movement Tolerance controls how far you can move the pointer before a dwell action is cancelled. To adjust the tolerance, tap Movement Tolerance.
15. On the next page, adjust the slider. The grey circle will indicate how far you can move the pointer before a dwell action is cancelled.
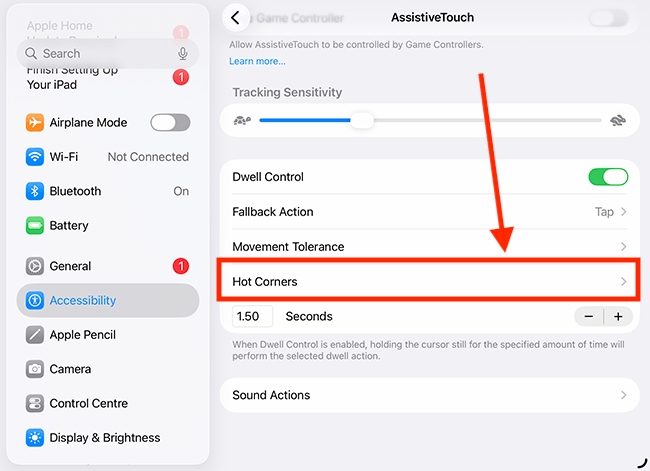
Using Hot Corners
16. With Hot Corners, you can perform actions by dwelling in the corners of the screen. You can choose from a wide variety of actions, such as taking a screenshot, going to the Home screen, opening the Control Centre, performing an accessibility action, or running a shortcut. You can assign a different action to each corner. To set these up, click or tap Hot Corners.
Select a corner
17. On the Hot Corners screen, tap a corner to assign an action to it.

Assign an action
18. On the next screen, choose an action from the list. Now, when you dwell in a corner, the chosen action will be performed.

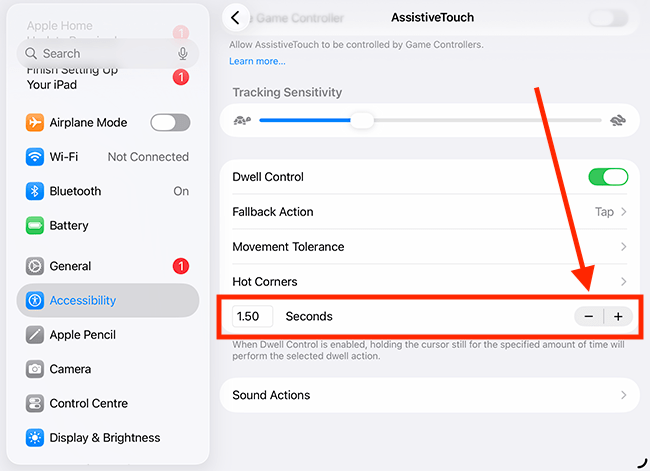
Adjust the Dwell time limit
19. Finally, Dwell Time Limit sets how long the pointer needs to rest or dwell on an item before the dwell action is performed. To change it, use the + (plus) and – (minus) buttons.
Return to the Home screen
20. When you are happy with your settings, you can return to the Home screen by swiping up from the bottom of the screen or pressing the Home button, if your device has one.
Need some more help?
Call our helpline 0300 180 0028 or email enquiries@abilitynet.org.uk
Need free IT Support at Home?
If you are older or disabled and need IT support at home, you can book a free home visit.