Call our helpline
0300 180 0028External devices – such as game controllers, MIDI, and Assistive Switch Control devices.
The screen of your device – perform gestures directly on the screen, such as a tap, to trigger actions.
Your device’s front-facing camera – to detect head movements.
Back Tap – on newer devices, you can tap the back of the screen to trigger actions.
Sounds – trigger actions by making sounds with your mouth.
Short guide:
- Open the Settings app
 and tap Accessibility.
 - Tap Switch Control.
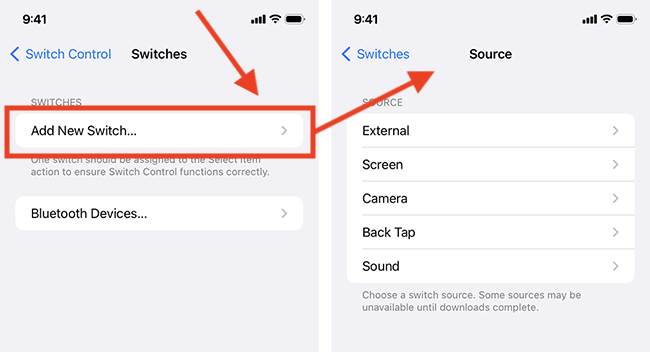
- Tap Switches, then Add New Switch.
- Choose the switch you are using, then assign the action you want it to perform. At least one switch needs to be assigned to the Select Item action.
- Go back to the main Switch Control settings screen and tap the toggle switch for Switch Control to turn it on.
- Tap your switch to start scanning. Use the switch assigned to Select Item to select a highlighted item.
- Choose an action to perform from the Scanner Menu.
- Set options on the settings screen to customise how Switch Control works.
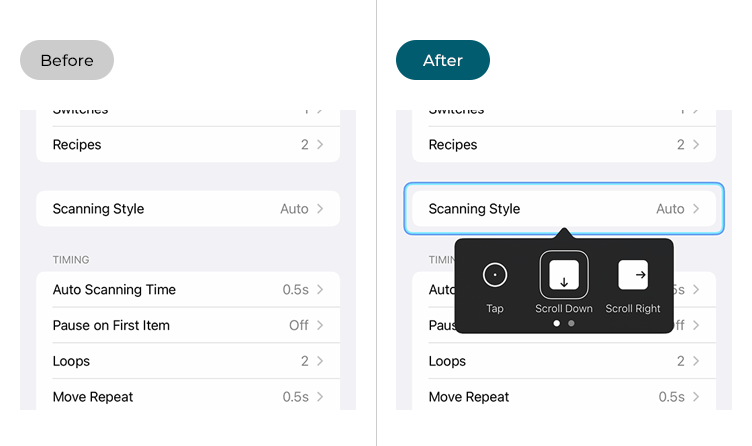
Before and after
This section gives you step by step instructions on how to enable Switch Control in iOS 16, with pictures of the screens to help.
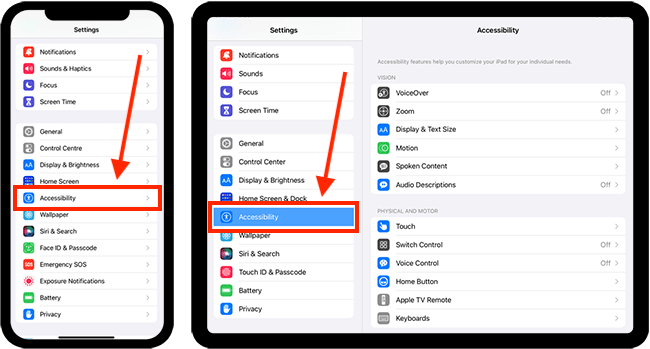
Find the Accessibility settings
1. Tap the Settings icon ![]() on your Home screen to open the Settings app. Scroll down and tap Accessibility.
on your Home screen to open the Settings app. Scroll down and tap Accessibility.
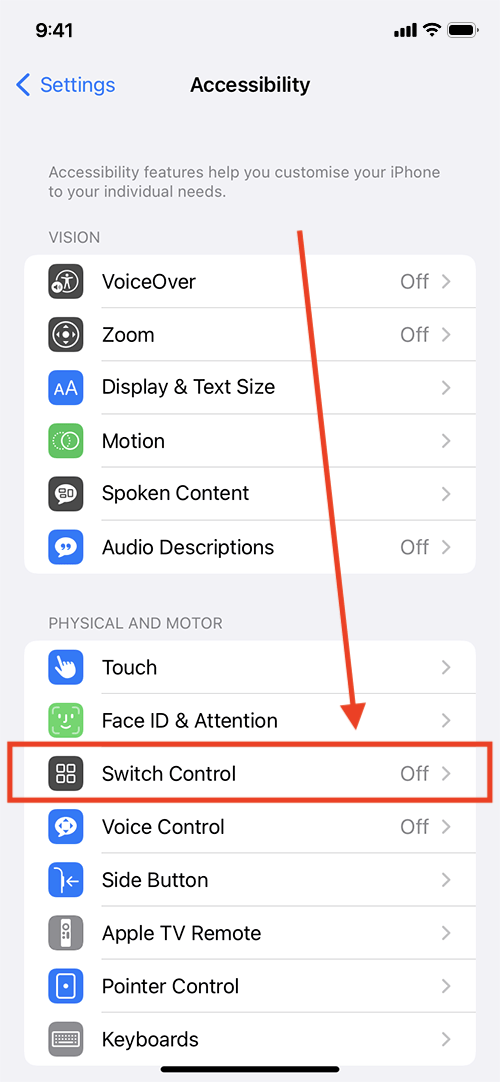
Open the Switch Control settings
2. On the Accessibility screen, tap Switch Control.
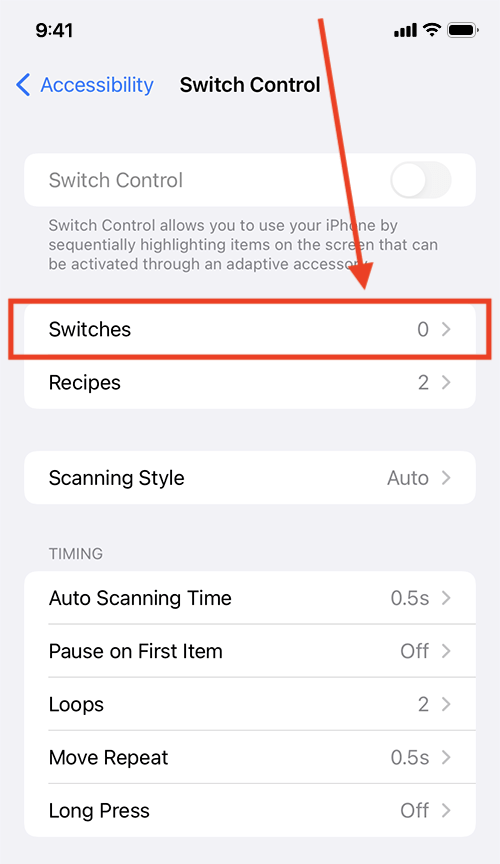
Add your switch/switches
3. Before you can enable Switch Control, you first need to add at least one switch. Tap Switches.
4. If you are using a Bluetooth switch, select Bluetooth and follow the on-screen instruction to pair your device.
5. Next, tap Add New Switch and choose the type of switch you want to use. The available options are:
External devices – such as game controllers, MIDI, and Assistive Switch Control devices.
The screen of your device – perform gestures directly on the screen, such as a tap, to trigger actions.
Your device’s front-facing camera – to detect head movements.
Back Tap – on newer devices you can tap the back of the screen to trigger actions.
Sounds – trigger actions by making sounds with your mouth.
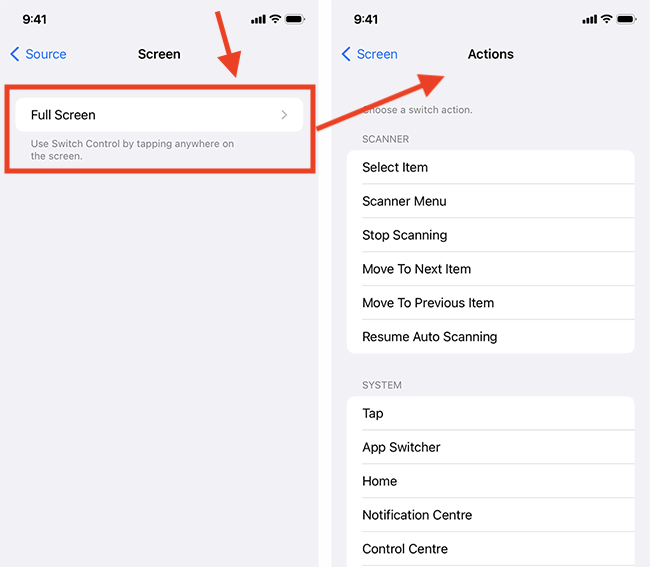
6. Choose from the options available for that type of switch. Next, select the action you would like this switch to perform. Note: One switch must be set to perform the Select Item action. It is recommended you set up at least one more switch to perform the Move to Next Item action.
7. Once you are happy with your switches, use the back button in the top-left corner to return to the main Switch Control screen.
Turn on Switch Control
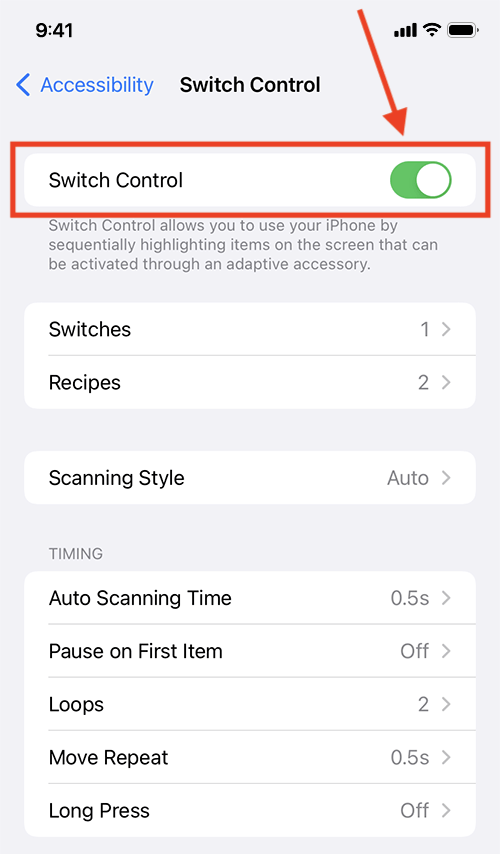
8. Tap the toggle switch next to Switch Control to turn it on.
Using Switch Control
9. Once enabled, you can start scanning by activating the switch assigned to Select Item. The default is to scan through groups of related items on the page. When you select a group, the items within the group are scanned, enabling you to select a single item. The default is to loop through the scan twice then stop if no selection is made.
When the item you require is in focus (highlighted with a blue rectangle) use the switch assigned to Select Item to make your selection.
When you select a single item, a scanner menu appears containing the actions you can perform, such as Tap, Scroll, Gestures. The available actions will depend on the item you have selected.
To customise the way Switch Control works, see the following steps.
Add another Switch
10. To add more switches, tap Switches and follow the steps detailed previously.
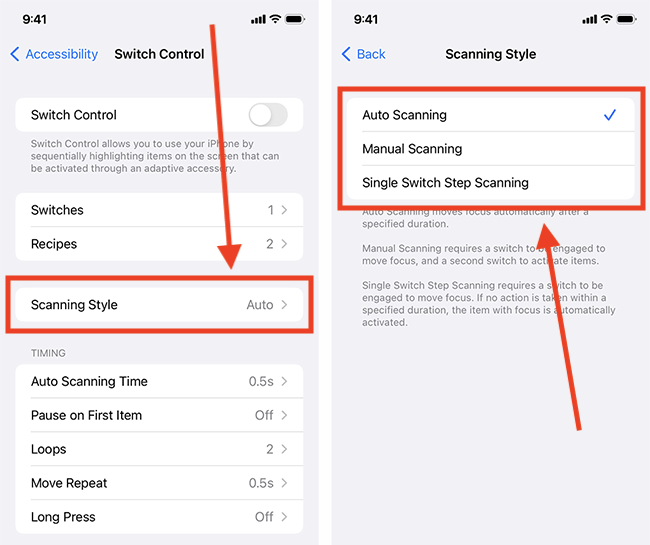
Change the scanning style
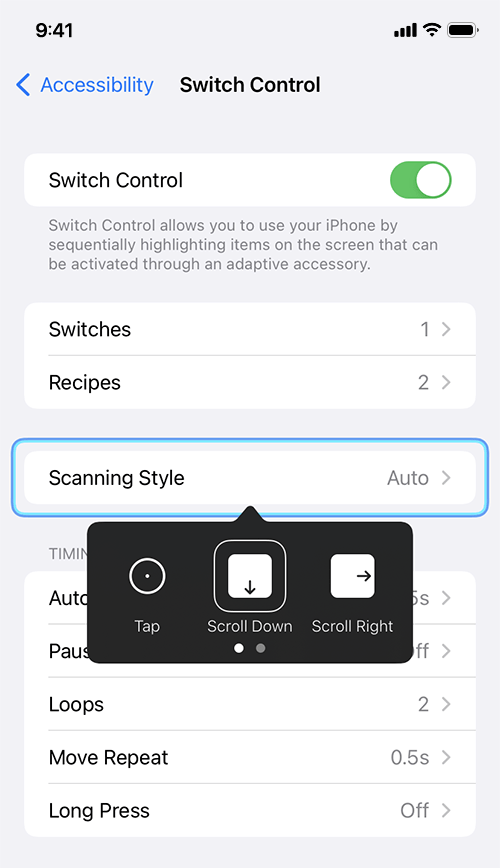
11. By default, Switch Control uses Auto Scanning, where it moves from one item to the next until a selection is made. If you would like more control over moving between items, you can choose from:
- Manual Scanning - this requires one switch to move between items, and a second switch to activate items.
- Single Switch Step Scanning this requires a switch to move focus to another item. If no action is taken, the item with focus is automatically activated.
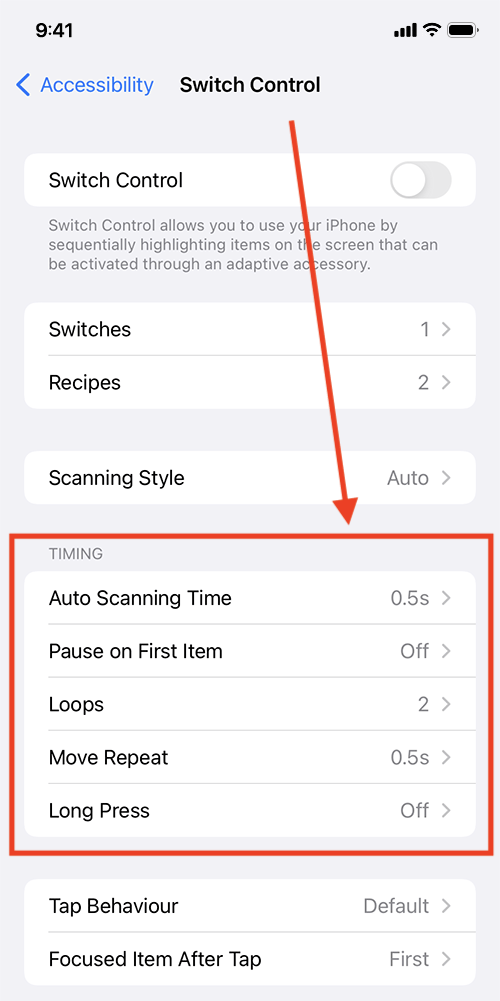
Change the scanning timing
12. You can customise the timing of Switch Control. The timing options are different depending on which scanning style you are using.
- Auto Scanning Time – (Auto Scanning only) this is the speed at which the scanning cursor cycles through items. The default is 0.5 seconds.
- Pause on First Item – (Auto Scanning only) this is how long scanning pauses on the first item before cycling through all items. The default setting has this turned off. Tap through to turn this on and set a duration for how long Switch Control pauses on the first item.
- Auto-Hide – (Manual Scanning only) this is the time it takes for the scanner interface to disappear due to inactivity.
- Dwell Time – (Single Switch Step Scanning only) how long an item must remain in focus before you can select it.
- Loops – the number of times scanning cycles through items before stopping and hiding the cursor. The default is two loops. You can choose between 1 and 10.
- Move Repeat – when you hold down a switch the Move To Next / Previous item action is repeated. This is off by default. Tap through to turn this on and to set the delay time before the repeat occurs
- Long Press – when you set up a switch, you may see an option to associate an action with a long press. This enables you to add a second action to the same switch, activated by holding it for a set duration. To enable Long Press functionality to work, turn it on here and set how long you need to hold the switch for.
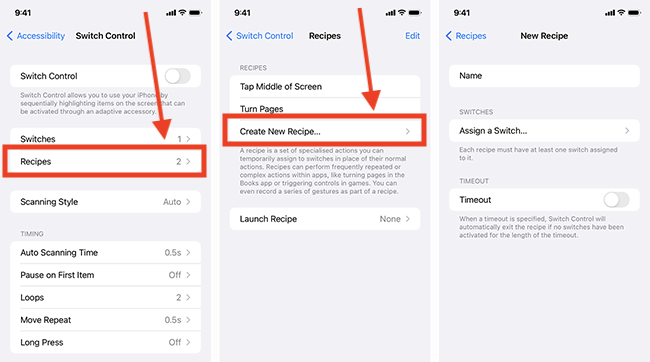
Speed up your workflow with Switch Control recipes
A recipe is a set of actions that you can temporarily assign to a switch instead of its normal behaviour. Recipes are very useful for performing repetitive actions, such as turning the pages of an eBook - in fact, Apple has already created a ‘Turn Pages’ recipe for you. The ‘Turn Pages’ recipe performs swipes from right to left, and vice-versa. The recipes you create are added to the Scanner Menu.
To create a new recipe, tap Recipes.
On the next screen, tap Create New Recipe. Choose which switch to assign the recipe to, then choose the action to perform when triggered.
If you would like one of your recipes to launch as soon as Switch Control starts, tap Launch Recipe, then select a recipe.
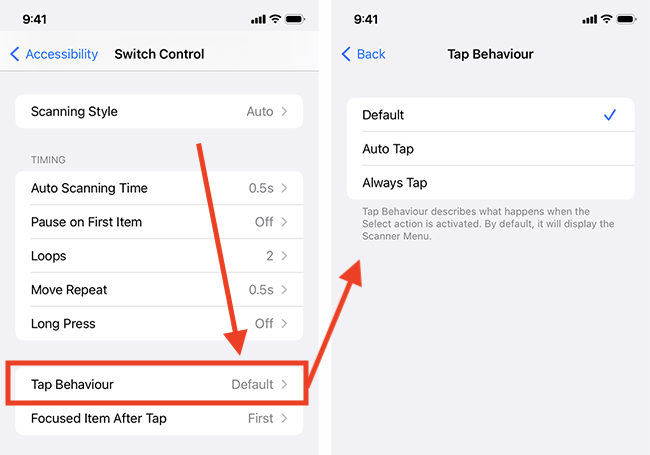
Change the tap behaviour
13. Select Tap Behaviour and choose from:
- Default – when the focused item is selected, the pop-up Scanning menu is displayed.
- Auto Tap – (not available in Single Switch Step Scanning mode) when the focused item is selected, it will be automatically activated unless the select switch is pressed twice to show the pop-up Scanning menu
- Always Tap – when the focused item is selected, it will always be activated. A pop-up Scanning menu icon will appear at the end of the scan cycles so that it is always available.
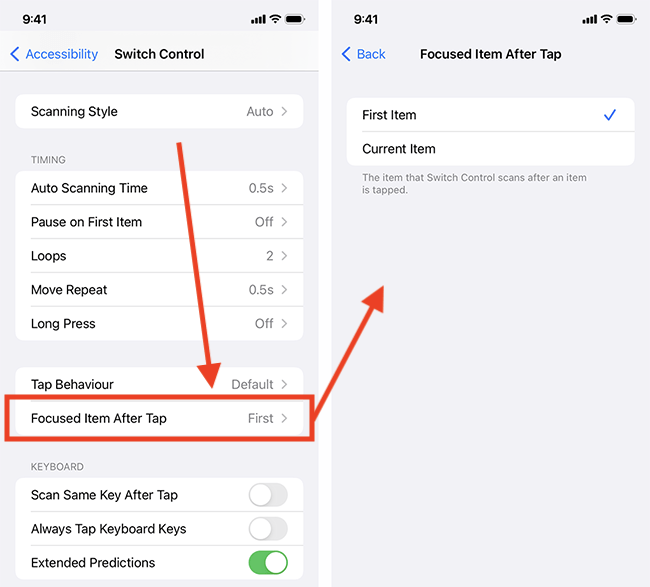
Choose which item becomes focused after a tap
14. Choose which item is scanned after an item is tapped. Tap Focused Item After Tap and choose from First Item or Current Item.
Keyboard settings
15. You customise how Switch Control behaves when the keyboard is in focus:
- Scan Same Key After Tap – the same key will be scanned again after tapping. This way users can select the same key without having to cycle back round to it. Tap the toggle switch for Scan Same Key After Tap to turn this on.
- (Keyboard) Always Tap Keyboard Keys – when scanning the onscreen keyboard, the keys will always be tapped instead of the pop-up Scanning menu appearing. Tap the toggle switch for Always Tap Keyboard Keys to turn this on.
- Extended Predictions – this provides the user with a greater number of predicted text options than standard. This feature is on by default.

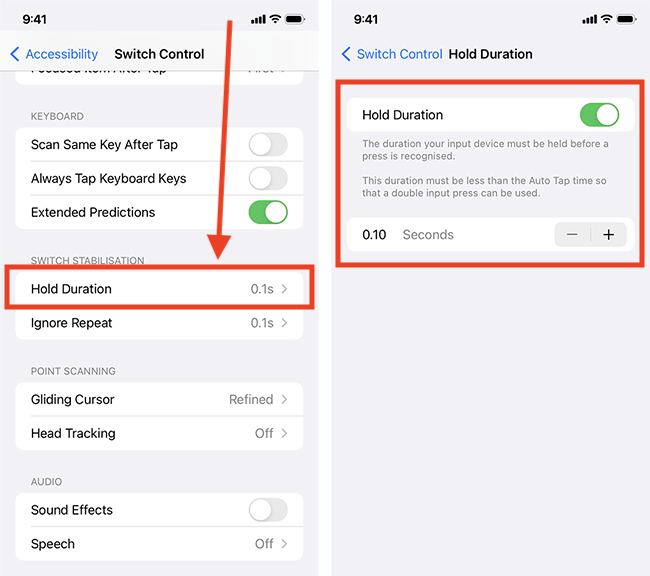
Hold Duration
You can set Switch Control to only recognise triggers after they have been held for a set amount of time. This is useful for individuals with motor difficulties, for example, a person with a tremor who may press the switch accidentally. Turning on this feature means your device will only respond to slightly longer and more deliberate switch presses.
Tap Hold Duration. On the next screen, set the toggle switch for Hold Duration to on, and set the duration.
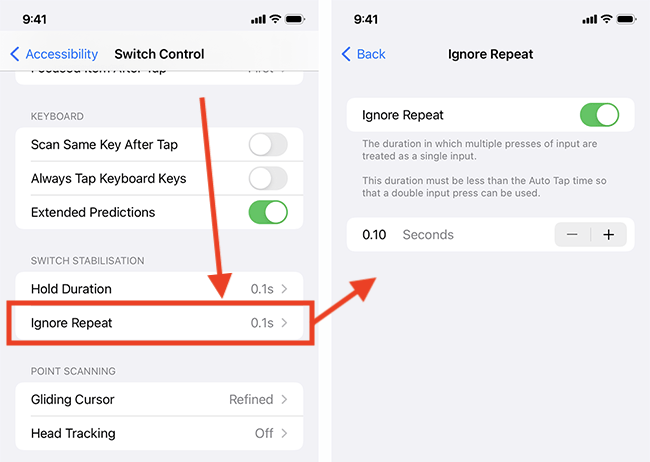
Ignore Repeat
You set Switch Control to ignore any accidental switch triggers made within a set amount of time. This can be particularly useful for users with fine motor or dexterity impairments. To enable this:
Tap Ignore Repeat. On the next screen, set the toggle switch for Ignore Repeat to on and set the duration within which repeated triggers are ignored.
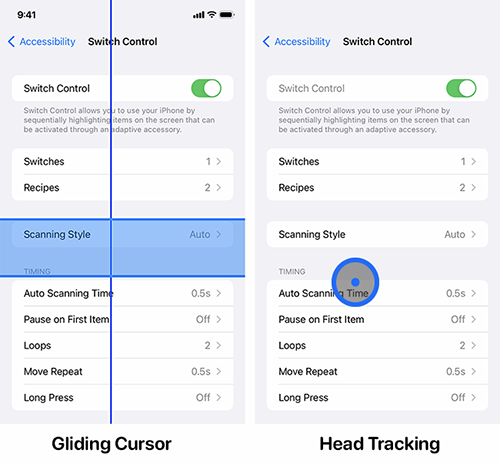
Point Scanning options
Point scanning enables users to select items by pinpointing them using crosshairs (Gliding Cursor). Devices with Face ID also have the option to use Head Tracking – your device uses the camera to track head movements to control an on-screen pointer and recognise facial movements (raised eyebrows, smile, etc.) to perform actions.
These options are available in the Scanner Menu when you select an item.
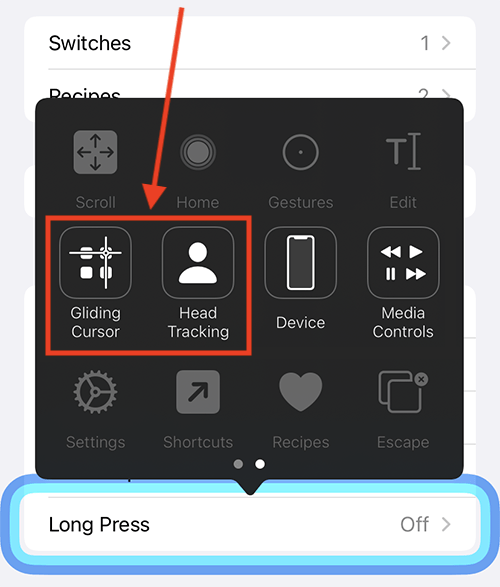
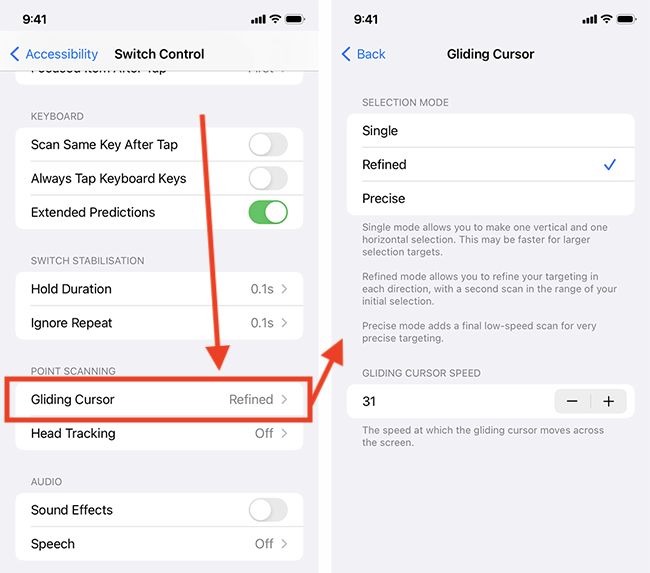
Gliding Cursor
You can change how the Gliding Cursor behaves. Tap Gliding Cursor. On the next screen, choose from:
- Single – allows you to make one vertical and one horizontal selection. This can be the fastest method for selecting larger targets.
- Refined – allows you to refine your selection with a second scan within the target area.
- Precise – adds a final, slow scan for precise targeting.
To adjust the speed the cursors move across the screen, use the + (plus) and – (minus) buttons under Gliding Cursor Speed.
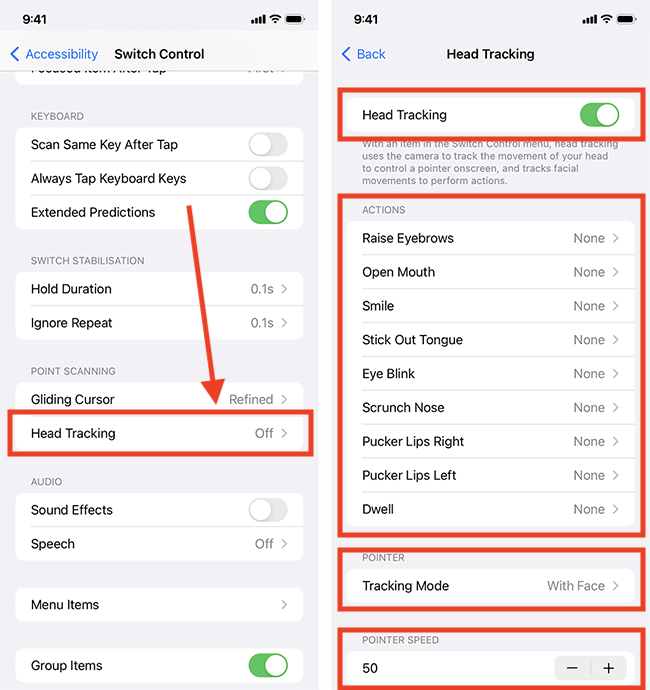
Head Tracking
Tap Head Tracking. On the next screen, tap the toggle switch for Head Tracking to turn it on.
Next, select a facial movement and assign an action to it.
Choose how your device tracks your head to move the pointer. Choose from:
- With Face – point your face directly at the position on the screen you want to move the pointer to.
- When Facing Screen Edges – point your face towards a screen edge to move the pointer in that direction. Facing directly at the screen will keep the pointer still.
- Relative to Head – the pointer moves with your head no matter where you face. The faster your head movement, the faster the pointer moves.
Set the Pointer Speed to determine how quickly the pointer moves with head movements
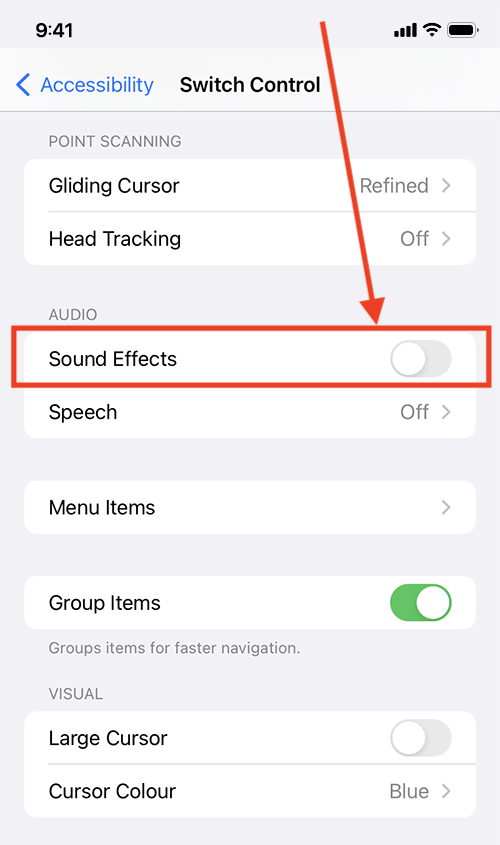
Sound Effects
If you would like to hear a click sound as each item moves into focus, tap the toggle switch for Sound Effects to turn it on.
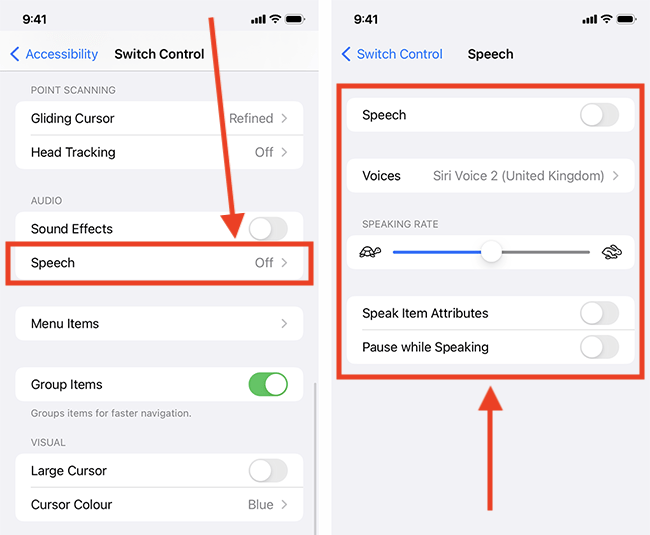
Speech
When the scan highlights an item, it reads aloud what the item is. This can be useful for users who are visually impaired or need voice feedback. To enable this:
Tap Speech. On the next screen tap, the toggle switch for Speech to turn it on.
You can also change the voice used for speech and adjust the speaking rate.
If you would prefer scanning was paused whilst items are read aloud, tap the toggle switch for Pause while Speaking to turn it on.
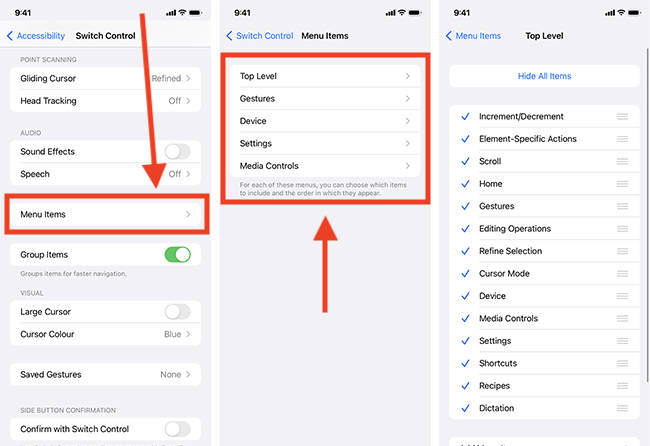
Customise which items appear in the Scanner Menu
To customise which items appear in the Scanner Menu, tap Menu Items.
On the next screen, select one of the Menu Items.
Untick the items you don’t want to appear in this menu or tick Hide All Items to untick them all.
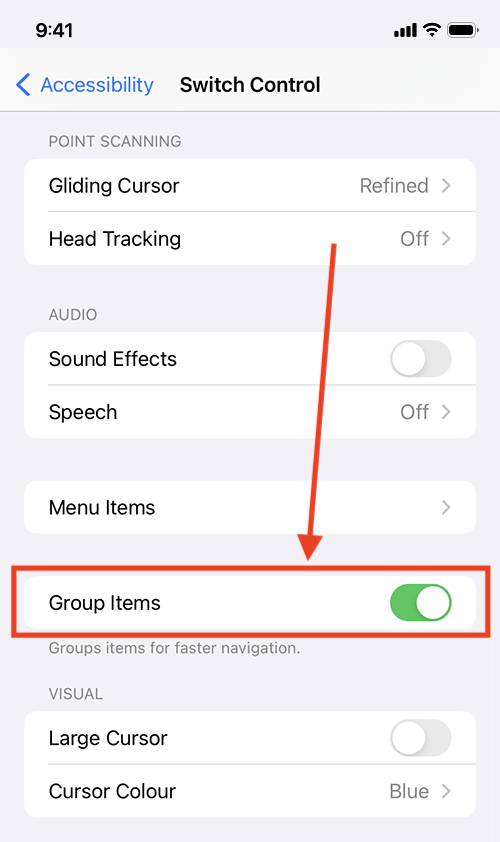
Group Items
By default, Switch Control scans related items as a group. This can make scanning quicker when there are a lot of items on a page. If you would prefer to scan every item on the page individually, tap the toggle switch for Group Items to turn it off.
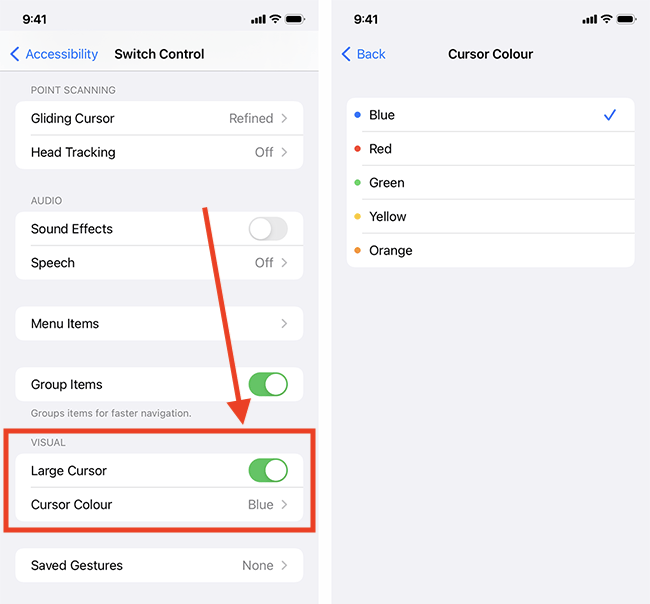
Change the appearance of the Switch Control cursor
The Switch Control cursor is the coloured rectangular border that highlights the item currently in focus. To make the cursor easier to see, you can make the border thicker and change the border colour.
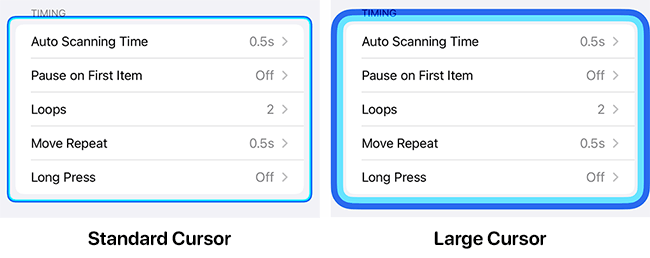
Tap the toggle switch for Large Cursor to make the border thicker.
To change the border colour, tap Cursor Colour and choose from the options.
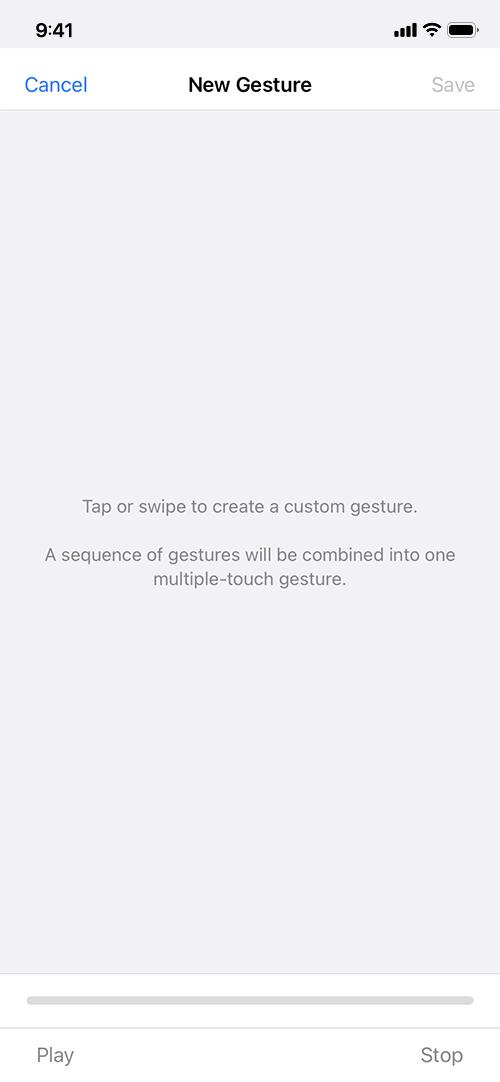
Create your own gestures to add to the Scanner Menu

You can create your own gestures and add them to the Scanner Menu.
Tap Saved Gestures, then tap Create New Gesture.
On the next screen, perform your gesture in the middle of the screen to record it. If you draw more than one gesture, they will be combined to create a single multi-touch gesture. When you are happy with your gesture, tap Save and name it.
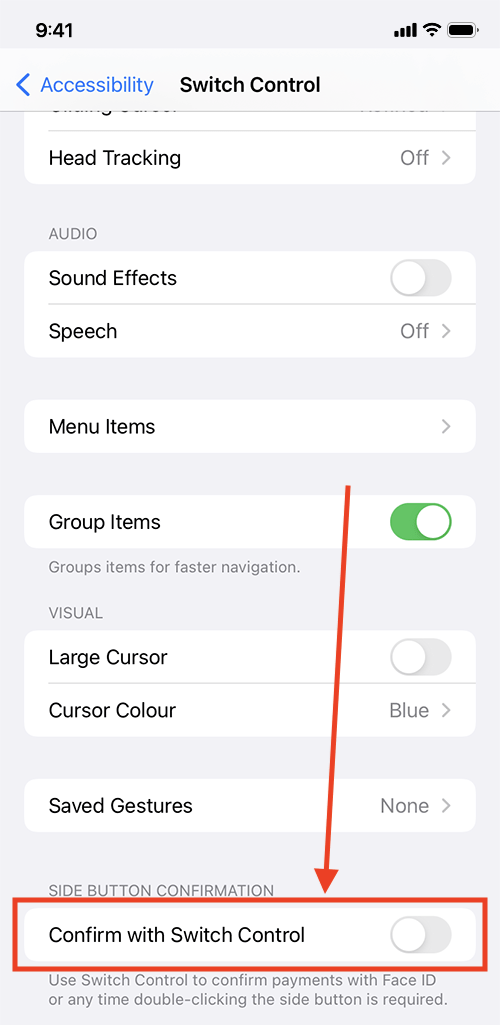
Confirm with Switch Control
On devices with Face ID, you can confirm payments using a switch instead of double-clicking the side button. Tap the toggle switch for Confirm with Switch Control to turn it on.
Return to the Home screen
4. When you are happy with your settings, you can return to the Home screen by swiping up from the bottom of the screen or by pressing the Home button on devices with a physical Home button.
Need some more help?
Call our helpline 0300 180 0028 or email enquiries@abilitynet.org.uk
Need free IT Support at Home?
If you are older or disabled and need IT support at home, you can book a free home visit.