Call our helpline
0300 180 0028Short guide:
- Open the Magnifier app
 from the Utilities folder on your Mac, or press Cmd + Space Bar to open Spotlight, then search for Magnifier.
 - To use your iPhone camera or a connected USB camera, click Camera in the toolbar along the top-left of the screen, then select the camera you want to use.
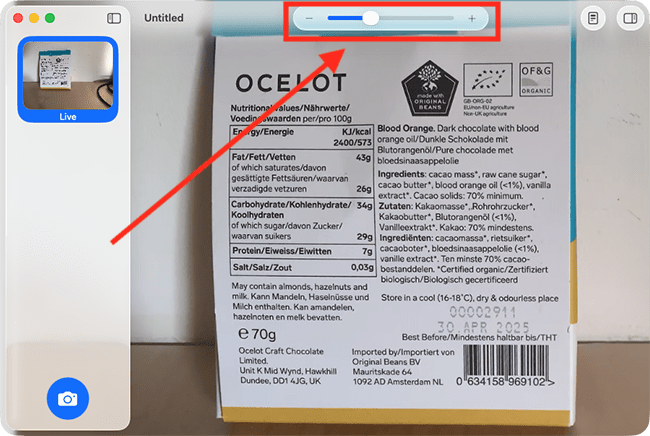
- Point your camera at an object or a page of text. Drag the slider at the top of the Magnifier window to zoom in and out.
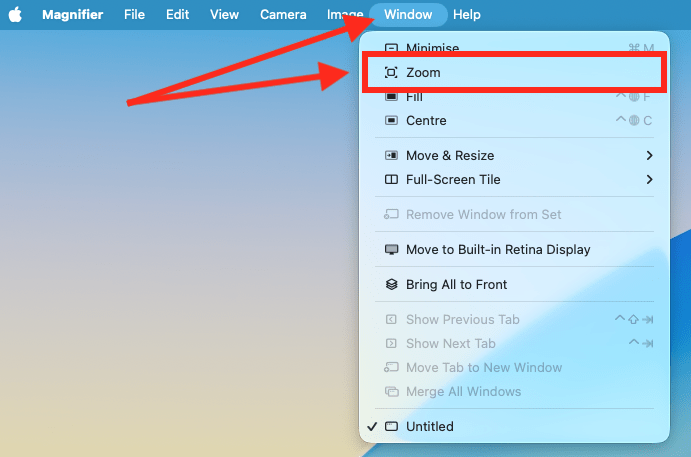
- To make the window full-screen, click Window in the toolbar along the top-left of the screen, and select Zoom.
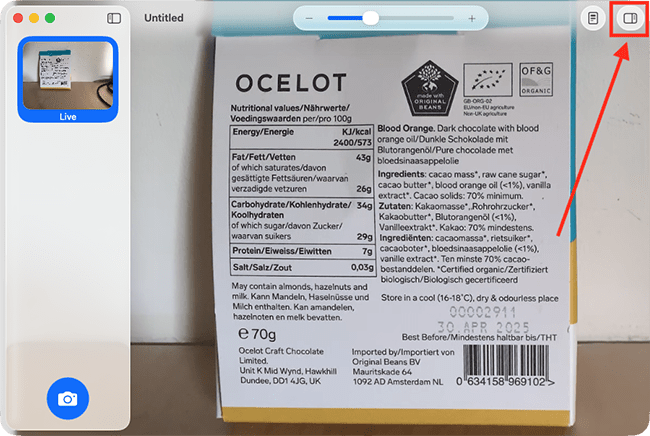
- To apply a colour filter, click the right-sidebar button
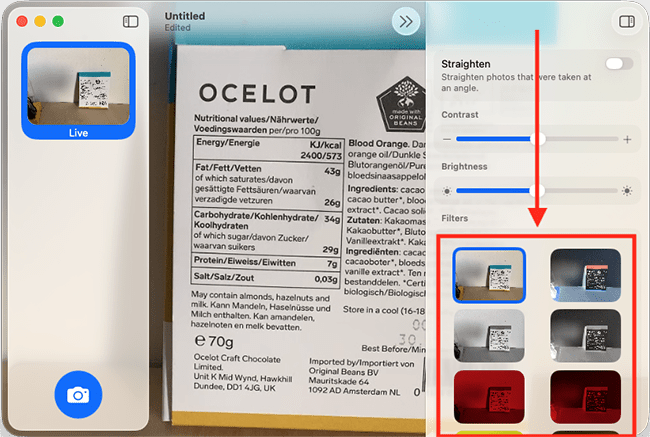
 in the top-right of the Magnifier window to reveal the sidebar, then choose your preferred filter. You can also adjust the brightness and contrast here.
 - To capture a still image of the magnified view, click the Capture Freeze Frame button
 in the bottom-right of ther Magnifier window. To view the image, click its thumbnail in the left sidebar.
 - To use Reader Mode to read text in your surroundings, point the camera at some text, then click the Capture Freeze Frame button in the bottom-right of the Magnifier window to capture an image of the text.
- Next, click the Reader Mode button
 along the top of the Magnifier window to view only the text in the Reader window.
 - Use the options in the right-sidebar to reformat the text to your preferences.
Before and after
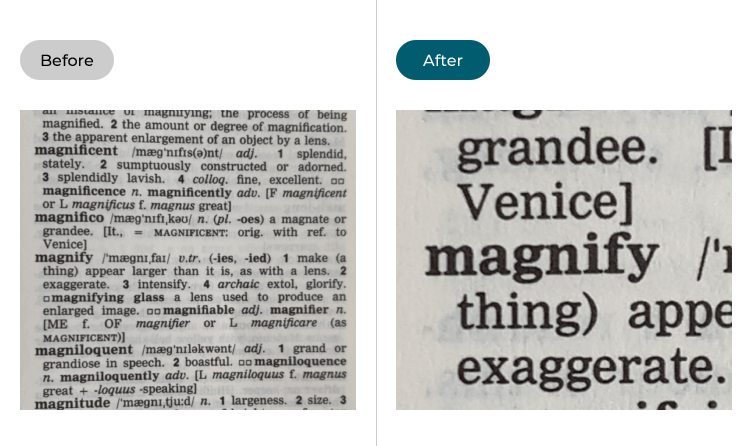
This section explains how to use the Magnifier app in macOS 26 Tahoe to magnify the screen. This is a step-by-step guide with pictures of the screens to help.
Open the Magnifier app
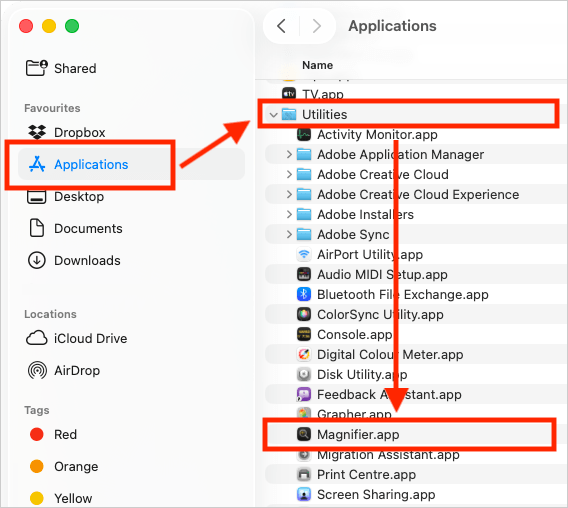
1. Open the Magnifier app from the Utilities folder on your Mac (Finder > Applications > Utilities > Magnifier).
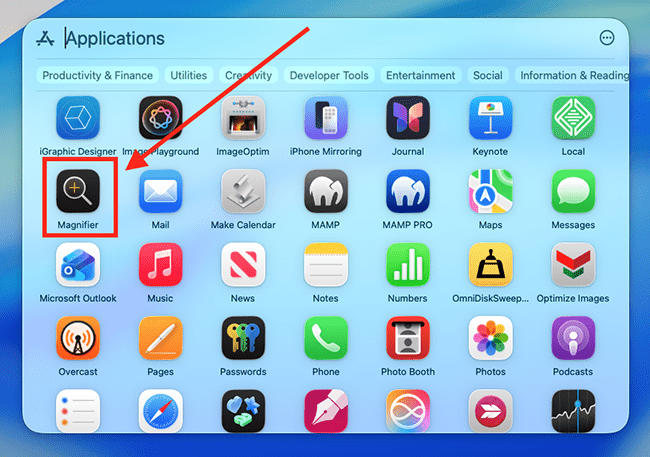
Alternatively, press Cmd (Command ⌘) + Space Bar to open Spotlight. In the Spotlight window, click the Applications button, then scroll down and select the Magnifier app from the list of app icons.

Connect a camera
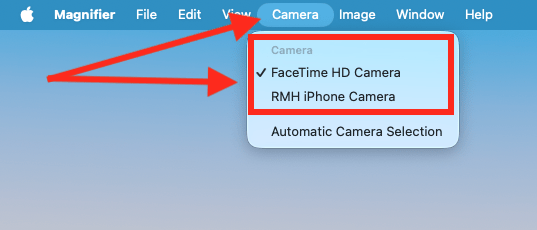
2. By default, the Magnifier app uses the built-in camera on your Mac. To use an iPhone or a connected USB camera, click Camera in the toolbar along the top-left of the screen, then select the camera you want to use.
Using the Magnifier
3. Point your camera at an object or a page of text. Drag the slider at the top of the Magnifier window to zoom in and out, or use the keyboard shortcuts Cmd + (plus) to zoom in and Cmd – (minus) to zoom out.
View the Magnifier full-screen
4. If you would like the Magnifier to fill the screen, click Window in the toolbar along the top-left of the screen, then select Zoom.
Apply a colour filter to the image
5. To apply a colour filter to the image, click the right-sidebar button in the top-right of the Magnifier window to reveal the sidebar.
6. Select your preferred filter. You can also adjust the brightness and contrast here.
Save filter settings
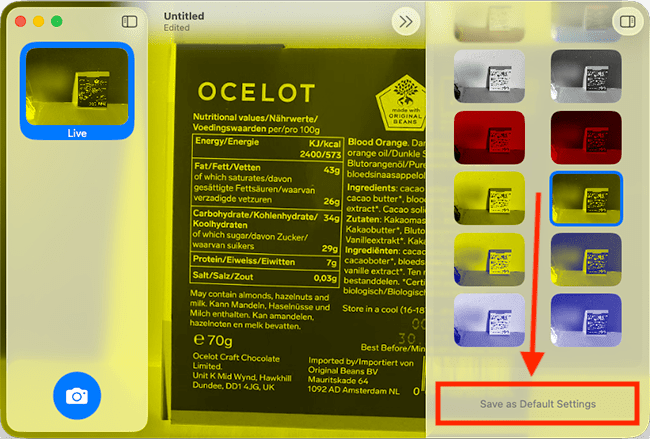
7. To save your filter settings so they are applied automatically the next time you open the Magnifier, scroll to the bottom of the right sidebar and click Save as Default Settings.
Capture a still image
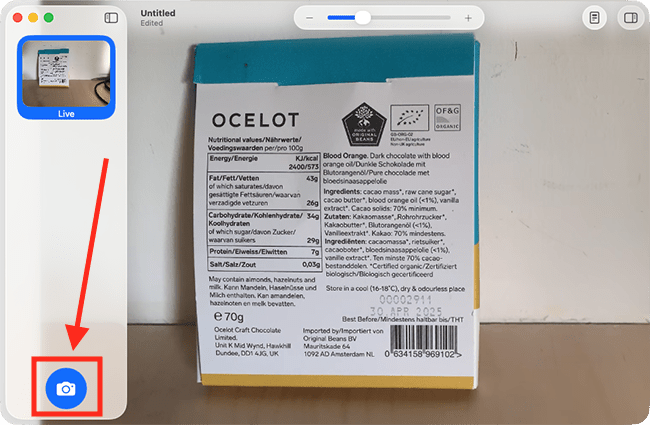
8. Sometimes it may be easier to view an item or text you have zoomed in on by capturing it as a still image. To do this, click the Capture Freeze Frame button in the bottom-right of the Magnifier window.
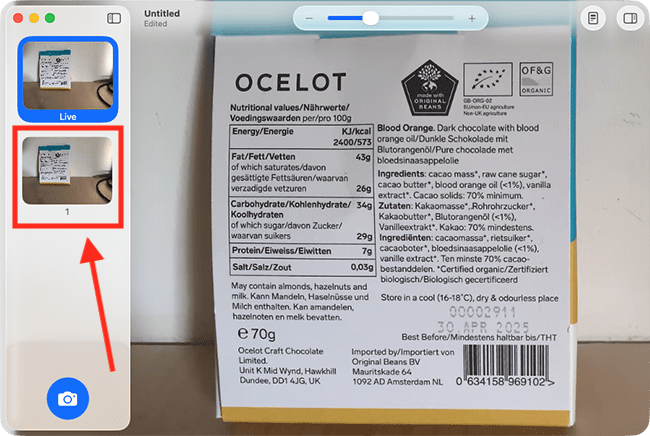
9. To view the image, click its thumbnail in the left sidebar.
10. You can use the slider to zoom in or out and apply colour filters to the image, just as described above.
11. To return to the live view, click the live view thumbnail at the top of the left sidebar.
Use Reader Mode to reformat text into a more readable document and/or have the text read aloud
The Magnifier’s Reader Mode formats text to make it easier to read. The Magnifier can also use your Mac’s built-in screen reader to read the text aloud.
12. You can use Reader Mode with a live view of text, but you may find it easier to capture a still image of the text first, then view that image in Reader Mode. To do this, point the camera at some text in your surroundings, then click the Capture Freeze Frame button in the bottom-right of the Magnifier window to capture an image of the text.
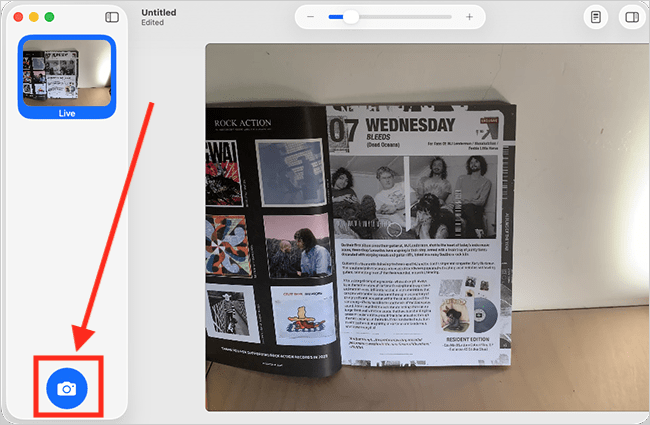
13. Click the thumbnail in the sidebar to open it. then, click the Reader Mode button along the top of the Magnifier window.
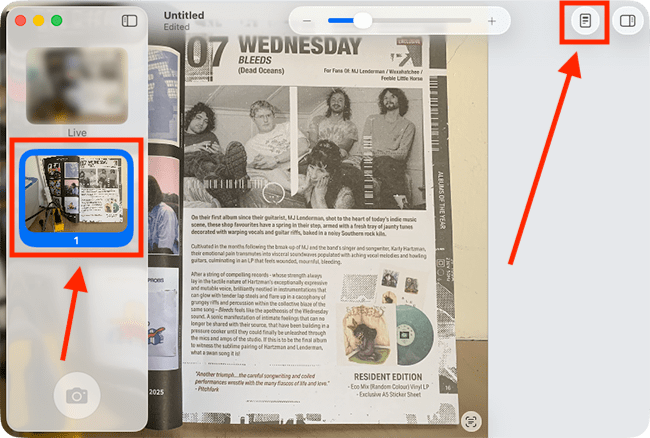
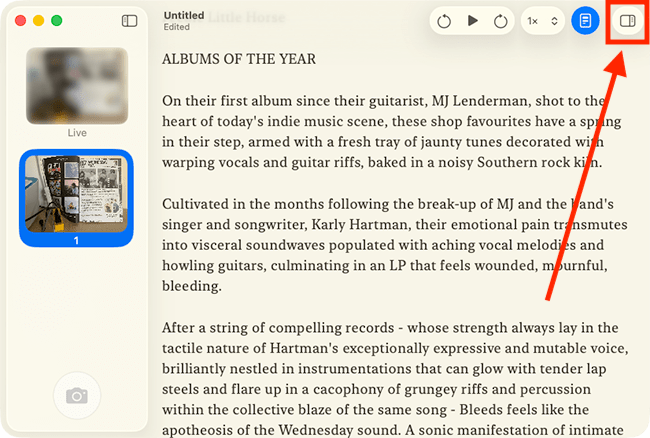
14. The text will appear in the Reader window, reformatted for easier reading. To customise the formatting further, click the right-sidebar button to open the formatting options.
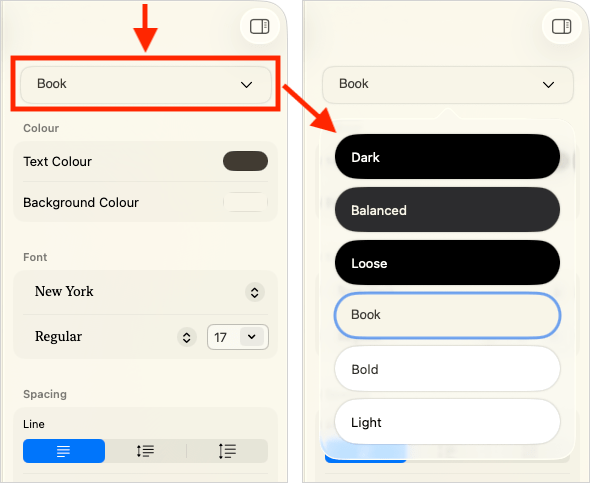
15.To help you get started, several predefined colour schemes are available — all fully customisable to suit your preferences. Choose a scheme from the drop-down menu.
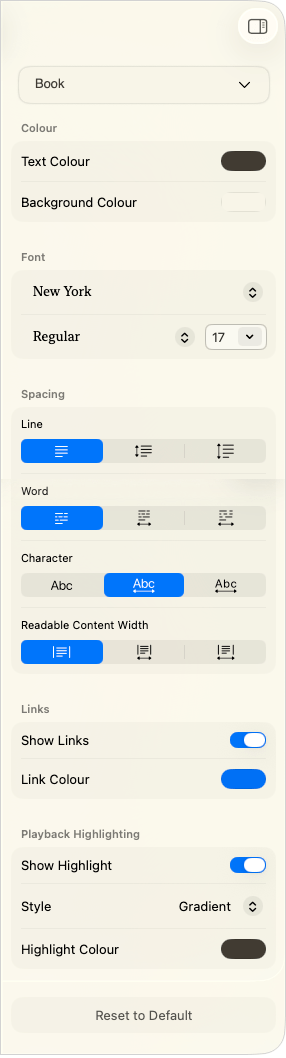
16. The table below lists the features you can customise within a scheme (also, see the screenshot below the table for reference).
| Reader Mode options | |
| Feature | Description |
Text |
|
| Text Colour | Click the Text Colour swatch to choose a new colour for text. |
| Background Colour | Click the Background Colour swatch to choose a new colour for the background. |
Fonts |
|
| Font | Click the Font drop-down menu to choose the font that is most legible for reading. |
| Font Style | Click the Font Style drop-down menu to choose the style that is most legible for reading — Regular, Bold. Italic, etc. |
| Font Size | Click the Font Size drop-down menu to choose your preferred reading size. |
Spacing |
|
| Line Spacing | Change the space between lines of text by selecting one of the three spacing options. |
| Word Spacing | Change the space between words by selecting one of the three spacing options. |
| Character Spacing | Change the space between characters by selecting one of the three spacing options. |
| Readable Content Width | Change the width of the text column by selecting one of the three content width options — a narrower column with fewer words per line is generally easier to read. |
Links |
|
| Show Links | Links are visible by default. If you'd like to hide links, click the toggle switch for Show Links to turn it off. |
| Link Colour | Click the Link Colour swatch to choose a new colour for links. |
Playback Highlighting |
|
| Show Highlight | Text is highlighted as it’s read aloud. To disable this, click the Show Highlight toggle switch. |
| Highlight Style | Click the drop-down menu for Style to choose a new style for how text is highlighted as it's read aloud. You can choose from Gradient, Background, or Underline. |
| Highlight Colour | Click the Highlight Colour swatch to choose a new colour for highlighting the text. |
Reset |
|
| Reset to Default | Reset the current scheme to its default values. |
Read the text aloud
17. To hear the text read aloud, click the Play button on the playback controls located along the top of the Magnifier app window. The text will be highlighted as it's read, based on the settings you chose above.
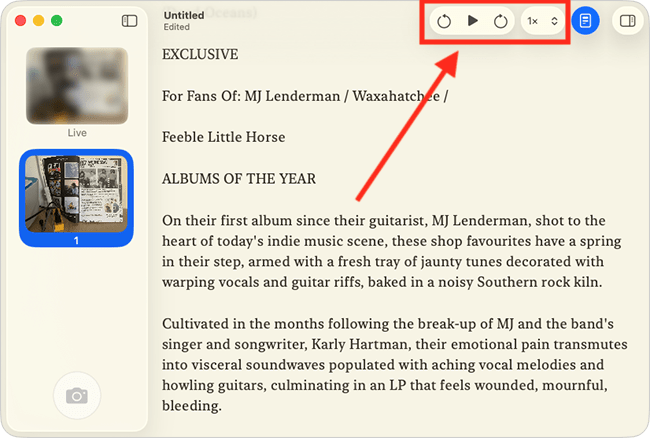
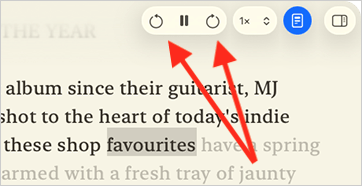
18. To skip forward or backward by 10 seconds, use the arrows on either side of the Play button. You can also use the slider next to the Play controls to navigate through the text.
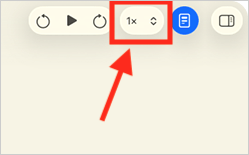
19. To change the playback speed, click the 1x button and select your preferred speed from the list.
Exit Reader Mode
20. To exit Reader Mode, click the Reader Mode button  again.
Note: If this does not work, it could be because your computer settings are managed by someone else (an IT department or administrator, for example). If so, you will need to contact them to access these settings or for help.
Need some more help?
Call our helpline 0300 180 0028 or email enquiries@abilitynet.org.uk
Need free IT Support at Home?
If you are older or disabled and need IT support at home, you can book a free home visit.