Call our helpline
0300 180 0028Short guide:
- You can use keyboard shortcuts to zoom in and out while Chrome is active. Press Ctrl and + (plus) to zoom in, Ctrl and – (minus) to zoom out, or Ctrl and 0 (zero) to return to the default size.
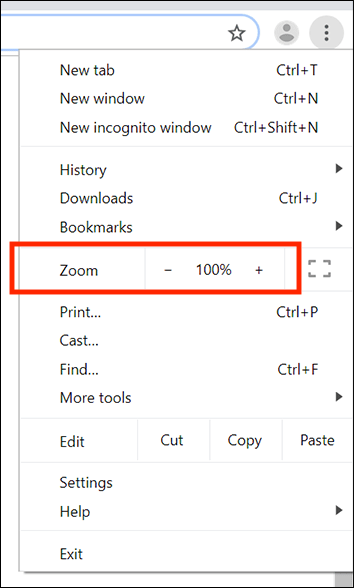
- You can also use the Zoom settings in the main Chrome menu. Click or tap the Menu button in the top-right of the browser.
- In the Zoom section, click the + (plus) button to increase the size of text and images. Select the - (minus) button to decrease the size of text and images. Press the Esc key when you’re finished.
- To quickly change Zoom settings, click on the magnifying glass shortcut in Chrome’s address bar. Press the – (minus) button to zoom out, the + (plus) button to zoom in, or the reset button to return to the default zoom level.
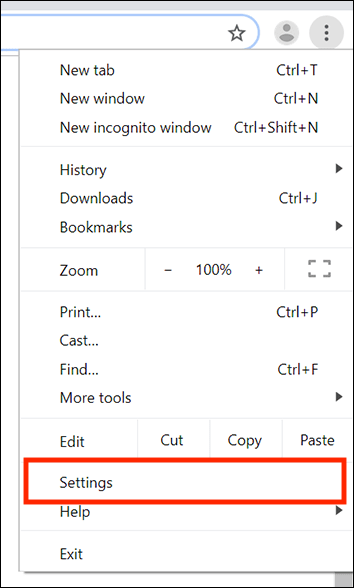
- To set a new default zoom level, click on the Menu button in the top-right of the Chrome browser, then click Settings.
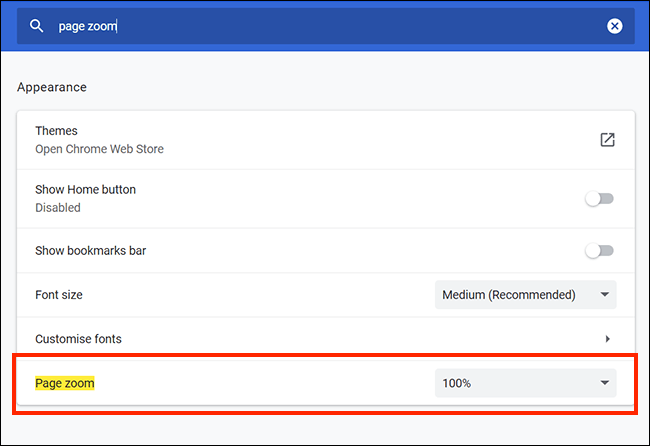
- Type ‘Page Zoom’ in the search box or click on Appearance on the left-hand side. Click on the drop-down menu for Page zoom and select a new default zoom level.
This section takes you step-by-step through using the Zoom control in Google Chrome for Windows 10, with pictures of the screen to help.
Use the keyboard to zoom
1. The quickest and easiest way to use the Zoom control is through keyboard shortcuts. Press Ctrl and + (plus) while Chrome is active to zoom in. Press Ctrl and – (minus) to zoom out, or Ctrl and 0 (zero) to return to the default size.
Find the Zoom control in the menu
2. You can also use the Zoom control in the main Chrome menu. To find it click or tap the Menu button in the top-right of the Chrome browser.

Using the Zoom control
3. In the Zoom section, click the + (plus) button to increase the size of text and images. Click the - (minus) button to decrease the size of text and images. Press the Esc key to hide the menu when you’re finished.
Making quick Zoom adjustments
4. Once you have used Zoom, you can make quick adjustiments using the magnifying glass shortcut that appears in Chrome’s address bar. Click on it, then press the – (minus) button to zoom out, the + (plus) button to zoom in, or the reset button to return to the default zoom level.

Change the default Zoom level
5. You can set a custom default zoom level, so that every webpage opens with text at a larger size when you launch the browser. Click on the Menu button in the top-right of the Chrome browser, then select Settings.
Set the level
6. Type ‘Page Zoom’ in the search box or click on Appearance on the left-hand side. Now click on the drop-down menu next to Page zoom and select a new default zoom level.
Note: If this does not work it could be because your computer settings are managed by someone else (an IT department or administrator for example). If so, you will need to contact them to access these settings or for help.