Terminology:
‘Alt’ refers to the ‘Option’ key ( ⌥ )
If you have enabled ‘Use F1, F2, etc. keys as standard function keys’ under ‘Keyboard’ settings in ‘System Preferences’ then omit the ‘Fn’ key from the keyboard shortcuts shown in this article.
- Open the ‘Apple Menu’ by clicking on the Apple icon (
 ) in the Menu Bar, or press ‘Fn’ + ‘Ctrl’ + ‘F2’ to highlight the Apple icon and press ‘Enter’.
 - Click to select ‘System Preferences…’ as shown in Fig 1 or press the down arrow key to highlight it and then press ‘Enter’.

Fig 1 - Click on the ‘Accessibility’ icon or press ‘Tab’ repeatedly (you might need to press ‘Fn’ + ‘Ctrl’ + ‘F7’ first) to cycle through the icons until the ‘Accessibility’ icon is highlighted with a blue border as shown in Fig 2 and then press the ‘ Spacebar’.
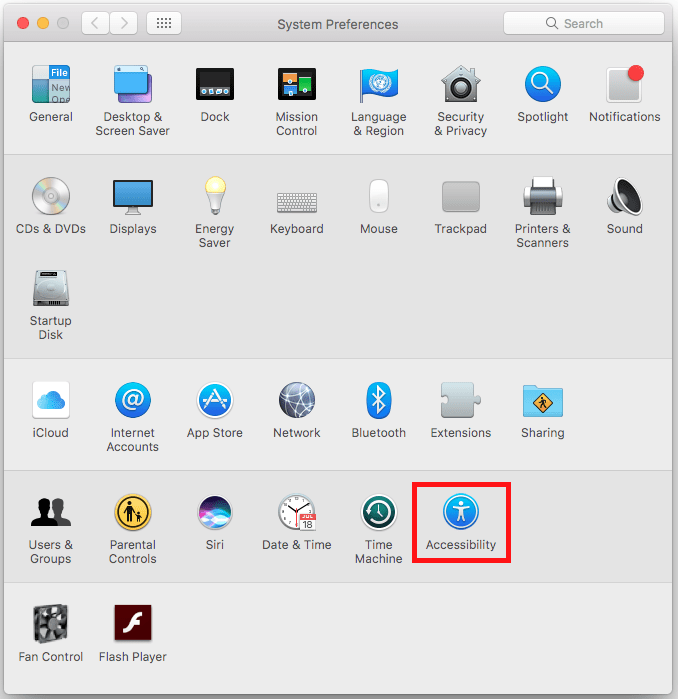
Fig 2 - In the left-hand column, click on the ‘Zoom’ item under the ‘Vision’ area or press ‘Tab’ to highlight one of the options for example ‘Display’ and then press the up or down arrow key to select the ‘Zoom’ item (highlighted in blue), see Fig 3.
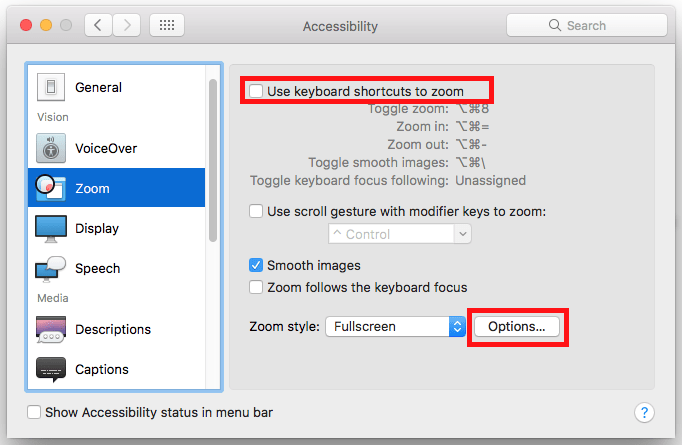
Fig 3 - To enable the use of keyboard shortcuts to activate ‘Zoom’ click the ‘Use keyboard shortcuts to zoom’ checkbox or press the ‘Tab’ key until the checkbox is highlighted and the press the ‘Spacebar’, see Fig 3 above.
Note: There are two ‘Zoom’ style options:
- ‘Fullscreen’ (the default) where the entire screen becomes magnified.
- ‘Picture-in-picture’ where only a small section of the screen around the mouse pointer becomes magnified.
You can customise the settings for both ‘Zoom’ styles.
To change the magnification options for ‘Fullscreen Zoom’:
- Click the ‘Options…’ button or press ‘Tab’ until ‘Options…’ is highlighted and then press the ‘Spacebar’, see Fig 3 above.
- Click on the ‘Maximum Zoom:’ slider to increase or decrease the maximum magnification level or press ‘Tab’ (you might need to press ‘Fn’ + ‘Ctrl’ + ‘F7′ first) to highlight the ‘slider’ and use the left and right arrow keys to increase or decrease the maximum magnification level, see Fig 4 below.
- Click on the ‘Minimum Zoom:’ gauge bar to increase or decrease the minimum magnification level or press ‘Tab’ (you might need to press ‘Fn’ +’Ctrl’ + ‘F7′ first) to highlight the ‘slider’ and use the left and right arrow keys to increase or decrease the minimum magnification level, see Fig 4.
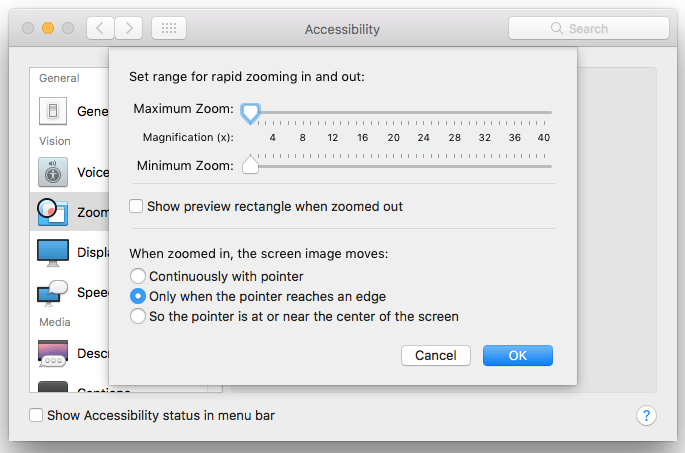
Fig 4 - When you are happy with your zoom settings click on the ‘OK’ button or press ‘Tab’ until it is selected and then press ‘Enter’.
If you would prefer to use the ‘Picture-in-picture’ zoom style:
- Click on the drop-down menu next to ‘Zoom Style’ and select ‘Picture in Picture’ or press ‘Tab’ until the drop-down menu is highlighted, press ‘Spacebar’ to activate, use the arrow keys to highlight ‘Picture in-Picture’ then press ‘Enter’, see Fig 5.
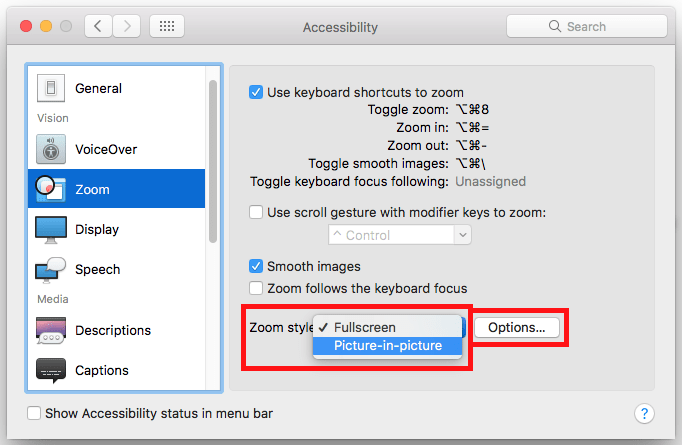
Fig 5 - To change the magnification settings for ‘Picture-in-picture’, click on the ‘Options…’ button or press ‘Tab’ until ‘Options…’ is highlighted and then press the ‘Spacebar’, see Fig 5.
- Click on the ‘Magnification (x):’ slider to increase or decrease the Magnification level or press ‘Tab’ (you might need to press ‘Fn’ + ‘Ctrl’ + ‘ F7′ first) to highlight the ‘slider’ and use the left and right arrow keys to increase or decrease the maximum magnification level, see Fig 6.
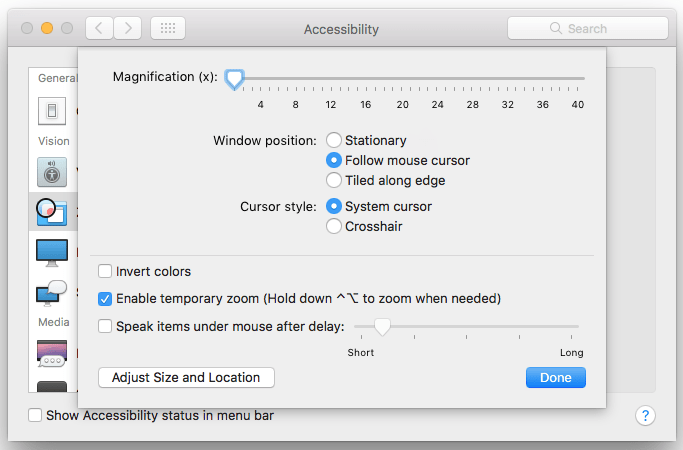
Fig 6 - When you are happy with your zoom settings click on the ‘OK’ button or press ‘Tab’ until it is selected and then press ‘Enter’.
- Finally click the ‘Close’ (red) button at the top of the ‘Accessibility’ window or press ‘Cmd’ + ‘ W ‘ to close the window.
Using Zoom:
- To turn the ‘Zoom’ magnification feature on or off at any time, press ‘Alt’ + ‘Cmd’ + ‘8’
- To zoom in: Press ‘Alt’ + ‘Cmd’ + ‘=‘ (equals) to zoom in to the maximum level of magnification you set in ‘More Options…’.
- To zoom out: Press ‘Alt’ + ‘Cmd’ + ‘-‘ (minus).
- Move your mouse around the screen to view the magnified page.
Note: If this does not work it could be because your computer settings are managed by someone else (an IT department or administrator for example). If this is the case you will need to contact them to access these settings or for further help.
Need some more help?
Call our helpline 0300 180 0028 or email enquiries@abilitynet.org.uk
Need free IT Support at Home?
If you are older or disabled and need IT support at home, you can book a free home visit.