Once dictation is enabled you can also use ‘speech-to-text’ to dictate text anywhere you would normally enter it with a keyboard such as documents, searches and email. (see the article: macOS 10.12 Sierra – Dictating text on this website for more information).
Terminology:
‘Alt’ refers to the ‘Option’ key ( ⌥ )
If you have enabled ‘Use F1, F2, etc. keys as standard function keys’ under ‘Keyboard’ settings in ‘System Preferences’ then omit the ‘Fn’ key from the keyboard shortcuts shown in this article. Note however that you still use the ‘Fn’ (Function) key to activate dictation as shown in this article.
To enable dictation:
- Open the ‘Apple Menu’ by clicking on the Apple icon (
 ) in the Menu Bar, or press ‘Fn’ + ‘Ctrl’ + ‘F2’ to highlight the Apple icon and press ‘Enter‘.
 - Click to select ‘System Preferences…’ as shown in Fig 1 or press the down arrow key to highlight it and then press ‘Enter’.
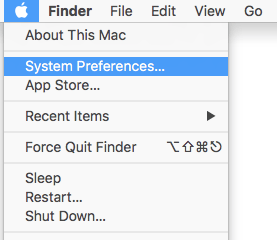
Fig 1 - Click on the ‘Keyboard’ icon or press ‘Tab’ repeatedly (you might need to press ‘Ctrl’ + ‘F7’ first) to cycle through the icons until the ‘Keyboard’ icon is highlighted with a blue border then press the ‘Spacebar’, see Fig 2.
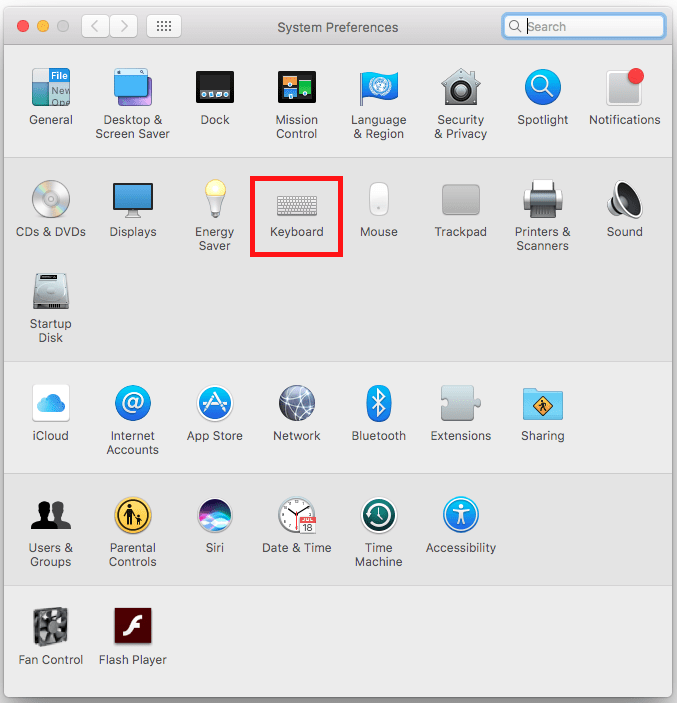
Fig 2 - Click on the ’Dictation’ tab or press ‘Tab’ until the ‘Keyboard’ tab is highlighted and press the ‘left arrow’ key to select the ‘Dictation’ tab, see Fig 3.
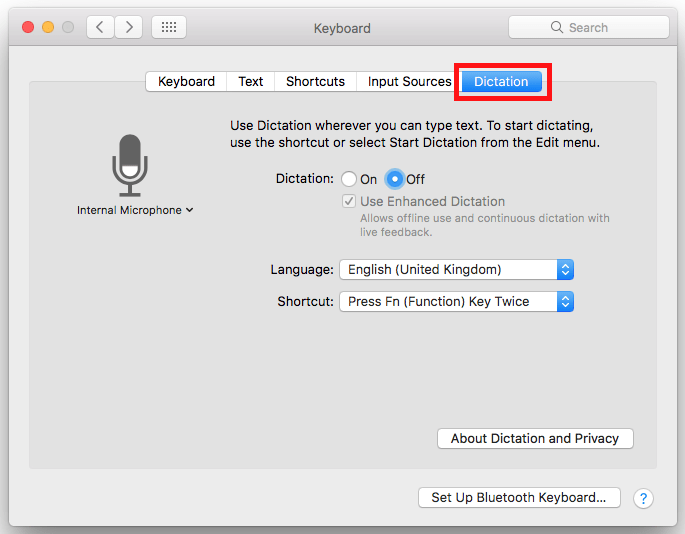
Fig 3 - Click the ‘On’ radio button next to ‘Dictation’ or press ‘Tab’ until the radio button is highlighted and press ‘Spacebar’, see Fig 4.
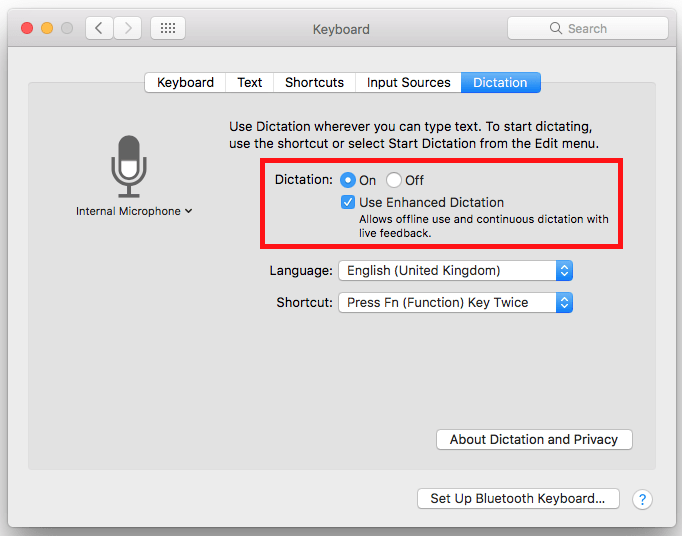
Fig 4 - To enable the full range of dictation commands, click the checkbox next to ‘Use Enhanced Dictation’ or press ‘Tab’ until the checkbox is highlighted and press ‘Spacebar’, see Fig 4.Note: The computer will now download the full dictation software from Apple so it will need to be connected to the internet. The download may take a while as it is a large file.
- The default keyboard shortcut to activate dictation is to press the ‘Fn’ (Function) key twice. If you would like to assign a different shortcut, click the drop-down menu next to ‘Shortcut’ or press ‘Tab’ until the drop-down menu is highlighted and press ‘Spacebar’ to activate it, see Fig 5.
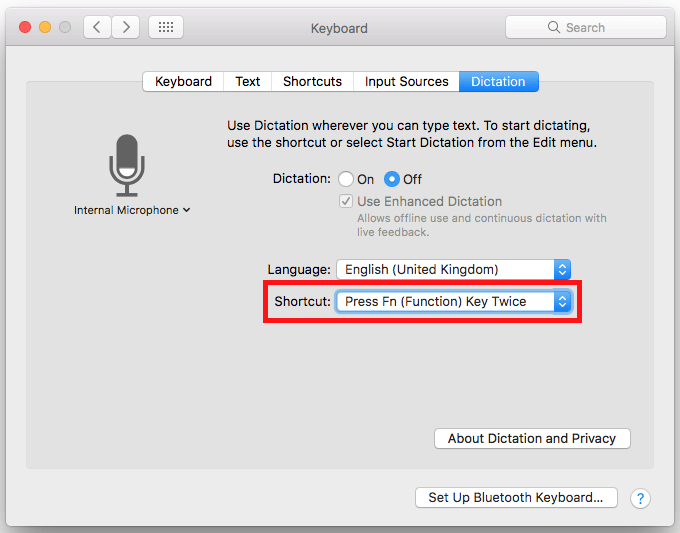
Fig 5 - Click on the shortcut you wish to use or press the arrows keys to select it and press ‘Enter’, see Fig 6
You can create your own shortcut by clicking ‘Customise…’ in the drop-down menu and typing your own shortcut using the keyboard.
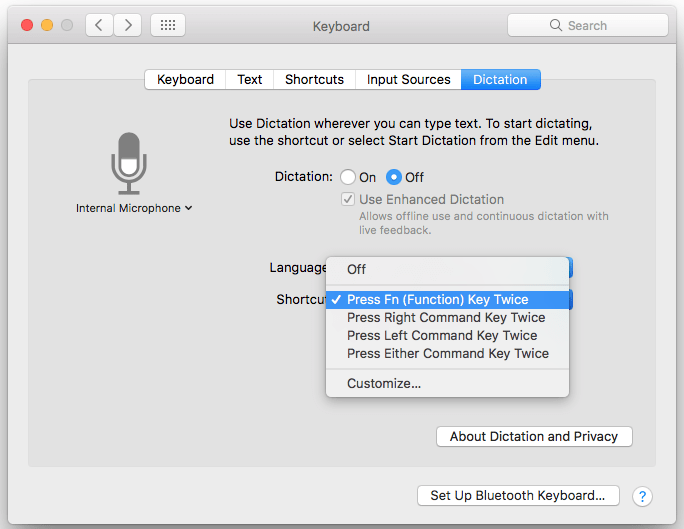
Fig 6 - When you are happy with your settings, click the ‘Back’ button at the top of the Keyboard preference pane (see Fig 7) to return to the main ‘System Preferences’ window.
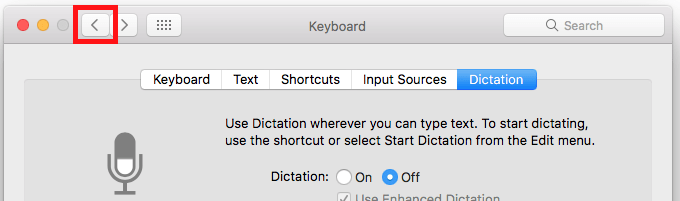
Fig 7
To see the ‘Dictation Commands’ that you can use:
- In the main ‘System Preferences’ window click on the ‘Accessibility’ icon or press ‘Tab’ repeatedly (you might need to press ‘Fn’ + ‘Ctrl’ + ‘F7’ first) to cycle through the icons until the ‘Accessibility’ icon is highlighted with a blue border as shown in Fig 8 (the red border is used here for clarity) and then press the ‘Spacebar’.
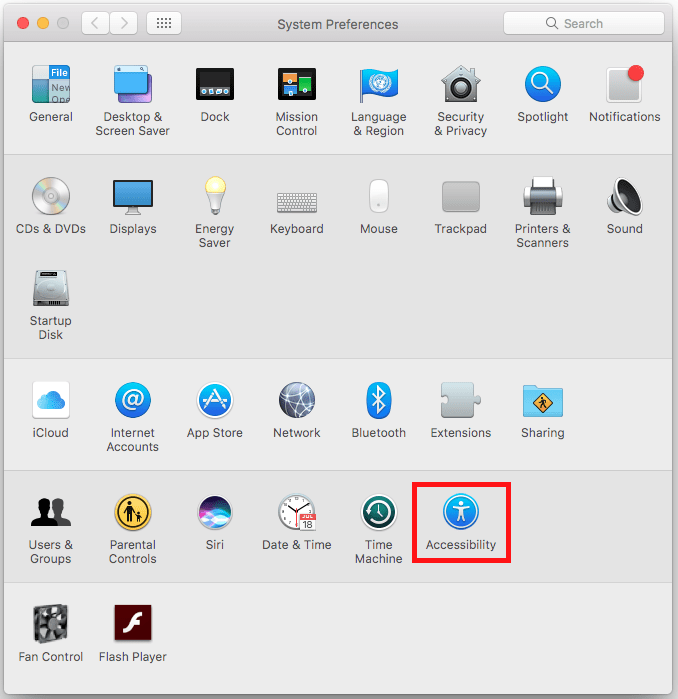
Fig 8 - In the left column, under the ‘Interacting’ section, click on the ‘Dictation’ item or press ‘Fn’ + ‘Ctrl’ + ‘F7’ (you may need to press it twice) to highlight one of the options and use the up and down arrow keys to select the ‘Dictation’ item, see Fig 9.

Fig 9 - Click on the ‘Dictation Commands…’ button or press ‘Tab’ to highlight it and press ‘Spacebar’, see Fig 10.
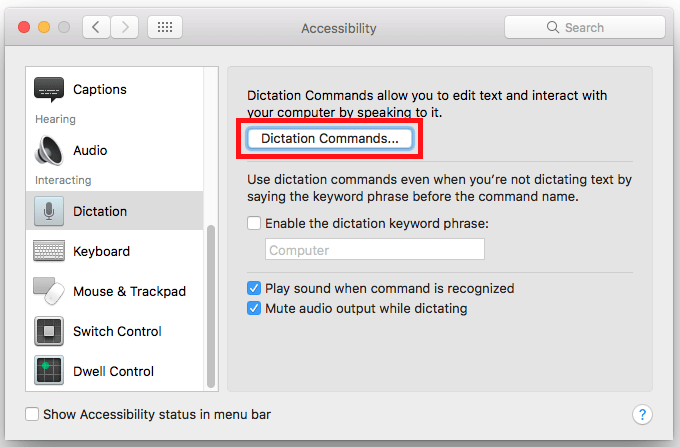
Fig 10 - Scroll the list in the left-hand column to see the dictation commands that are available to you. You can turn any of the commands on or off by clicking the checkbox next to a command, see Fig 11.

Fig 11 - To see all the phrases that can be spoken to trigger a particular command click on a command in the left-hand column or press ‘Tab’ to highlight the list and use the arrow keys to select a command.You will see all the phrases that you can speak to trigger that command in the right-hand column, see Fig 12. In Fig 12 you can see all the phrases that you can speak to trigger the command ‘Go to beginning’.
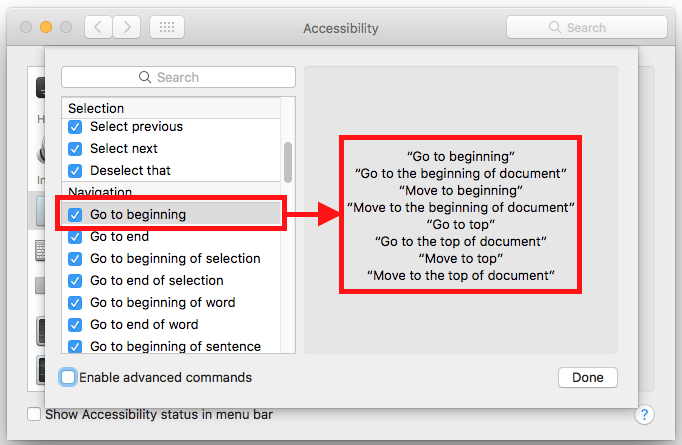
Fig 12 - To turn on additional commands click the checkbox next to ‘Enable advanced commands’ or press ‘Tab’ until the checkbox is highlighted and press ‘Spacebar’, see Fig 13.
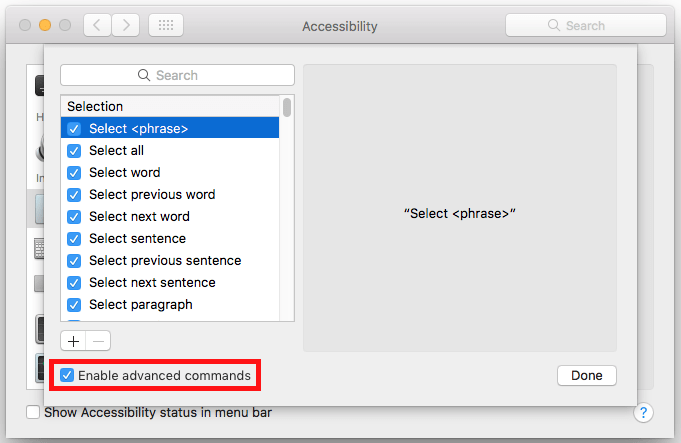
Fig 13 - With ‘Advanced commands’ enabled (see step 15 above) you now also have the ability to create your own commands.
- To create a new command, click on the ‘+’ (plus) button that appears once ‘Advanced commands is enabled’ or press ‘Tab’ until the ‘+’ (plus) button is highlighted and press ‘Spacebar’, see Fig 14.
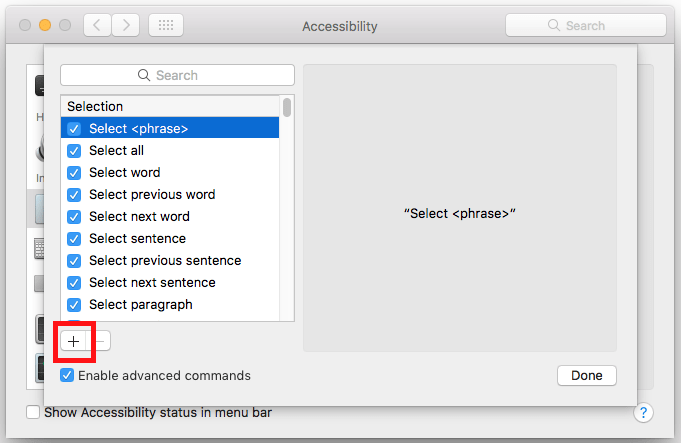
Fig 14 - Configure the following options for your custom command (see Fig 15):
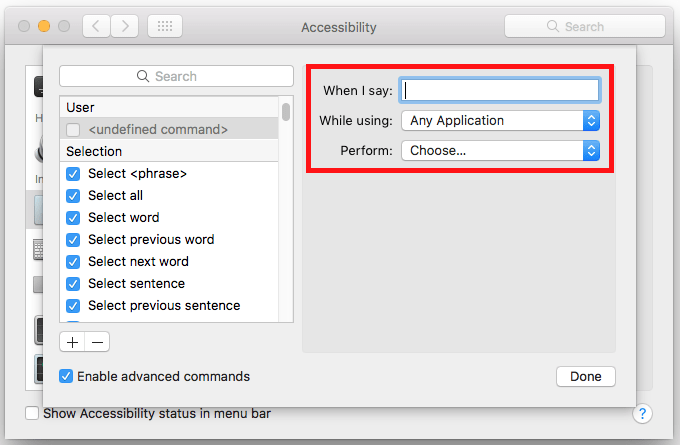
Fig 15- ‘When I say’: Type the phrase that you want to speak to trigger the command
- ‘While using’: Use the default, ‘Any Application’, or choose a specific application from the drop-down menu.
- ‘Perform’: Choose an action, from the drop-down list, to perform when the custom command is spoken, see Fig 16.
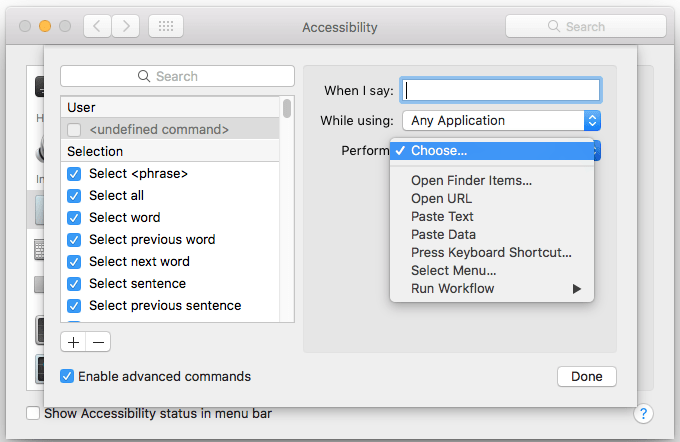
Fig 16
- When you are happy with your custom command settings click ‘Done’ or press ‘Tab’ until the ‘Done’ button is highlighted and press ‘Enter’.
As well as pressing the ‘Fn’ (Function) key twice to activate dictation you can also set up a spoken command to activate dictation. Your computer will constantly listen for this phrase and activate dictation whenever it hears you say it.
- Click the checkbox next to ‘Enable the dictation keyword phrase’ or press ‘Tab’ until the checkbox is highlighted and press ‘Spacebar’, see Fig 17.
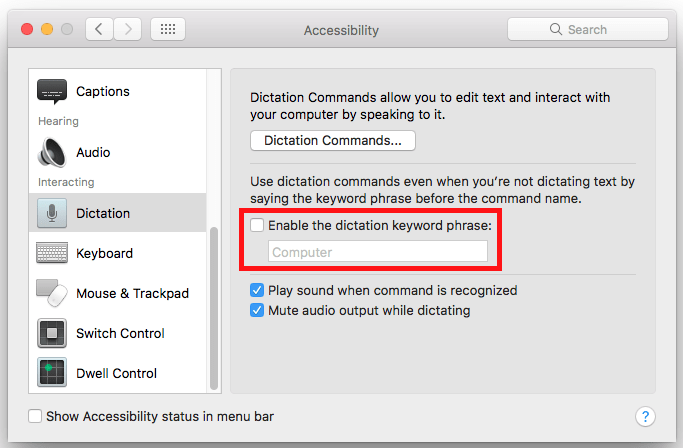
Fig 17 - Type the phrase that you would like to speak to turn on dictation - the default is ‘Computer’. The example we have used (Fig 18) is ‘activate dictation’ but you can choose any phrase you want.
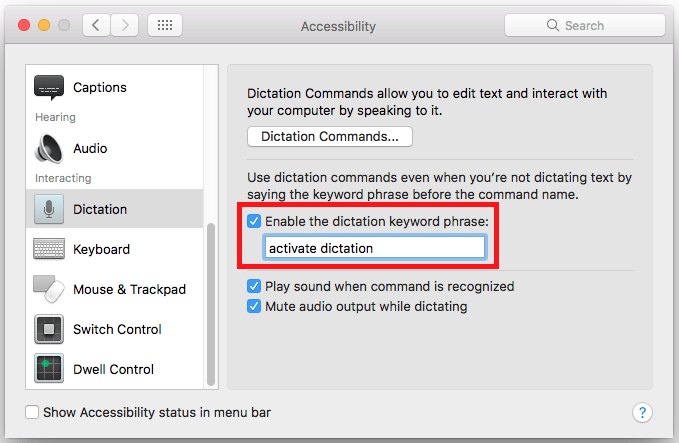
Fig 18 - When you are happy with your settings click the ‘Close‘ (red) button at the top of the window or press ‘Cmd‘ + ‘W‘ to close the window.
Using Dictation Commands:
- To use ‘Dictation Commands’, press the ‘Fn’ (Function) key twice and speak the command you wish to use.
When ‘Dictation Commands’ is active a microphone icon will appear on the screen to show that your computer is listening, see Fig 19, below. You can click and drag the icon to position it anywhere on the screen.
- To turn off ‘Dictation commands’ press the ‘Fn’ key again or click the ‘Done’ button underneath the microphone icon.
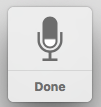
Fig 19
Alternatively, if you have enabled the ‘Dictation keyword phrase’ (see step 19 above). You can speak your keyword phrase followed by the command you wish to use. Using our example in step 20 you could say: “activate dictation” + “save document” to save the current document you are working on.
Note: When using the ‘Dictation keyword phrase’ the microphone icon does not appear on the screen.
- To open a window showing all available commands (see Fig 20, below), activate ‘Dictation Commands’ using one of the above methods and say “Show Commands”.
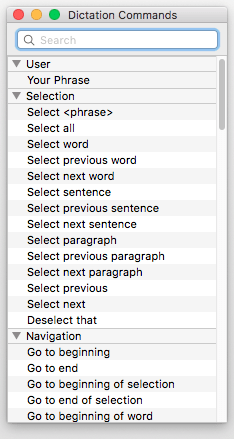
Fig 20
Note: If this does not work it could be because your computer settings are managed by someone else (an IT department or administrator for example). If this is the case you will need to contact them to access these settings or for further help.
More information:
Apple’s “Dictation Commands’ support page: https://support.apple.com/en-gb/HT203085
Apple’s “Dictation – speech-to-text’ support page: https://support.apple.com/en-gb/HT202584
Need some more help?
Call our helpline 0300 180 0028 or email enquiries@abilitynet.org.uk
Need free IT Support at Home?
If you are older or disabled and need IT support at home, you can book a free home visit.