In this article
Using Zoom with keyboard shortcuts
Using Zoom with scroll gesture and modifier key
Zoom settings
Zoom style (Full screen or Picture-in-picture)
Using Zoom with keyboard shortcuts
- To turn the Zoom magnification feature on or off at any time, press Alt + Cmd + 8
- To zoom in: Press Alt + Cmd + = (equals)
- To zoom out: Press Alt + Cmd’+ - (hyphen).
- Move the mouse pointer around the screen to view the magnified page.
Using Zoom with scroll gesture and modifier key
- To zoom in: Press the modifier key (by default this is the Control key) and drag two fingers upwards on your keyboard or magic mouse (if using a conventional mouse, you can use the scroll wheel).
- To zoom out: Press the modifier key (by default this is the Control key) and drag two fingers downwards on your keyboard or or magic mouse (if using a conventional mouse, you can use the scroll wheel).
- Move the mouse pointer around the screen to view the magnified page.
Zoom settings
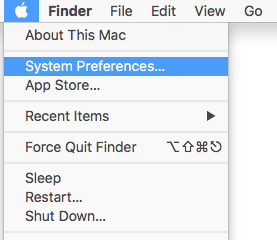
- Select the Apple icon
 in the top left corner of the screen.
 - Select System Preferences from the menu.
- In the System Preferences window, select Accessibility.
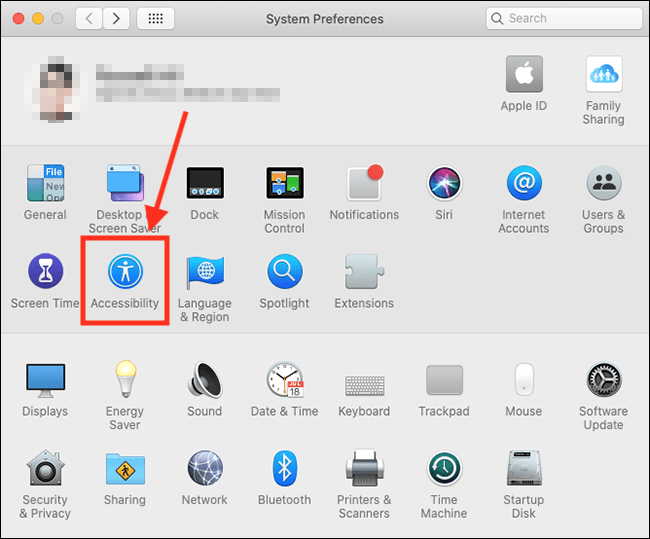
- On the Accessibility settings screen, select Zoom in the left column.

- In the Zoom settings pane you can enable the following options:

Use keyboard shortcuts to zoom
If you enable Use keyboard shortcuts to zoom, you can use the following shortcuts:
- Toggle Zoom: Alt (⌥) + Command (⌘) + 8
- Zoom In: Alt (⌥) + ‘Command (⌘) + = (equals)
- Zoom Out: Alt (⌥) + Command (⌘) + - (hyphen)
- Toggle smooth images (see below): Alt (⌥) + Command (⌘) + \ (backslash)
Use scroll gesture with modifier keys to zoom
This enables you to activate zoom by holding down a modifier key (by default this is the Control ⌃ key) and using a two-finger scroll gesture (or mouse wheel) to zoom in and out. If you would like to change the modifier key, select the drop-down menu and choose from:
- Control ⌃
- Option (⌥)
- Command (⌘)

Smooth images
When the screen is zoomed in, text and images can become pixelated. Tick the checkbox for Smooth images to rectify this.
Zoom follows keyboard focus
If you ordinarily use the keyboard to navigate the screen and activate menus you may find this option useful – with it enabled, the screen automatically moves so that the area where the keyboard is currently focused is always visible and zoomed in.
Speak items under the pointer
When enabled, the computer will read aloud the item that is currently under the pointer. You can adjust the delay for how long the pointer needs to be over an item after which the computer starts talking.

By default, Speak items under the point is only active when the screen is zoomed in. If you would prefer to use this option even when the screen is zoomed out, select the drop-down menu for Speak items under the pointer and choose Always.

Zoom style
- There are two Zoom styles you can choose from:
- Full Screen Zoom’(default) - the entire screen becomes magnified.
- Picture-in-picture Zoom - only a small section of the screen surrounding the mouse pointer becomes magnified.

- To open the zoom style settings, select the Apple icon in the top left corner of the screen.
- Select System Preferences from the menu.
- In the System Preferences window, select Accessibility.
- On the Accessibility settings screen, select Zoom in the left column.
- To change the zoom style, choose from the drop-down menu for Zoom Style in the right column.

You can customise the settings for both Zoom styles, see the steps below
Full Screen Zoom settings
To change the settings for Full Screen zoom:
- Make sure the zoom style is set to Full screen.
- Select the Options button next to Zoom style.

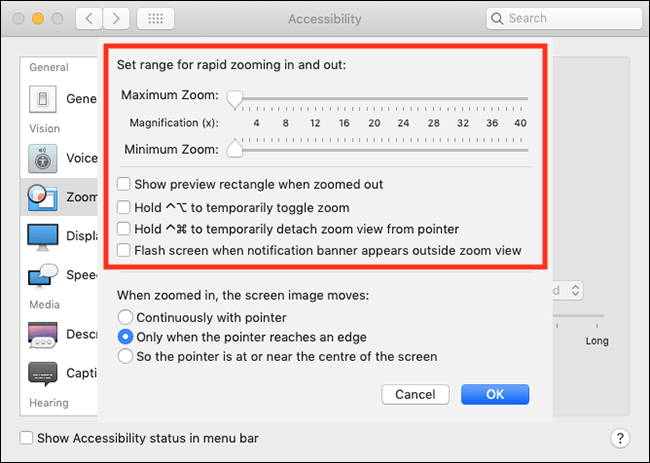
- You can enable several options for Full Screen zoom on this screen.
- Maximum Zoom - adjust the slider to increase or decrease the maximum magnification level.
- Minimum Zoom - adjust the slider to increase or decrease the minimum magnification level.
- Show preview rectangle when zoomed out – a black outline will appear on the screen indicating the area that will be magnified when Zoom is activated.
- Hold ⌃ (Control) +⌥ (Alt) to temporarily toggle zoom – when zoomed in you can temporarily view the screen at normal size whilst holding this shortcut.
- Hold ⌃ (Control) + ⌘ (Command) to temporarily detach zoom from pointer – If you find it difficult to see the content underneath the pointer when you are zoomed in, use this shortcut to temporarily hide the pointer whilst moving around the screen.
- Flash screen when notification banner appears outside zoom view – the entire screen will flash once when a notification arrives.
- You can also choose how the zoomed screen image moves in relation to the pointer. Choose from:
- Continuously with pointer – the zoomed screen moves as you move the pointer.
- Only when the pointer reaches an edge – the zoomed image remains stationary until the pointer reaches an edge of the screen. Once the pointer is touching an edge, keep moving your mouse or your finger on the trackpad and the screen will reposition.
- So the pointer is at or near the centre of the screen – When you move your mouse or your finger on the trackpad the screen will move but the pointer will remain as centred on the screen as possible.
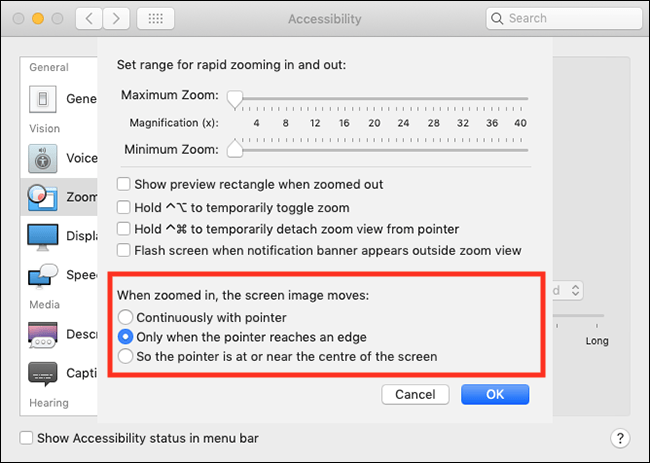
- When you are happy with settings select OK.
Picture-in-picture Zoom settings
To change the settings for Picture-in-picture zoom:
- Make sure the zoom style is set to Full screen.
- Select the Options button next to Zoom style.

- You can enable several options for Picture-in-picture zoom on this screen:
Window position
- Stationary – the screen image moves within the stationary Zoom window.
- Follow mouse cursor – The Zoom window moves in relation to the pointer.
- Tiled along edge – One edge of the screen becomes the Zoom window. You can resize this window and choose which edge it should appear on under the Adjust Size and Location settings (see section below).

Cursor Style
- System cursor – show the default pointer and cursor in the Zoom window.
- Crosshair – show an enlarge crosshair in place of the pointer.

- Invert colours – the colours of the image inside the Zoom window will be inverted to make it easier to distinguish between the zoomed and non-zoomed sections of the screen.
- Hold ⌃ (Control) +⌥ (Alt) to temporarily toggle zoom – when zoomed in you can temporarily view the screen at normal size whilst holding this shortcut.
- Hold ⌃ (Control) + ⌘ (Command) to temporarily detach zoom from pointer – If you find it difficult to see the content underneath the pointer when you are zoomed in, use this shortcut to temporarily hide the pointer whilst moving around the screen.

Adjust Size and Location
If you would like to reposition or resize the Picture-in-picture window.
- Select the Adjust Size and Location button.

- A preview of the Picture-in-picture window will appear. You can drag any edge or corner to resize the window. Click and drag within the window to reposition it on the screen.

- When happy with the size and position of the window, select OK.
- When happy with your Picture-in-picture zoom settings, select Done.
When you are finished, click the Close (red) button in the top left corner of the System Preferences window.
Note: If this does not work it could be because someone else manages your computer settings (an IT department or administrator). If this is the case, you will need to contact them to access these settings or for further help.
Need some more help?
Call our helpline 0300 180 0028 or email enquiries@abilitynet.org.uk
Need free IT Support at Home?
If you are older or disabled and need IT support at home, you can book a free home visit.