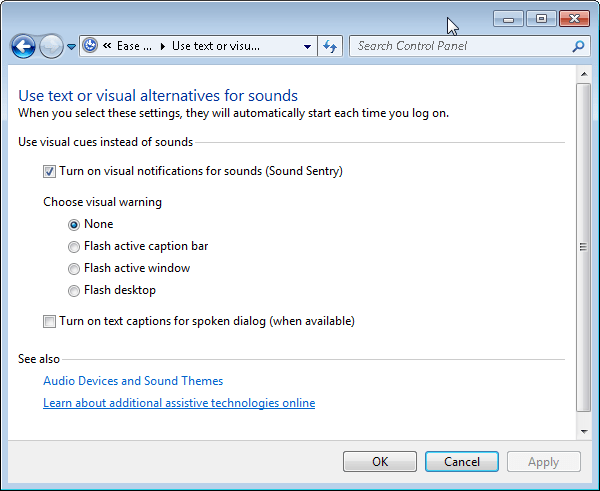
To enable Sound Sentry, work through the following steps.
Step 1
- Ease of Access Center has replaced Accessibility Options in the ‘Control Panel’.
- Open ‘Ease of Access Center’ press ‘Windows’ logo key +‘U’ or click Start button ‘Control Panel’ + ‘Ease of Access’ + ‘Ease of Access Center’.
Step 2
- Under ‘Explore all settings’, ‘Tab’ to and press ‘Enter’ or click to select Use text or visual alternatives for sounds'. Fig 1.

Fig 1
- This will have opened the "Use text or visual alternatives for sounds" screen, fig 2

Fig 2
- ‘Tab’ to and press ‘Enter’ or click to select ‘Turn on visual notifications for sounds (Sound Sentry)’
Once you have enabled Sound Sentry, you can choose from the type of visual alert you would like. Simply ‘Tab’ to and press ‘Enter’ or click to select the option of your choice from the available list. You can easily come back here to change your selection if you would like to try a different method.
To save your settings:
- ‘Tab’ to and press ‘Enter’ or click to select ‘OK’
This will enable the Sound Sentry option. When there are sound alerts on your computer, you will also get a visual alert such as the screen flashing, depending on what you have chosen on this page.
Need some more help?
Call our helpline 0300 180 0028 or email enquiries@abilitynet.org.uk
Need free IT Support at Home?
If you are older or disabled and need IT support at home, you can book a free home visit.