Call our helpline
0300 180 0028You will hear descriptions of every item on the screen, including information such as battery level, Wi-Fi and cellular network signal levels, the network provider, and time of day. ‘VoiceOver’ lets you know when the display changes to landscape or portrait orientation, and when the screen is locked or unlocked.
How to enable VoiceOver
- Open the ‘Accessibility Settings’: Settings > General > Accessibility. (See the article Open Accessibility Preferences on this website for more information.)
- Under the ‘Vision’ section, tap on VoiceOver. Fig 1.
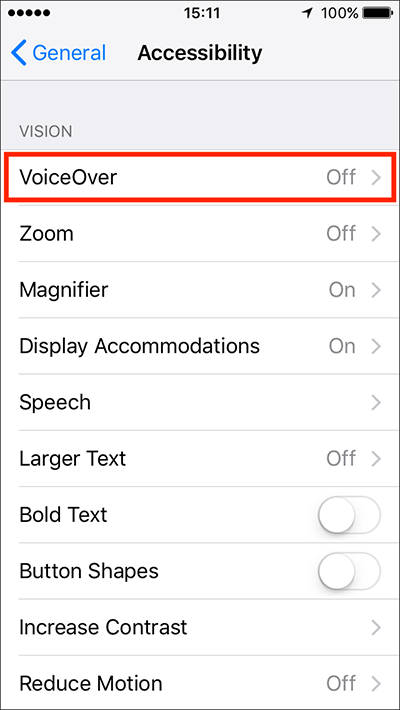
Fig 1 - Now turn on tap the toggle switch for VoiceOver. Fig 2.

Fig 2
Note: The first time you enable VoiceOver you will receive an alert to say that the gestures you regularly use on your iPhone will change. Tap on ‘OK’ to activate VoiceOver. If you want to cancel at this point simply press your device’s ‘Home’ button.
The gesture changes mean that from now on when you single-tap on a label or button VoiceOver will tell you what it is rather than activating it. You will then need to double-tap on the selected item in order to activate it.
VoiceOver Practice
When VoiceOver is enabled you will see an option for ‘VoiceOver Practice’ (Fig 3). ‘VoiceOver Practice’ is not a guided practice session but simply a screen where you can try out different gestures.
To begin a practice session, tap twice on ‘VoiceOver Practice’. Fig 3.
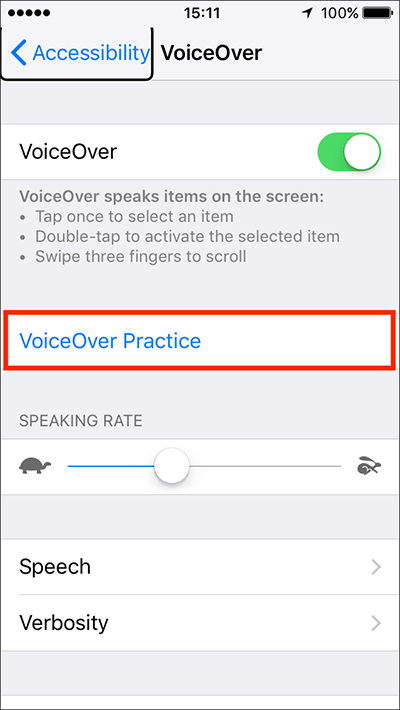
Fig 3
Tap in the middle of the screen to activate the practice area (Fig 4). Try tapping and swiping with different numbers of fingers to hear spoken feedback of the action that will be carried out when each gesture is performed. See ‘VoiceOver Gestures’ below for a list of common gestures).
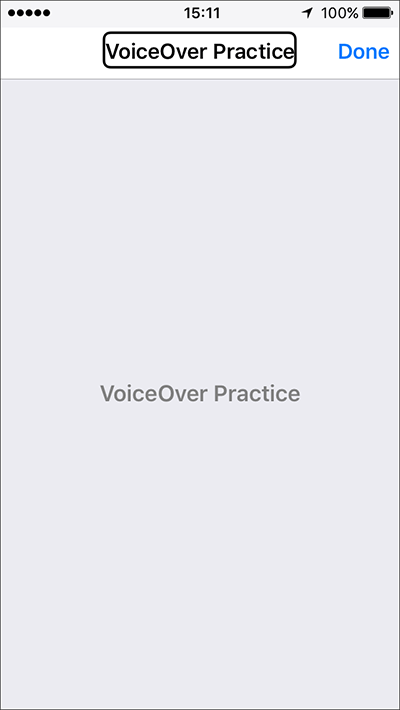
Fig 4
To end a practice session, tap twice on ‘Done’ in the top right of the (Fig 4) to return to the main VoiceOver settings screen.
VoiceOver Gestures
Using various finger gestures with VoiceOver you can select and operate functions on your device.
- One-finger single tap: Select an item.
- One-finger swipe: Drag a finger across the screen. VoiceOver will read aloud each item as you touch them. Lift your finger to select an item.
- One-finger double tap: activates a selected item.
- Two-finger double tap: Starts and stops the current action
- Two-finger triple tap: Item chooser.
- Two-finger flick down: Read a page starting at the selected item.
- Two-finger flick up: Read a page starting at the top.
- Three-finger single tap: Speak page number or rows being displayed.
- Three-finger double-tap: Toggle speech on and off.
- Three-finger triple tap: Toggle screen curtain on and off.
- Three-finger quadruple tap: Copy last spoken test to the clipboard.
- Three-finger flick down: Scroll up one page.
- Three-finger flick up: Scroll down one page.
- Three-finger flick right: Scroll left one page.
- Three-finger flick left: Scroll right one page.
- Four-finger single tap near top of screen: Move to the first element.
- Four-finger single tap near bottom of screen: Move to the last element.
- Four-finger double tap: Toggle VoiceOver help.
- Four-finger swipe right: Switch to the next app.
- Four-finger swipe left: Switch to the previous app
For a full list of gestures visit: http://help.apple.com/iphone/10/#/iph3e2e2281
VoiceOver Settings
Speaking Rate
The speaking rate is adjustable so you can set it to a speed that best suits you.
With VoiceOver enabled, tap the slider bar twice to select it (Fig 5).
You can alter the speech rate by sliding your finger left and right on the bar, you will hear the percentage read out as you move the selector. You can also adjust speech by swiping the screen with one finger when prompted. Swipe down to decrease the speaking rate, and up to increase it. With each gesture you will hear a sample of how the speech rate has changed.
Alternatively, tap on the ‘Tortoise’ icon to decrease the speaking rate and tap on the ‘Hare’ icon to increase the speaking rate.
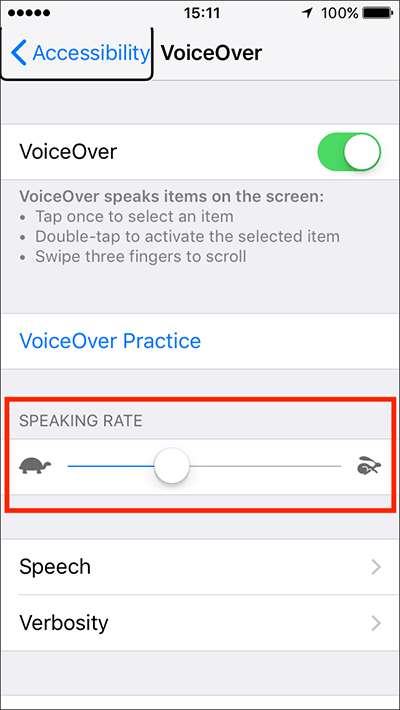
Fig 5
Speech
You can change the voice and language used by VoiceOver and if you find VoiceOver mispronounces certain words or names you can also add your own pronunciations to be used instead.
To change Speech settings, double tap ‘Speech’ (single tap if you have not activated VoiceOver at this point, but these instructions assume that you have). Fig 6.
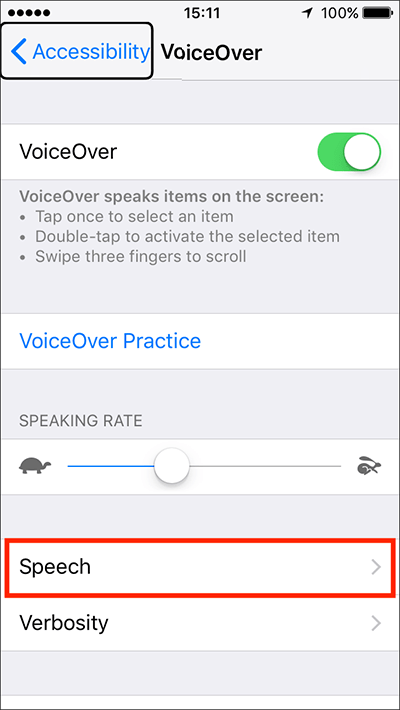
Fig 6
Voice
- To change the voice used by VoiceOver, double tap on ‘Voice’, see the first panel of Fig 7.
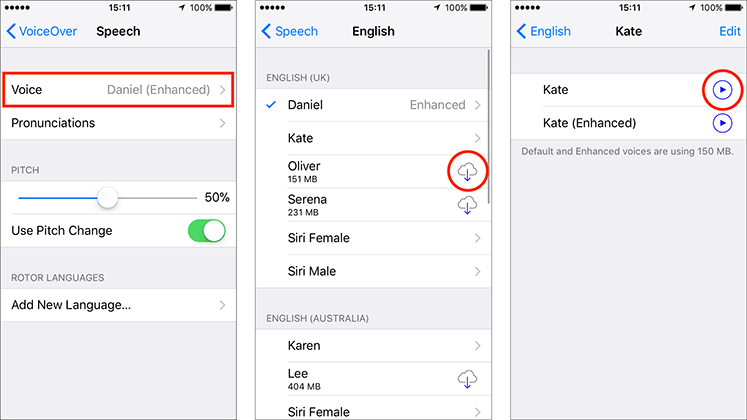
Fig 7 - Double tap on the voice you would like to use (See the second panel of Fig 7).Note: Some voices need to be download before they can be used. If that is the case, tap the download icon next to a voice to download and install it (see circled in the second panel of Fig 7).
- You can choose between the standard voice or the enhanced, more life-like, voice. See panel three of Fig 7.You can hear a sample of any voice that has been installed by double-tapping the ‘Play’ button (see circled in panel three of Fig 7).Note: The enhanced voices may need to be downloaded separately as they take up more storage space. If you are using a mobile data connection downloading a voice pack will use up some of your data allowance. We recommend being connected to Wi-Fi when you download voices.
Pronunciation
- To add your own pronunciations, double tap on ‘Pronunciations’. Fig 8.
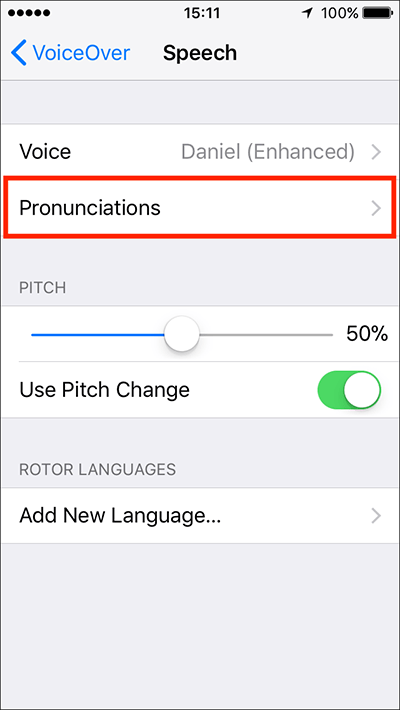
Fig 8 - Double tap the ‘+’ (plus) button in the top right corner. Fig 9.
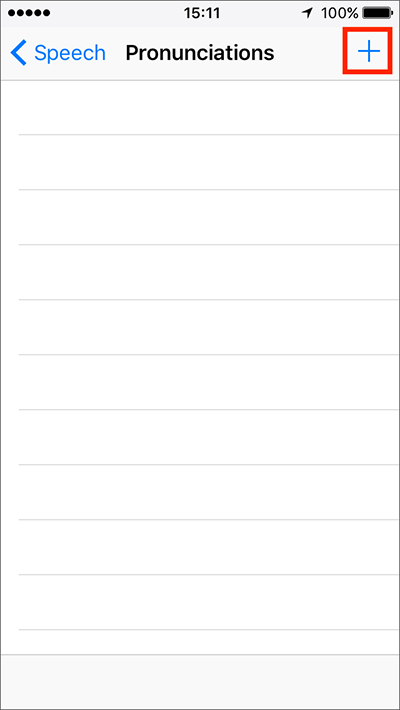
Fig 9 - In the ‘Phrase’ box, type the word or phrase that you wish to change the pronunciation for, see the first panel of Fig 10.
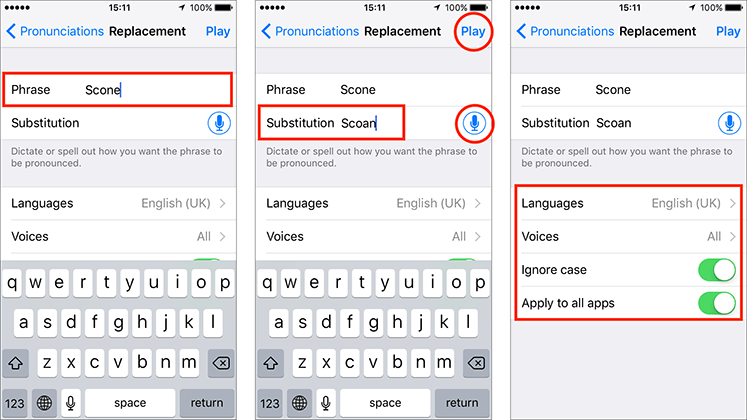
Fig 10 - In the ‘Substitution’ box, enter the pronunciation you would like to substitute for the original phrase by either typing a phonetic pronunciation (see panel two of Fig 10) or tapping the microphone icon and dictating the pronunciation (circled in the second panel of Fig 10).
- You can hear how your new pronunciation will sound by double-tapping the ‘Play’ button in the top right corner (circled in the second panel of Fig 10).
- When happy with the substitute pronunciation you can choose which languages and voices to apply. You can also choose to ignore the case of words and to whether to apply it to all apps or just selected apps. Double-tap on the options highlighted in the third panel of Fig 10 to change these settings.
Pitch
To change the pitch of the voice, double tap the slider bar once to select it (Fig 11). You can alter the pitch by sliding your finger left and right on the bar. Alternatively, you can alter pitch by swiping the screen with one finger when prompted. Swipe down to decrease the pitch, and up to increase it. You will hear the percentage read out as you move the selector and will hear a sample of how the voice sounds as the pitch setting changes.
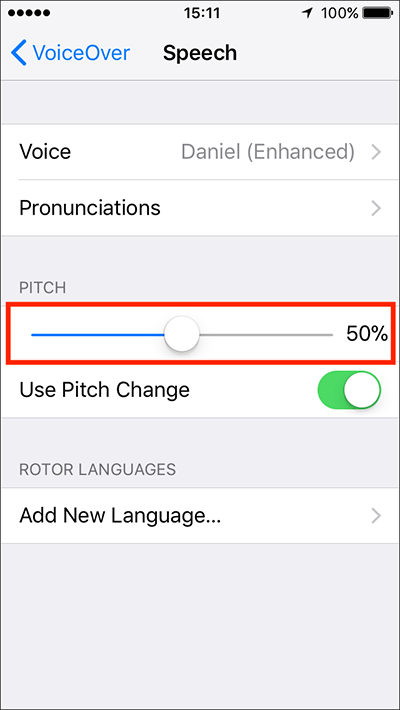
Fig 11
Use Pitch Change
VoiceOver uses ‘Pitch Change’ to make the difference between how it announces a character that has been selected on the keyboard from how it announces the same character when it is inserted into a document. A selected character is announced in a low pitch, an inserted character is announced in a high pitch.
‘Pitch Change’ is also used to indicate the first and last words of a grouping, such as items in a table or list - higher pitch for the first item, and lower pitch for the last. Note: The change is quite subtle.
To enable this option, double tap the toggle switch next to ‘Use Pitch Change’. Fig 12.
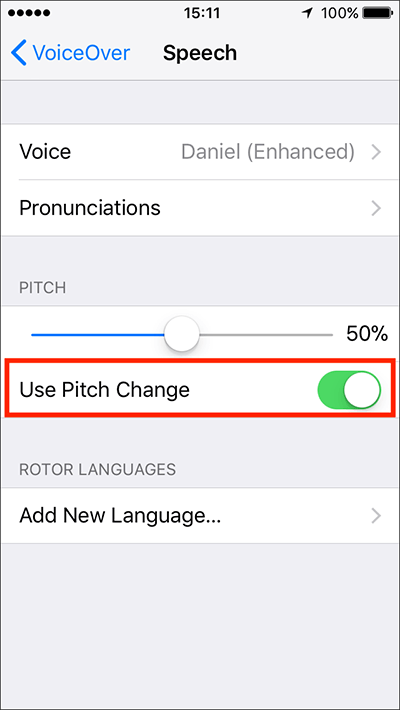
Fig 12
Rotor Languages
By default VoiceOver uses the language you chose when setting up your device. You can add additional languages that can be selected when you use the Rotor function (see The Rotor section below)
- Double tap ‘Add New Language…’ (single tap if you have not activated VoiceOver at this point, but these instructions assume that you have). Fig 13.
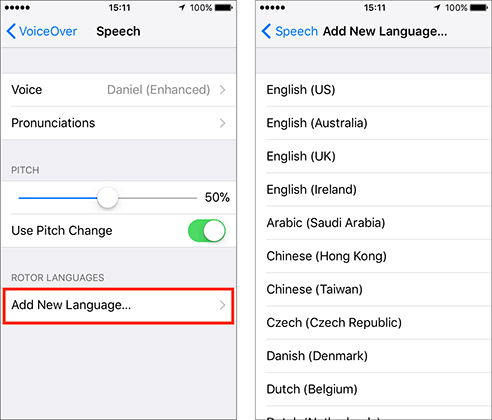
Fig 13 - Double tap to select the language you wish to add, see the second panel of Fig 13.
- The selected language will be added to ‘Rotor Languages’, see the first panel of Fig 14.
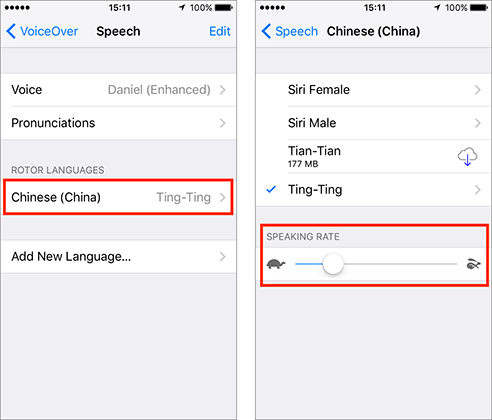
Fig 14 - If you wish to choose a different voice for this language, double tap on the language (Chinese in our example above) and choose from the list of voices, see the second panel of Fig 14.
- You can also change the ‘Speaking Rate’ for this language by double-tapping and dragging the circular handle on the slider bar left or right, see the second panel of Fig 14.
Verbosity
VoiceOver gives you a lot of information as you navigate a screen. You can customise the amount of spoken feedback you receive from ‘VoiceOver’.
- Double tap on ‘Verbosity’. (single tap if you have not activated VoiceOver at this point, but these instructions assume that you have). Fig 15.
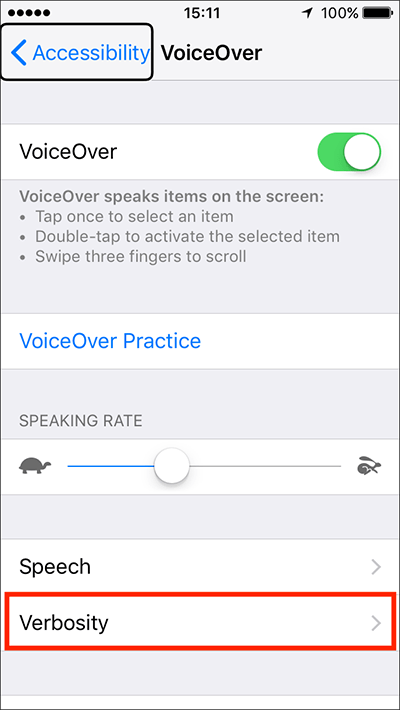
Fig 15 - You can change the following settings (Fig 16):
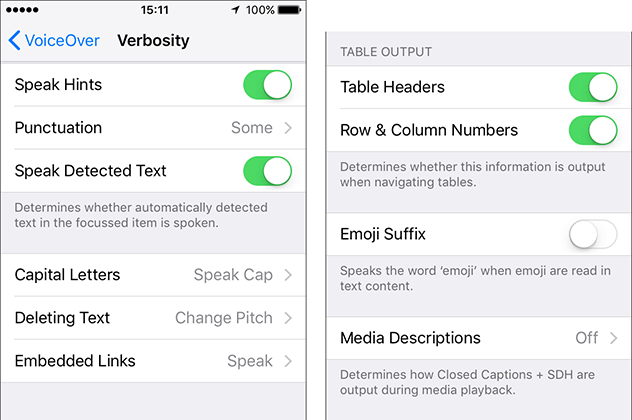
Fig 16- Speak Hints – by default you’ll receive hints such as “tap to select” and “double-tap to activate”. Double tap the toggle switch to disable.
- Punctuation – By default only some punctuation is spoken. Double tap to choose from: ‘All’, ‘Some’ or ‘
- Speak Detected Text – Determines whether automatically detected text in the focused item is spoken.
- Capital Letters – By default, VoiceOver will say “cap” and then the letter in order to highlight there is a capital letter. Double tap to choose from ‘Speak Cap’, ‘Play Sound’, ‘Change Pitch’ or ‘Do Nothing’.
- Deleting Text – By default the pitch will change when deleting text. Double tap to choose from ‘Speak’, ‘Play Sound’, ‘Change Pitch’ or ‘Do Nothing’.
- Embedded Links – By default embedded links are read aloud. Double tap to choose from ‘Speak Cap’, ‘Play Sound’, ‘Change Pitch’ or ‘Do Nothing’.
- Table Header / Row & Column Numbers – By default table information is read aloud. Double tap the toggle switch to turn off spoken feedback for this item.
- Emoji Suffix – VoiceOver can say “emoji” when emoji are read in text. Double tap the toggle switch to enable this feature.
- Media Descriptions – Determines how Closed Captions + SDH are output during media playback. Double tap to choose from ‘Off’, ‘Speech’, ‘Braille’ or ‘Speech and Braille’
Braille
You can use a refreshable braille display that uses Bluetooth wireless technology to read VoiceOver output in braille. In addition, braille displays with input keys and other controls can be used to control an iPhone when VoiceOver’ is turned on.
To connect a Braille device, double tap on ‘Braille’ (single tap if you have not activated VoiceOver at this point, but these instructions assume that you have). Fig 17.
Note: You will need to have Bluetooth enabled.
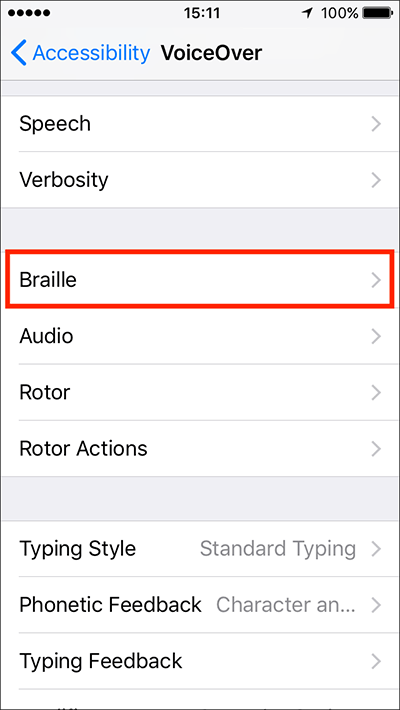
Fig 17
- ‘Uncontracted Eight-dot Braille’ is selected by default for ‘Braille Display Output’ but you can double tap to choose ‘Uncontracted Six-dot Braille’ or ‘Contracted Braille’. Fig 18.
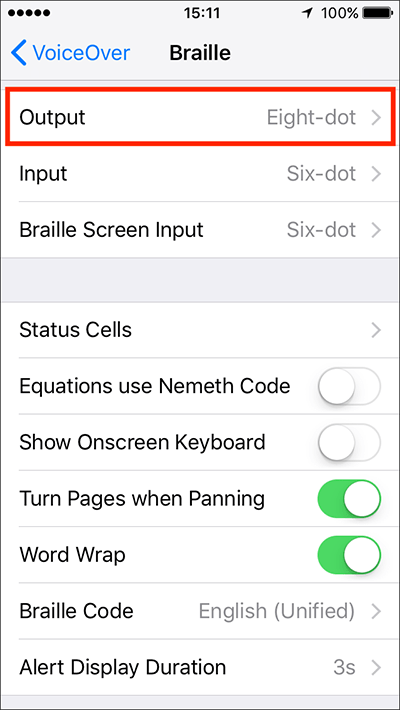
Fig 18 - ‘Turn Pages when Panning’ is turned on by default. This enables you to turn pages while panning or scrolling with the onscreen Braille keyboard present. Fig 19.
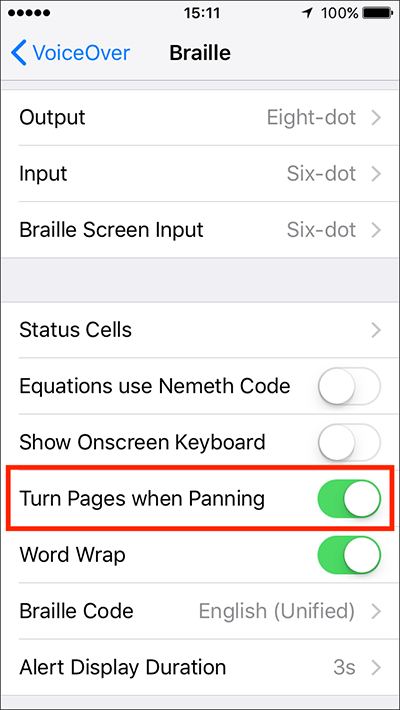
Fig 19
For more information on using ‘Braille’, see the Apple guide: http://help.apple.com/iphone/10/#/iph10366cc30
For a list of common ‘Braille’ commands you can use on your device, see the Apple guide: https://support.apple.com/en-gb/HT202132
For a list of supported devices, see: https://support.apple.com/en-gb/HT202514
Audio
In the audio settings you can enable/disable the follow options:
- Mute Sound Effects: Turn sound effects off or on.
- Audio Ducking: Reduce the volume of audio (music, etc.) while VoiceOver is talking.
- Auto-select Speaker in Call: During audio calls, switch to your device’s speaker when you are not holding the phone to your ear.
- Send to HDMI: Send audio to a device connected via HDMI (if the device is already connected you should reconnect it for this to take effect).
- By default, these options are all enabled. To change the settings, double tap on ‘Audio’ (single tap if you have not activated VoiceOver at this point, but these instructions assume that you have). Fig 20.
- On the next screen, double tap on the toggle switch next to each item to enable or disable them. See the second panel of Fig 20.
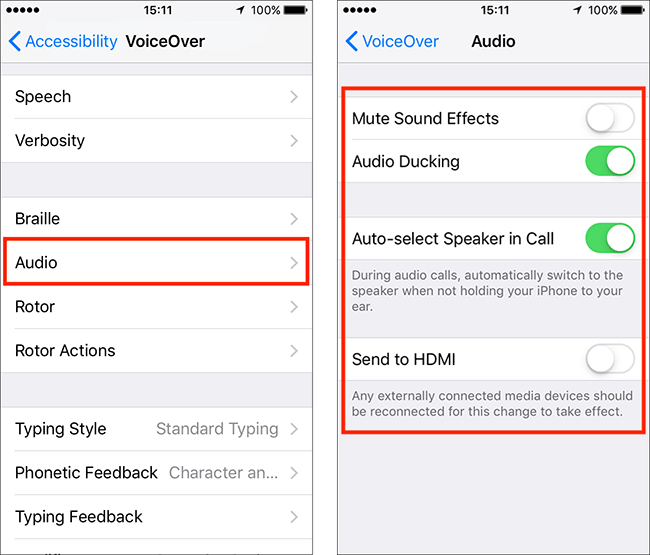
Fig 20
The Rotor
VoiceOver features a virtual controller called the ‘Rotor’. Fig 21.
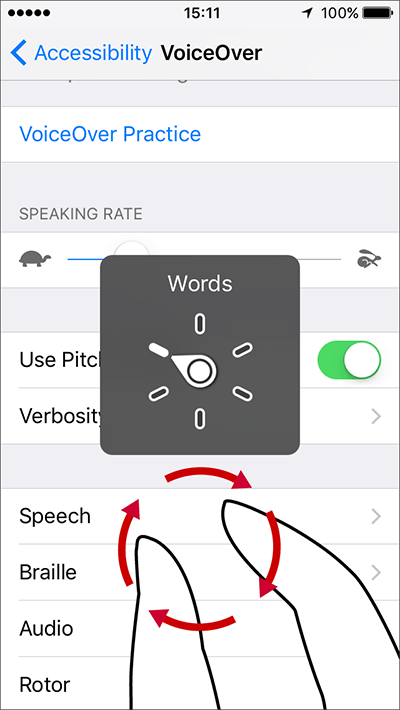
Fig 21
The ‘Rotor’ allows you to change the way VoiceOver moves from one item to the next based on the option you choose. For instance, if you choose ‘Heading’ from the ‘Rotor’ you can move from one heading to the next heading with a flick gesture.
You can also the ‘Rotor’ to alter the settings for the speech rate, language and volume.
With VoiceOver enabled you can activate the ‘Rotor’ at any time by rotating two fingers (clockwise and anti-clockwise) on the screen as if you were turning an actual dial (Fig 21, above).
Rotor settings:
You can choose, and re-order, the options that the ‘Rotor’ displays so that rotating your fingers on the screen brings up only the options you require and in the order that best suits your needs.
- Double tap on ‘Rotor’ (single tap if you have not activated VoiceOver at this point, but these instructions assume that you have), see the first panel of Fig 22.
- Double tap any unticked item to add it to the ‘Rotor’. Double tap any ticked item to remove it from the ‘Rotor’, see the second panel of Fig 22.
- To re-order an item, double tap and hold on the ‘list’ icon until the item lifts up (see the third panel of Fig 22). You can now drag and drop the item to a different position in the list.
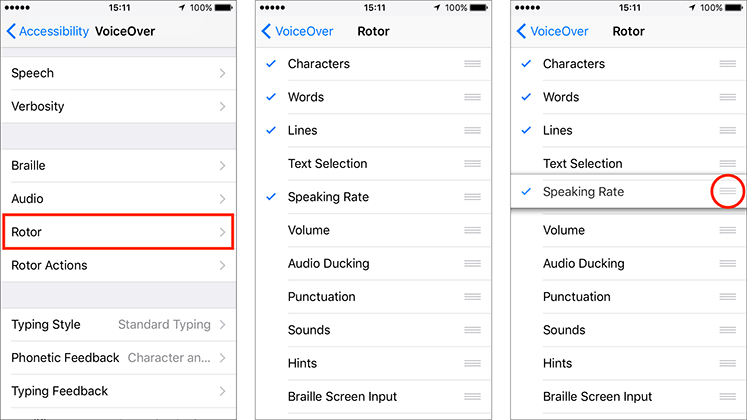
Fig 22
Using the Rotor:
Note: VoiceOver needs to be enabled in order to use the ‘Rotor’.
- Rotate two fingers on the screen as if you were turning an actual dial, to reveal the ‘Rotor’. See Fig 21, above.
- Keep rotating your fingers to scroll through the available options. VoiceOver will read out each option as you rotate through them.
- Lift your fingers to choose an option.
- You can now move from one item to the next item by flicking your finger down to move to the next item or up to go back to the previous.
- If you choose ‘Speech Rate’, ‘Volume’ or ‘Language’ from the ‘Rotor’, you can flick up and down the screen to speed up or slow down the speech rate, increase or decrease the volume and to choose a different language.
For more information on using the ‘Rotor’, see the Apple guide: https://support.apple.com/en-au/HT204783
Typing Styles
You can choose from three typing styles to use with the on-screen software keyboard. To choose the one most comfortable for you:
- Double tap on ‘Typing Styles’ (single tap if you have not activated VoiceOver at this point, but these instructions assume that you have). Fig 23.
- Double tap to select one of the following options (see the second panel of Fig 23).
- Standard Typing – Touch a key to select a character (you can slide your finger over the keyboard to select the character if this is easier). Whilst still touching the key, tap the screen with another finger to enter the character. You will receive spoken feedback when a key is selected and again when a character is entered.
- Touch Typing – Touch a key to select a character. If you have touched the wrong key, slide you finger to the correct one. You will receive spoken feedback for each key you touch. A character won’t be entered until you lift your finger.
- Direct Touch Typing – VoiceOver is disable for the keyboard so you can type normally without spoken feedback.
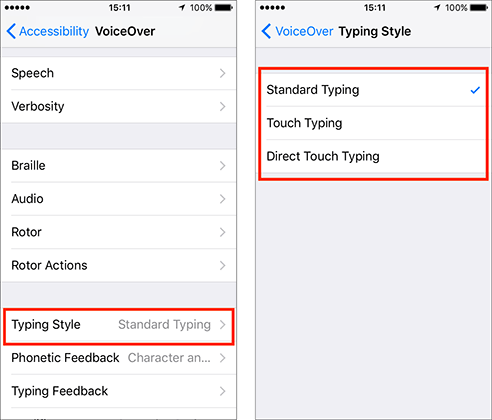
Fig 23
Phonetic Feedback
Phonetic Feedback’ gives VoiceOver users the ability to have letters pronounced using their phonetic alphabet equivalent, e.g. ‘A’ for Alpha and ‘B’ for Bravo.
By default, ‘Character and Phonetics’ is selected for phonetic feedback. To change this setting:
- Double tap on ‘Phonetic Feedback’ (single tap if you have not activated VoiceOver at this point, but these instructions assume that you have). Fig 24.
- Double tap to select one of the following options (see the second panel of Fig 24):
- Off
- Character and Phonetics
- Phonetic Only
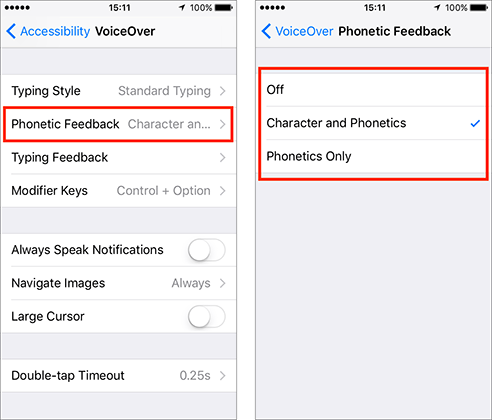
Fig 24
Typing Feedback
By default ‘Characters and Words’ is selected for the spoken feedback given by VoiceOver when you type. This default applies to both software and hardware keyboards but you can choose a different setting for each keyboard. To change these settings:
- Double tap on ‘Typing Feedback’ (single tap if you have not activated VoiceOver at this point, but these instructions assume that you have). Fig 25.
- Double tap to select the options you would like to use for on-screen keyboards and external, hardware keyboards (see the second panel of Fig 25). Choose from:
- Nothing
- Characters
- Words
- Characters and Words
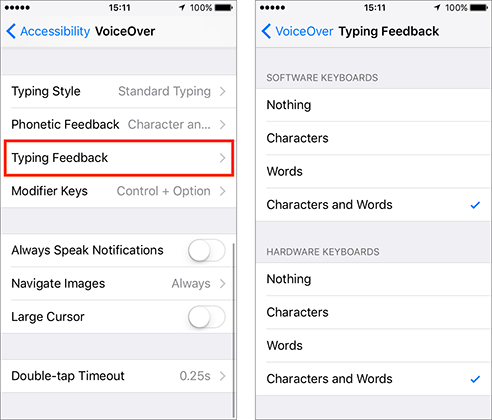
Fig 25
Modifier Keys
When using an external keyboard with your device you need to press ‘modifier’ keys before you can activate a VoiceOver keyboard command. By default, the ‘modifier’ keys are ‘Control + Option’ (also known as the ‘Alt’ key). You can change the ‘modifier’ key to ‘Caps Lock’ if you would prefer to.
- Double tap on ‘Modifier Keys’(single tap if you have not activated VoiceOver at this point, but these instructions assume that you have). Fig 26.
- Double tap to select one of the following options. Fig 26.
- Control + Option
- Caps Lock
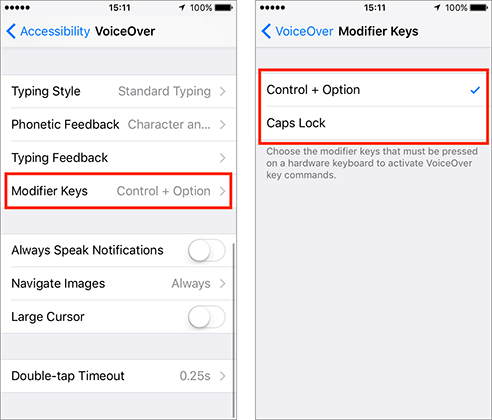
Fig 26
For a list of VoiceOver keyboard commands visit: http://help.apple.com/iphone/10/#/iph6c494dc6
Always Speak Notifications
By default, this setting is turned off.
- If you would like VoiceOver to announce notifications when they are received, double tap (single tap if you have not activated VoiceOver at this point) the toggle switch next to ‘Always Speak Notifications’ to enable this feature see Fig 27.
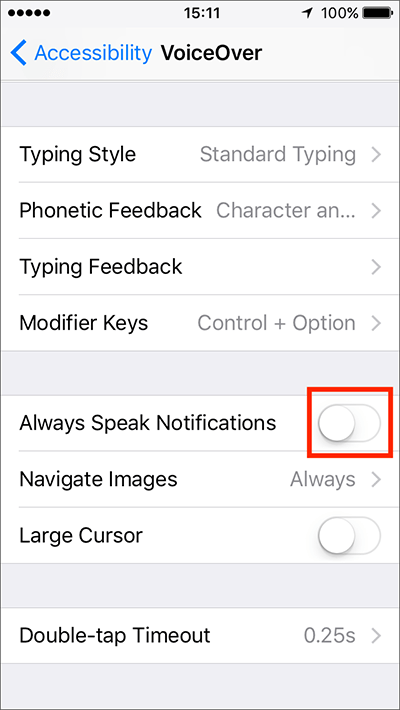
Fig 27
Navigate Images
By default, ‘Navigate Images’ is set to ‘Always’ and will read out any information associated with images on a page. ‘VoiceOver’ can now describe what is in an image (such as a car, a cat or facial expressions) even if it hasn’t been annotated.
- If you would like to change this setting, double tap on ‘Navigate Images’ (single tap if you have not activated VoiceOver at this point). Fig 28.
- Double tap to select one of the following options (see the second panel of Fig 28).
- Always -images will always be read out.
- With descriptions - only images with an alternative text description will be read out.
- Never:images will not be read out.
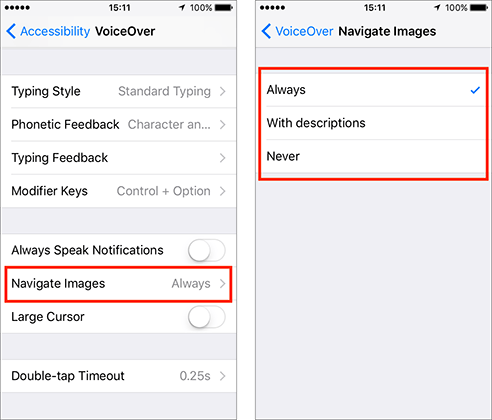
Fig 28
Large Cursor
A rectangle border appears around the currently selected element. You can make this border thicker so that it is easier to see. For an example of each style of border see the borders around ‘Typing Styles’ in both panels of Fig 29.
- If you would like to use the thicker border, double tap (single tap if you have not activated VoiceOver at this point) the toggle switch next to ‘Large Cursor’ to enable this feature, see the first panel of Fig 29.
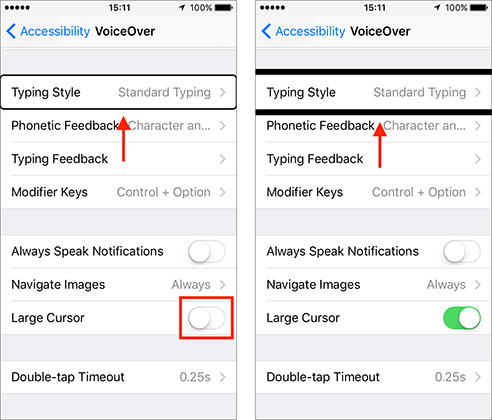
Fig 29
Double-tap Timeout
When VoiceOver is enabled you have to double-tap an item to activate it. You can adjust the length of time in which the two taps must occur to perform a double-tap gesture. The timeout can be set between 0.20 seconds and 0.50 seconds.
- Double tap on ‘Double-tap Timeout’ (single tap if you have not activated VoiceOver at this point). Fig 30.
- Double tap on the ‘+’ (plus) and ‘-’ (minus) buttons to set a more comfortable timeout limit, see the second panel of Fig 30.
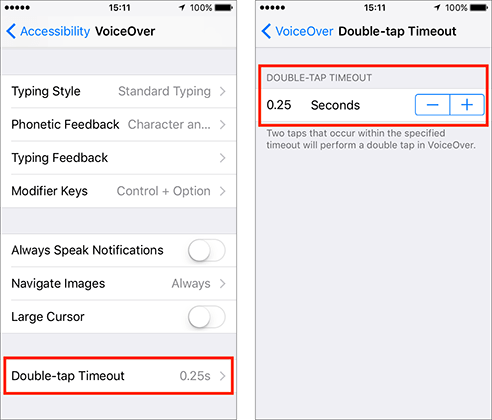
Fig 30
More information
‘VoiceOver’ can be turned on and activated using the iOS ‘Accessibility Shortcut’. For more information about using this shortcut see the article: Accessibility Shortcut (Triple-click Home) - iPhone/iPad/iPod Touch on this website.
Apple’s VoiceOver guide: https://help.apple.com/iphone/10/ - /iph3e2e415f
Gestures:
Apple’s VoiceOver gestures guide: https://help.apple.com/iphone/10/ - /iph3e2e2281
Keyboards:
Apple’s list of VoiceOver keyboard commands: https://help.apple.com/iphone/10/#/iph6c494dc6
Braille:
For more information on using ‘Braille’, see the Apple guide: https://help.apple.com/iphone/10/#/iph10366cc30
For a list of common ‘Braille’ commands you can use on your device, see the Apple guide: https://support.apple.com/en-gb/HT202132
For a list of supported devices, see: https://support.apple.com/en-gb/HT202514
Rotor:
For more information on using the ‘Rotor’, see the Apple guide: https://support.apple.com/en-au/HT204783
Need some more help?
Call our helpline 0300 180 0028 or email enquiries@abilitynet.org.uk
Need free IT Support at Home?
If you are older or disabled and need IT support at home, you can book a free home visit.