Call our helpline
0300 180 0028Detection mode is a collection of features to assist visually impaired users with navigating their surroundings. This guide covers detecting text and labels. For information about other detection features, see the links below.
Scene detection describes the people and objects detected in your surroundings. See our guide How to get descriptions of your surroundings using the Magnifier app for more information.
iPhone Pro and iPad Pro models give more detailed information about people, doors, furniture in your surroundings. See our guide How to detect people, doors, and furniture in your surroundings using the Magnifier app for more information.
For more information on using the Magnifier app, read our guide How to use your iPhone or iPad as a magnifier in iOS 18
Note: Apple warns "Detection Mode should not be relied on in high-risk or emergency situations, in circumstances where you may be harmed or injured, or for navigation".
Short guide:
- Open the Magnifier app
 .
. - In the Magnifier app, tap the settings button
 .
. - Tap Detect.
- On the next page, tap the toggle switch for Show in Control Panel to turn it on.
- Tap the back button, then tap Done to return to the magnifier.
- Tap the Detect button to turn on detection mode.
- Press and hold the Detection button
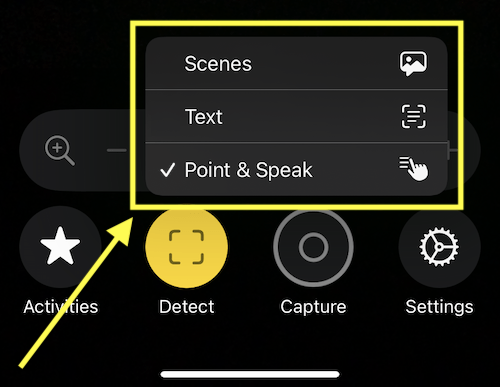
 and choose Text or Point & Speak.
 - Position your camera so that the rear camera can detect text.
- If you selected Text detection, your device will read aloud any text that it recognises.
- If you selected Point & Speak, point your finger at the text you want to hear read aloud.
- To customise the settings for Point & Speak, tap the settings button .
- On the Settings screen, tap Detect, then choose Text or Point & Speak.
Before and after
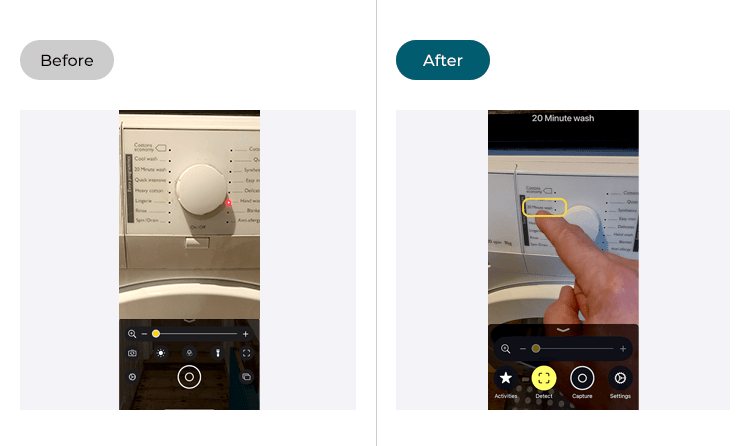
This section gives you step-by-step instructions on how to use Point & Speak in iOS 18, with pictures of the screens to help.
Open the Magnifier app
1. Tap the Magnifier icon ![]() on your Home screen.
on your Home screen.

Note: The Magnifier icon may appear in a different place on your home screen.If you don't see the icon on your home screen, you can find the Magnifier app in your App Library. Just swipe right through your Home pages until you find it. Then, tap the Magnifier icon in the Utilities folder.
Add the Detect button to the magnifier controls
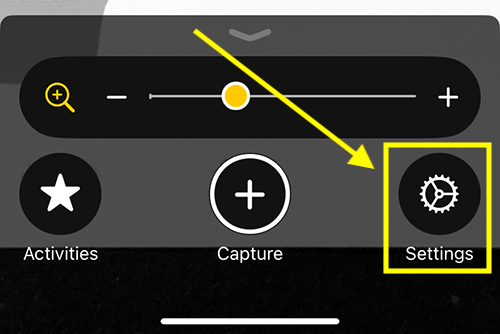
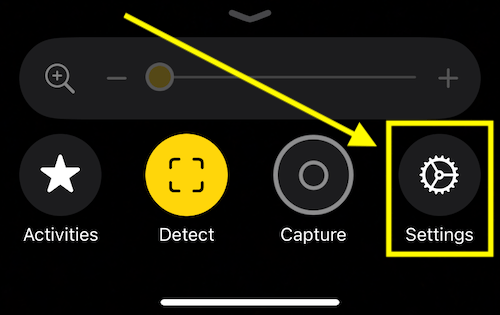
2. To use any of the detection modes, you first need to add the Detect button to the Magnifier. Tap the Settings button ![]() on the Magnifier.
on the Magnifier.
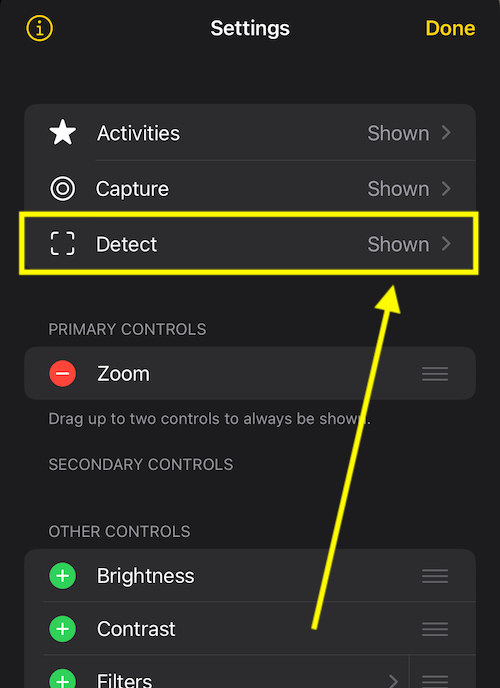
3. On the Settings screen, tap Detect.
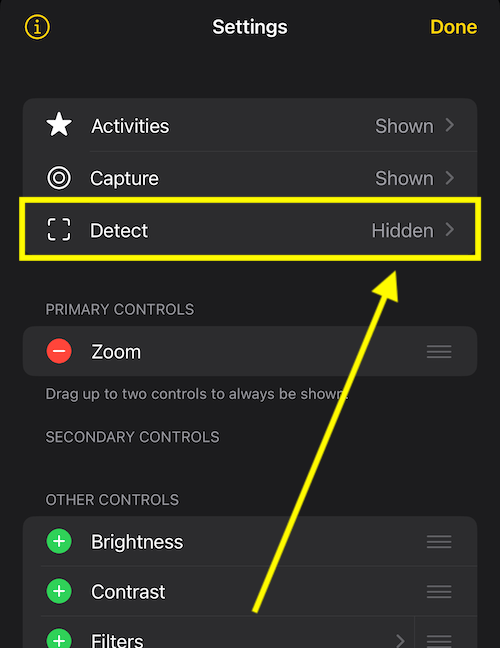
4. On the next page, tap Show in Control Panel.
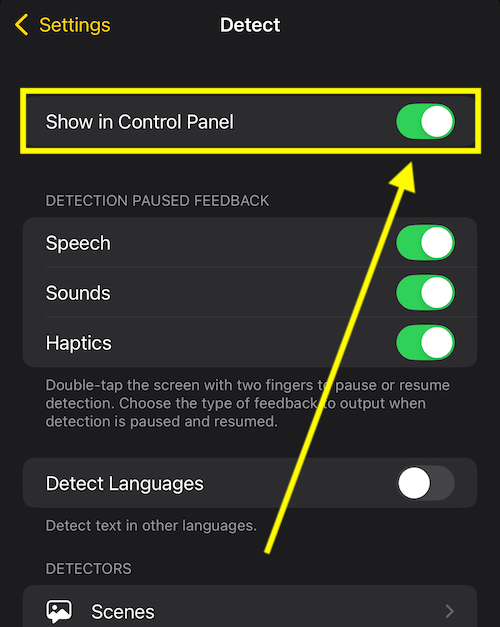
Close Magnifier settings
5. Tap the back button, labelled Settings, in the top-left corner. Then tap the Done button in the top-right corner to return to the Magnifier.

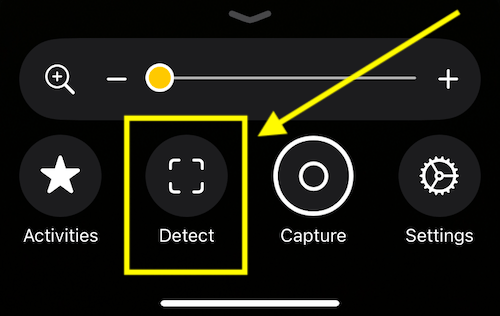
Turn on detection mode
6. Tap the Detect button ![]() to turn on detection mode.
to turn on detection mode.
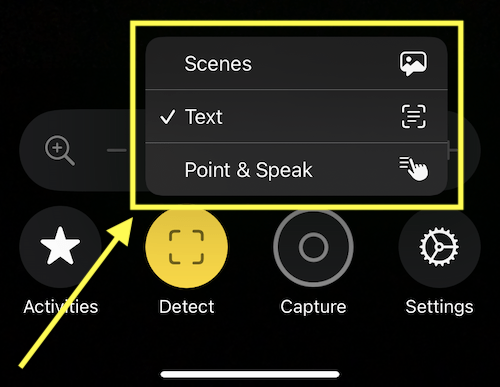
Using Text detection
7. Press and hold the Detect button ![]() and choose Text.
and choose Text.
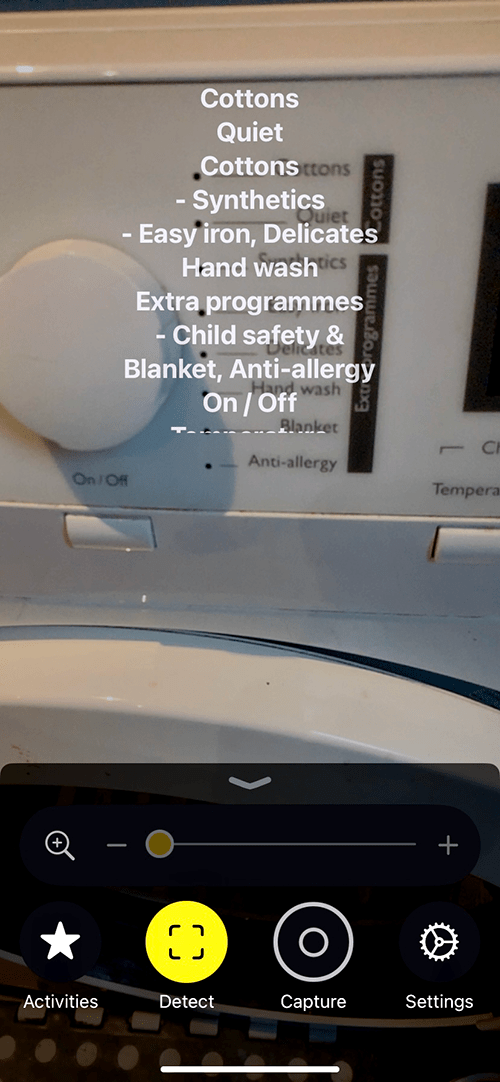
8. Position your camera so that the rear camera can detect text. Any text your device detects will be read aloud. A large, nicely formatted version of the text will be shown on the screen.
Use Point & Speak to read aloud the text labels on objects that you point at
9. With Point and Speak users can point at a label to have it read aloud. This is useful when the Magnifier detects many labels, such as buttons on a kitchen appliance.
Press and hold the Detect button ![]() and choose Point & Speak.
and choose Point & Speak.
10. Position your camera so that the rear camera can detect text. Point your finger at the text you want to hear read aloud. Your device will keep reading the labels aloud as you move your finger from one label to another.

Pause or stop detection
11. To pause detection, double-tap the screen with two fingers. Double-tap again with two fingers to resume detection. To stop detection mode, tap the Detect button ![]() .
.
Customise the settings for Text detection and Point & Speak
12. To customise the settings for Text detection or Point & Speak, tap the Settings button ![]() on the Magnifier.
on the Magnifier.
13. On the Settings screen, tap Detect.
14. On the Detect screen, tap Text or Point & Speak.
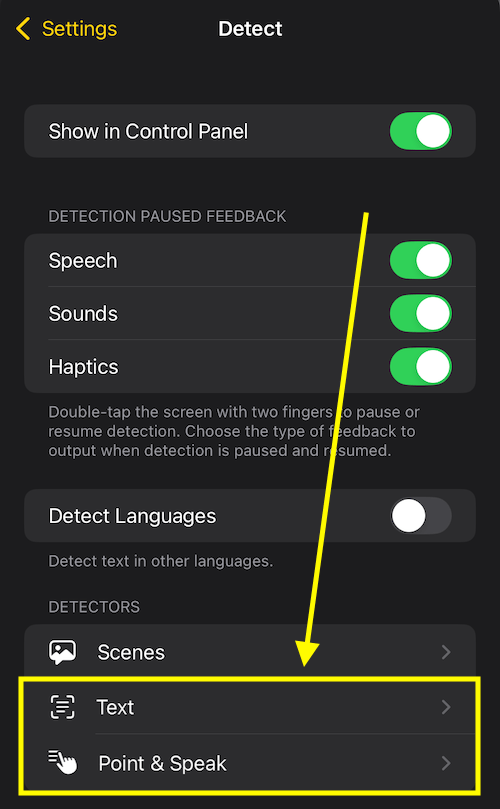
15. You can customise the following settings (descriptions shown after the image below):
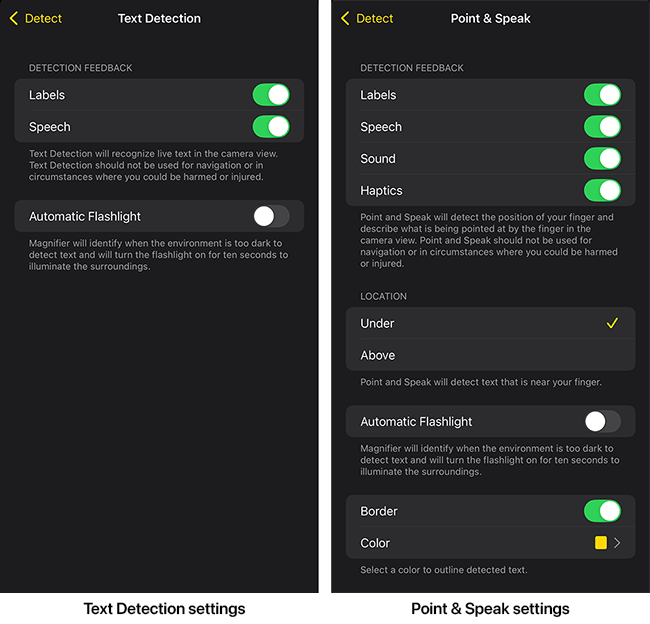
| Text and Point & Speak detector settings | |
| Detection Feedback | Turn on the toggle switches for the types of feedback you would like to receive: Labels – written on-screen descriptions Speech – spoken descriptions Sounds – alert sounds. Point & Speak only Haptics – vibrations. Point & Speak only |
| Automatic Torch | When it's too dark to detect text, the Magnifier turns on a torch to light up the area for 10 seconds |
| Point & Speak only | |
| Location | Choose whether Point and Speak detects text that is below or above your finger. |
| Border and Colour | Show a border around the text you are pointing at. Change the colour of the border. |
Return to the Magnifier
16. When you are happy with your settings, tap the back button in the top-left corner < (labelled, Detect), then tap the back button again (labelled Settings). Finally, tap Done in the top-right corner to close Settings and return to the Magnifier.
Need some more help?
Call our helpline 0300 180 0028 or email enquiries@abilitynet.org.uk
Need free IT Support at Home?
If you are older or disabled and need IT support at home, you can book a free home visit.