With Reader Mode, the magnify reformats text you have captured with the camera to make it easier to read. The magnifier can also use the built-in screen reader to read the text aloud.
The Magnify also contains a powerful feature called Detection Mode. Detection Mode can be used to detect people and doors, give descriptions of objects in your surroundings, and read aloud text found in the viewfinder.
This guide covers using to magnifier to zoom in on objects and text. To find out more about the Detection Mode features, see our guides about Image Descriptions, People Detection, Door Detection, and Point and Speak.
Short guide
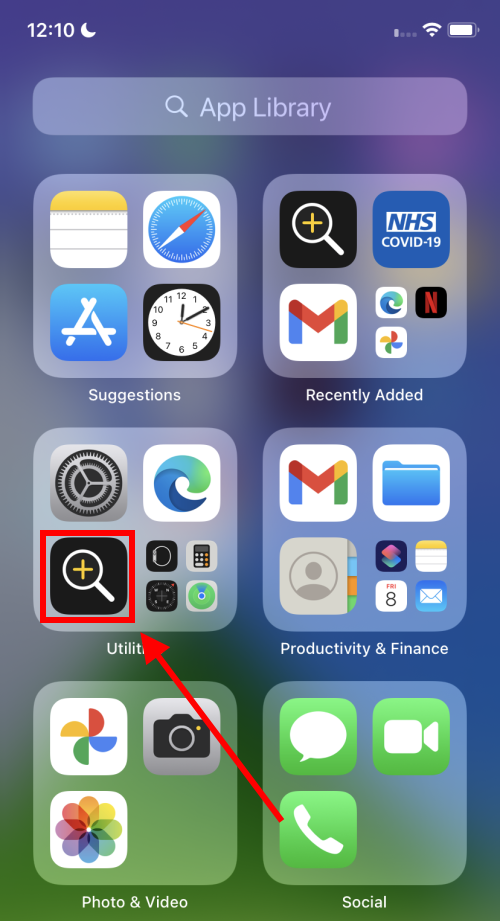
- To find the Magnifier, swipe right through the Home page screens to find your App Library. Tap the Magnifier icon in the Utilities folder.
- Launch the Magnifier and point your camera at an object or a page. Drag the magnifier slider to zoom in and out.
- To capture a still image, tap the Capture button. Note: These images are not saved to the photo library but you can use the Share button to save a copy or to send to someone.
Before and after

This section explains how to use the Magnifier in Apple iOS 18, with step-by-step instructions and pictures of the screen to help.
Find the magnifier
1. You can find the Magnifier in your App Library. Swipe through your Home pages of apps until reach the App Library page. Tap the Magnifier icon found in the Utilities folder.
Add the Magnifier to the Home screen of apps
2. You can also tap and hold the Magnifier icon then drag it out onto a page of your Home screen. It’s also possible to add the Magnifier to the Accessibility Shortcut. See our guide How to use the Accessibility Shortcut in iOS 18 to find out more about using the Accessibility Shortcut.

Using the Magnifier
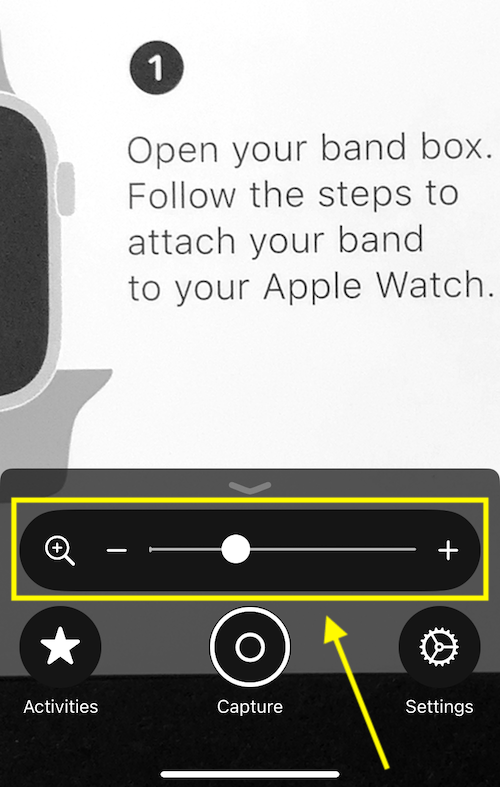
3. Tap the Magnifier icon. Point your camera at an object or a page of small text. Drag the zoom slider to zoom in or out.
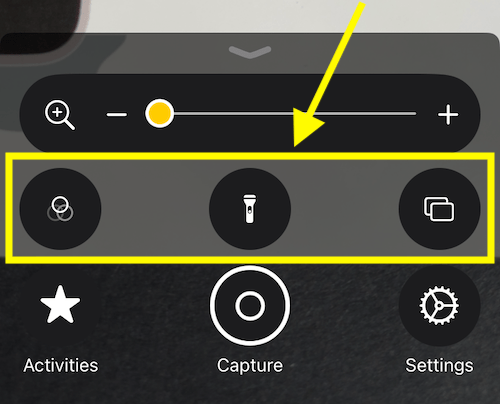
Note: There are several features you can add to the Magnifier controller to make what appears on the screen easier to see. These features include Colour Filters, Brightness and Contrast controls, and a Torch. We cover adding more controls in the section titled Add more features to the Magnifier controller at the end of this guide.
Capture a still image
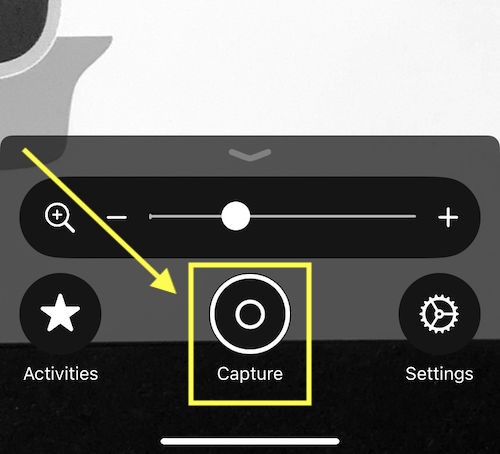
4. Sometimes you may find it easier to view the item or text you have zoomed in on if you capture it as a still image. To capture an image, press the Capture button. You can use the zoom slider to zoom in or out on the captured image. To return to the magnifier view, tap the Capture button (now labeled Close) again.
Note: The still images you capture are not saved to the photo library. However, you can use the Share button to save a copy or to send the image to someone.
Capture multiple still images
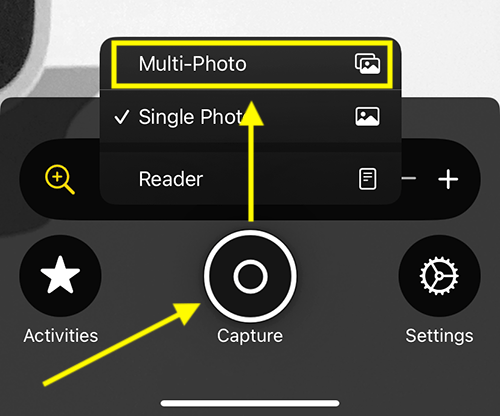
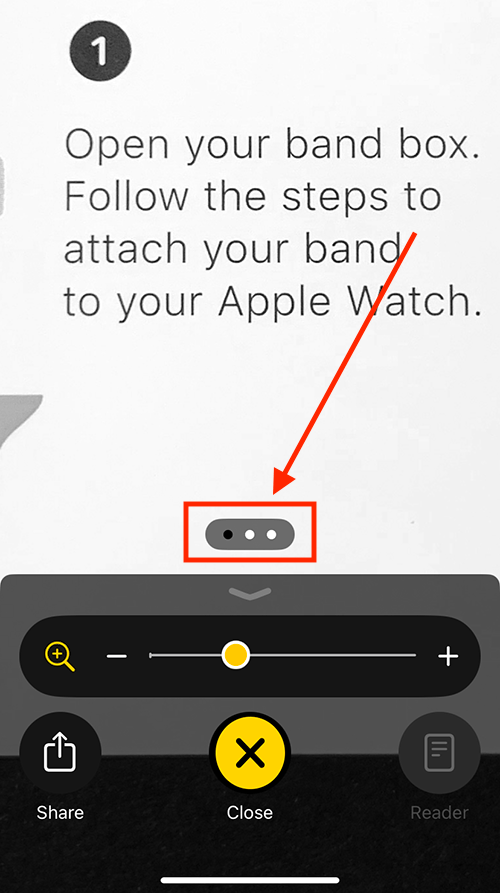
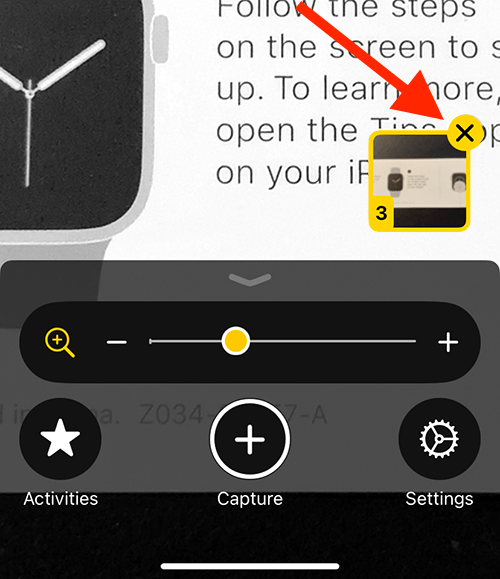
5. You can capture multiple still images but you first need to switch to Multi-Photo mode. To do so, long-press on the capture button and select Multi-Photo.
6. Now when you capture an image, it will appear as a thumbnail on the right of the screen. To view the images, tap the thumbnail.
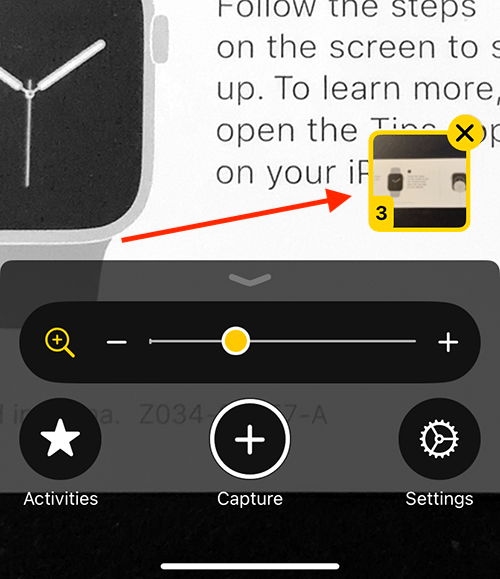
7. Tap the image indicator to scroll through the images. To return to the magnifier view, tap the Capture button (now labelled Close) again.
9. To delete the captured stills, tap the X button on the thumbnails.
Using Reader Mode to reformat text into a more readable document and/or have the text read aloud
10. The Magnifier's reader mode fomats text to make it easier to read. The magnifier can also use your device's built-in screen-reader software to read the text aloud.
There are two ways to enter Reader Mode:
- Capture a still image of some text. If the Magnifier can read the text, a Reader button will appear in place of the Settings button. Tap the Reader button to view a nicely formatted version of the text.
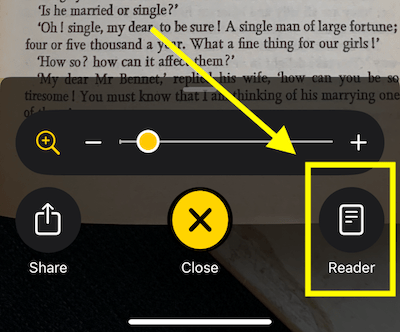
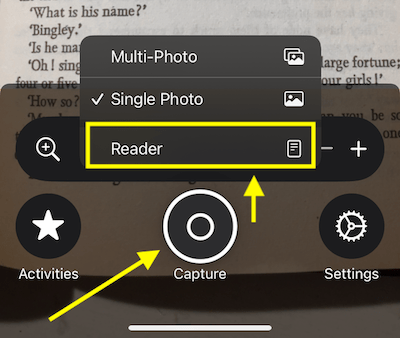
- Point the camera at some text. Press and hold the capture button to show the capture options. If the magnifier detects text, the Reader option will be available. Tap the Reader option to view a nicely formatted version of the text.
Customise the reader view
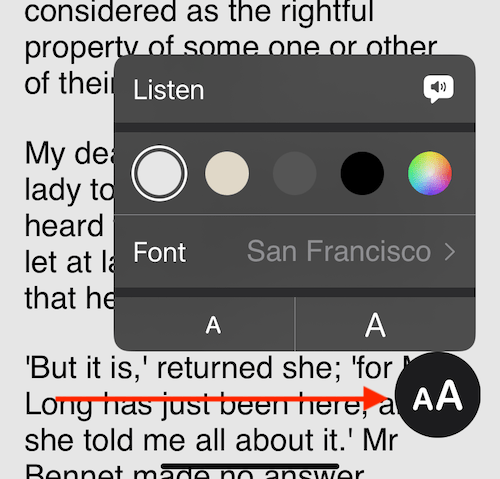
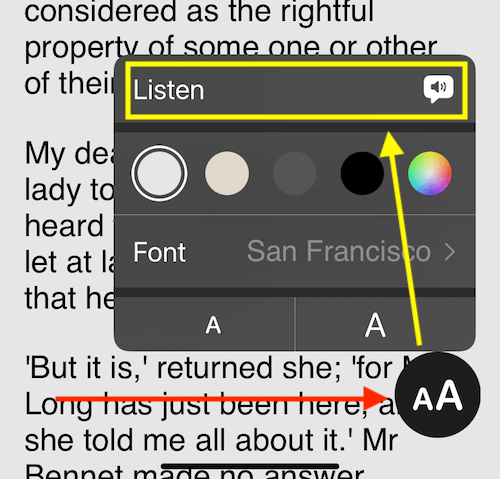
11. You can change the appearance of the Reader view to make the text even easier to read. You can change the colours, the font, and the font size. Tap the AA button in the bottom-right corner to view these options.
Set your device to read text aloud
12. To have the Magnifier read text aloud, tap the AA button in the bottom-right corner. Tap listen on the Reader options window.
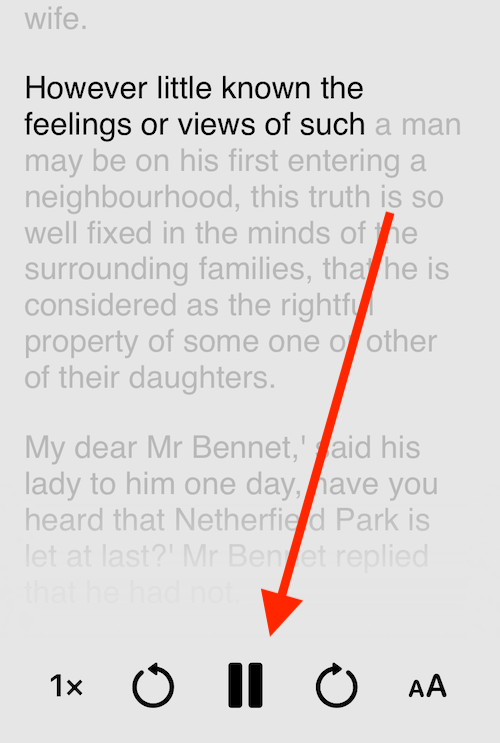
13. When text is being read aloud you can adjust the speaking rate, skip backwars and forward one paragraph at a time, and pause speaking. The text currently being read aloud is highlighted on the screen.
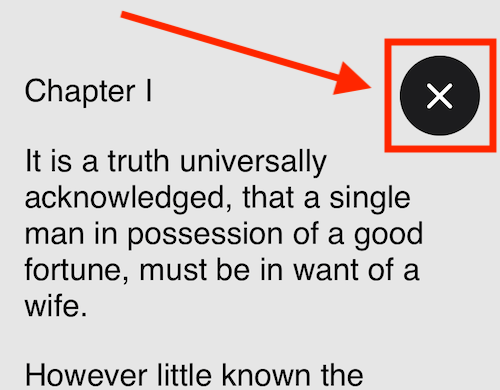
Exit Reader mode
14. To exit Reader mode, tap the X button in the top-right corner to return to the Magnifier.
Add more features to the Magnifier controller
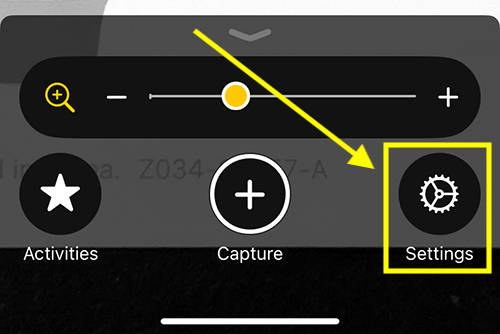
15. There are several features you can add to the Magnifier to make what appears on the screen easier to see. These features include Colour Filters, Brightness and Contrast controls, a Torch, and a button to make it easier to switch between capture modes. To add any of these features, tap the Settings button on the controller.
16. In the Other Controls section, tap the + (plus) button next to the controls you want to use. This will add the controls to the Secondary Controls section.
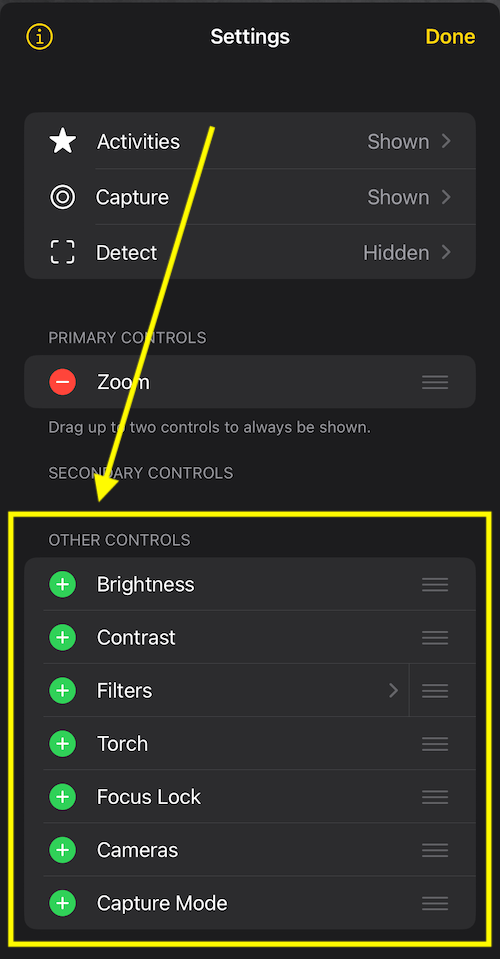
17. If you want to use filters, you can customise which filters are available to you. Tap Filters and untick any of the filters you don't want to use.
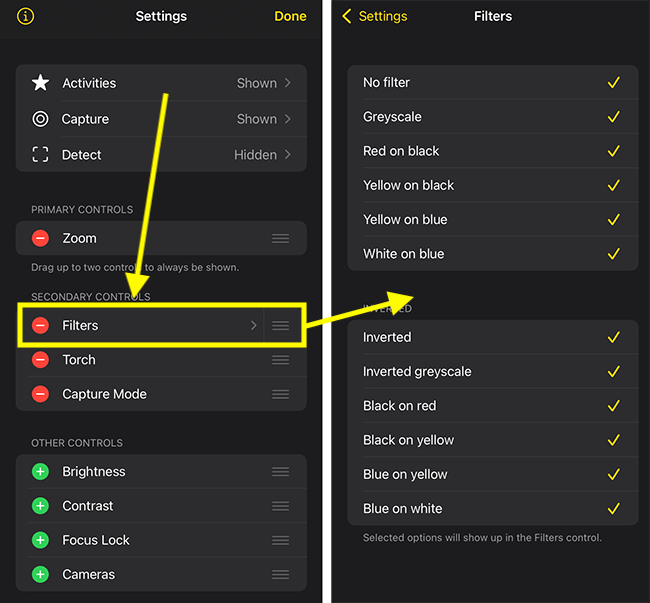
18. When you are happy with your settings, click Done in the top-right corner to return to the Magnifier.
Using secondary controls
19. When you return to the Magnifier, the secondary controls will be hidden. To reveal them, drag the controller handle upwards.
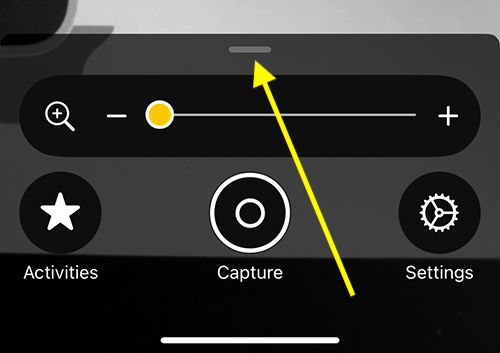
20. Tap a control to turn it on. Note: If you have enabled more than five secondary controls, you may need to swipe through them to find the one you want to use.
To hide the secondary controls drag the handle back down a little way.
Tip: To hide all the controls (except the zoom slider), drag the handle all the way to the bottom of the screen.
Save the current controller settings as an activity
If you customise any of the control settings while using the Magnifier, you can save those settings as activities. This makes it quick and easy to return to those exact settings without having to adjust anything.
21. Customise the controls as required. E.g. Change the zoom level, add a colour filter, etc.
22. Tap the Activities button.

23. Tap Save As New Activity.
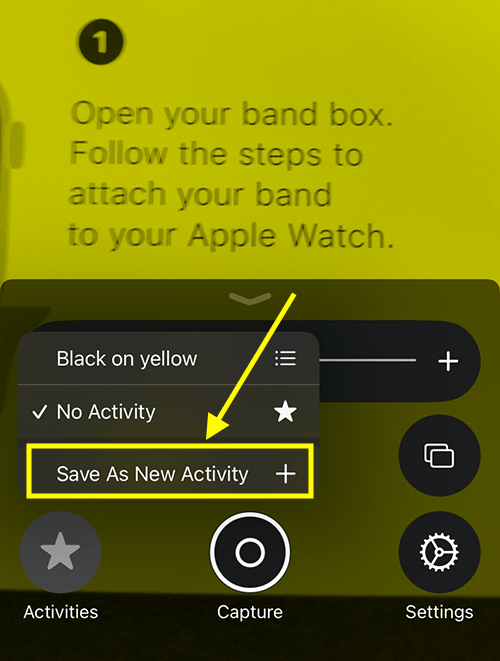
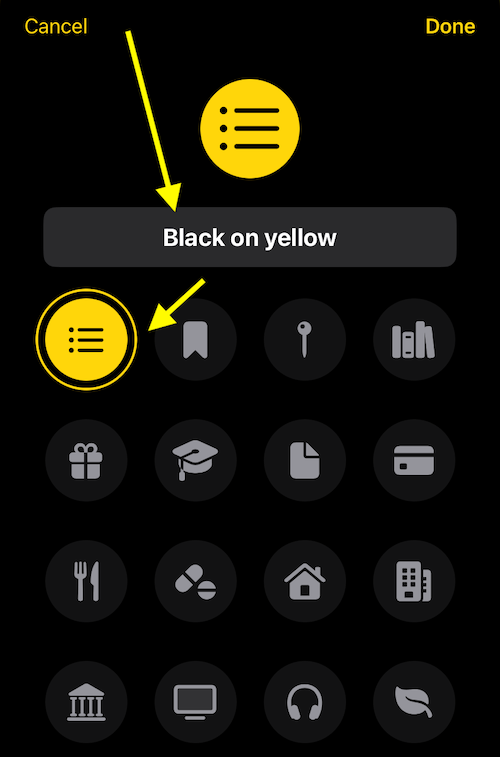
24. On the next screen, give the activity a title and choose an icon to represent it.
25. Click Done in the top-right corner to return to the Magnifier.
Use a saved activity
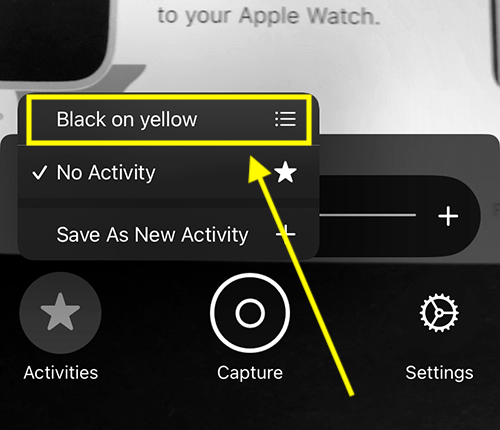
26. To use a saved activity, tap the Activities button, as before, and select the activity you want to use.
Make changes to a saved activity
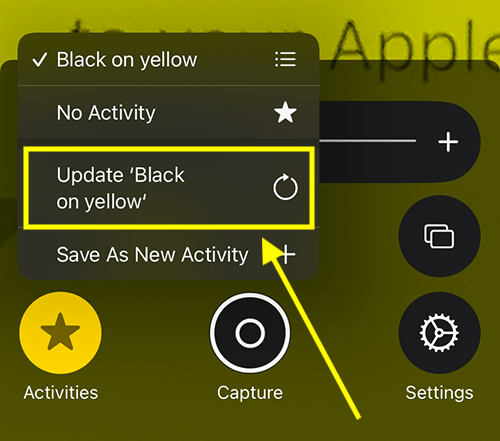
27. If you make further changes to the controls while using a saved activity, you can update the activity to use these new settings from now on. Tap the Activities button, as before, then select Update 'name of activity'.
Note: You can also make changes to a saved activity through the Settings menu. To do so, Tap the Settings button, then tap Activities.
Return to the Home screen
28. When you’ve finished using the Magnifier, swipe up from the bottom of the screen or tap the Home button, if your device has one, to return to the Home screen.
Need some more help?
Call our helpline 0300 180 0028 or email enquiries@abilitynet.org.uk
Need free IT Support at Home?
If you are older or disabled and need IT support at home, you can book a free home visit.