Call our helpline
0300 180 0028For more information on using the Accessibility Keyboard, see our article How to use the on-screen Accessibility keyboard in macOS 12 Monterey.
Short guide:
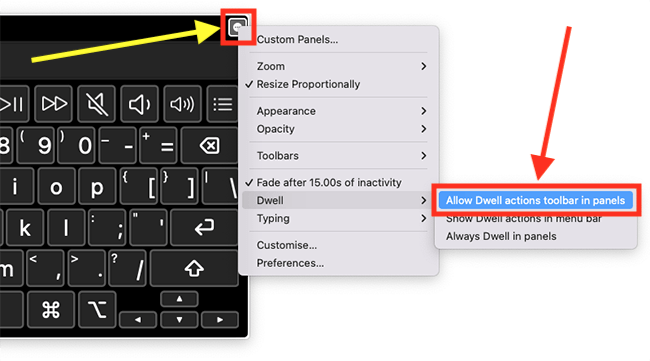
- On the Accessibility Keyboard, click the Options button
 in the top-right corner.
 - Select Dwell from the menu, then select Allow dwell actions toolbar in panels.
- Choose actions from the Dwell toolbar that appears at the top of the Accessibility Keyboard.
- Rest the pointer over an item on the screen for a few seconds to perform the chosen action.
Before and after
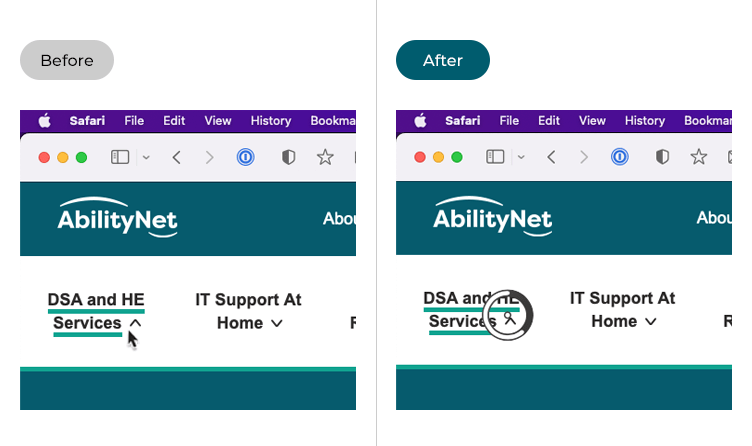
This section gives you step by step instructions on how to use Dwell with the on-screen Accessibility Keyboard in macOS 12 Monterey, with pictures of the screens to help.
Enable Dwell
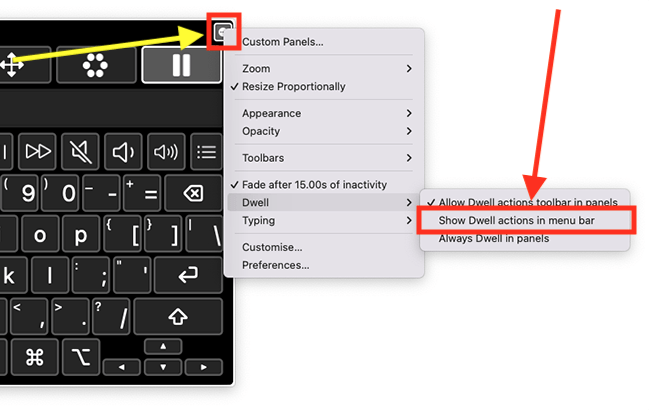
1. Click the Options button ![]() in the top-right corner of the Accessibility Keyboard. Select Dwell from the menu, then select Allow dwell actions toolbar in panels.
in the top-right corner of the Accessibility Keyboard. Select Dwell from the menu, then select Allow dwell actions toolbar in panels.
The Dwell toolbar appears along the top of the Accessibility Keyboard.
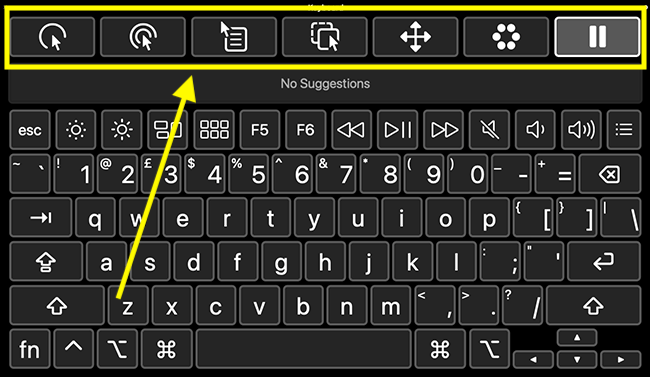
The action you select from the Dwell panel will be performed when the pointer is rested on an item for a specified amount of time (dwelling). The dwell pointer indicates the countdown by turning grey before the action is performed.

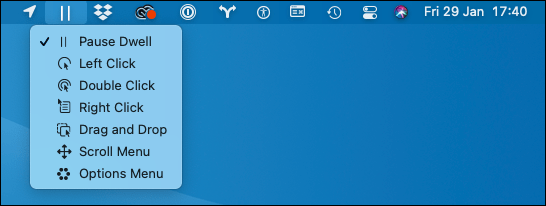
The Dwell actions
 |
Left Click – perform a left-click when you dwell on an item |
 |
Double Click – perform a double-click when you dwell on an item |
 |
Right Click – perform a right-click when you dwell on an item |
 |
Drag and Drop – drag and drop an item. Dwell on an item to activate drag, reposition the item then dwell again to rel |
 |
Scroll Menu – a scroll controller appears on-screen. Dwell on an arrow to scroll the page in that direction. |
 |
Options Menu – shows a circular menu of the Dwell actions. |
 |
Pause – pause Dwell. This can be useful when watching a video or reading a webpage where you don’t want to accidentally trigger a Dwell action. |
Show Dwell in the Menu Bar
2. You can add the Dwell menu to the menu bar that appears along the top-right of the computer screen. To do so, click the Options button in the top-right corner of the Accessibility keyboard. Select Dwell from the menu, then select Show dwell actions in menu bar.
Always dwell in panels
3. When Dwell has been paused, you can continue using it to select items in the Accessibility Keyboard and custom panels. To do so, select the Options button in the top-right corner of the Accessibility keyboard. Select Dwell from the menu, then select Always dwell in panels.

Edit Dwell settings
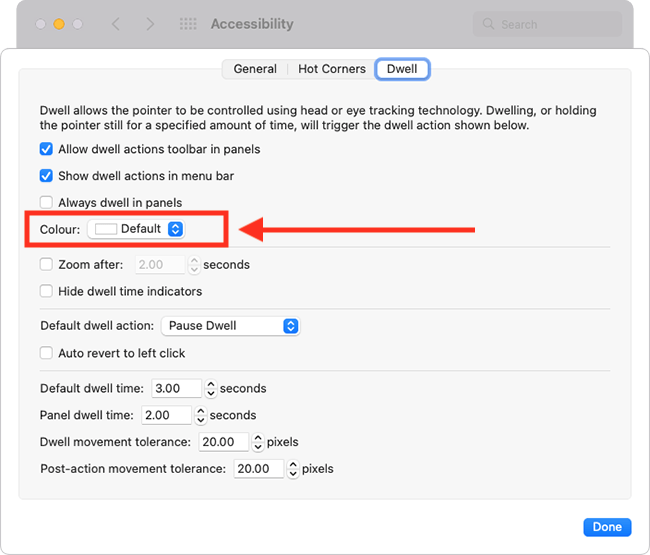
4. Click the Options button in the top-right corner of the Accessibility Keyboard, then select Preferences.

Change the colour of the dwell pointer
5. To change the colour of the Dwell pointer, select the drop-down menu for Colours and choose from the options.
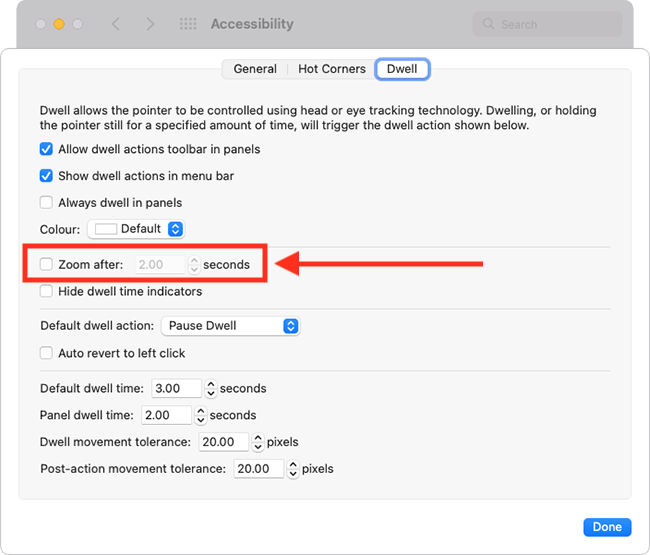
Magnify the area around the pointer
6. You can magnify the area around the pointer. This is activated when the pointer has been idle for a specified amount of time. Tick the checkbox for Zoom after and set how long the pointer needs to be idle before zoom occurs.
Note: The size of the magnified area is based on the size set for picture-in-picture zoom. To change the picture-in-picture size, select Apple menu > System Preferences, click Accessibility, then click Zoom. For more information, see our article How to magnify the screen in macOS 12 Monterey.
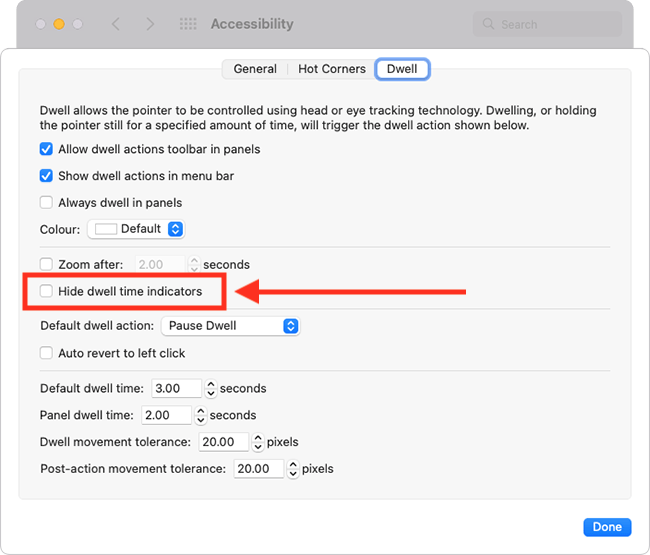
Hide the Dwell pointer
7. To hide the Dwell pointer, tick the checkbox for Hide dwell time indicators.
Set the default Dwell action
8. The default Dwell action is Left Click. Click the dropdown menu for Default dwell action and select a different action.

Revert to left-click after performing an action
9. After performing an action, always make left-click the next action to be performed. This can be useful if left-click is the action you use most often. Tick the checkbox for Auto revert to left click.

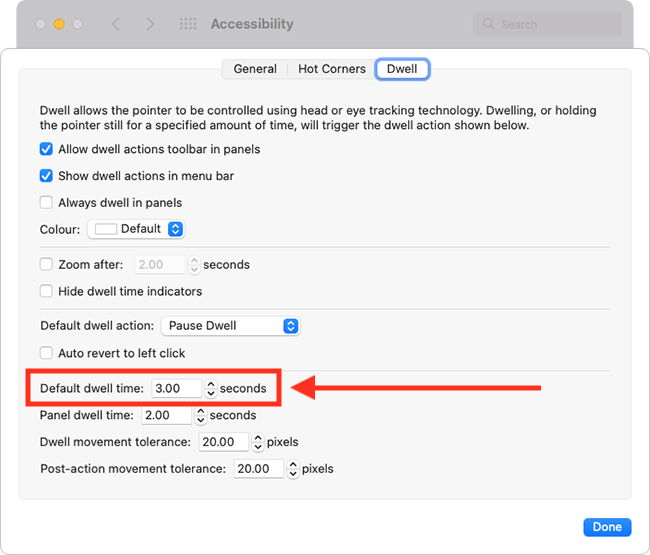
Change how long you need to dwell on an item on the screen
10. This is the amount of time the pointer needs to dwell (rest) on an item on the screen before an action is performed. The default is three seconds. Use the arrows for Default dwell time to increase or decrease the time.
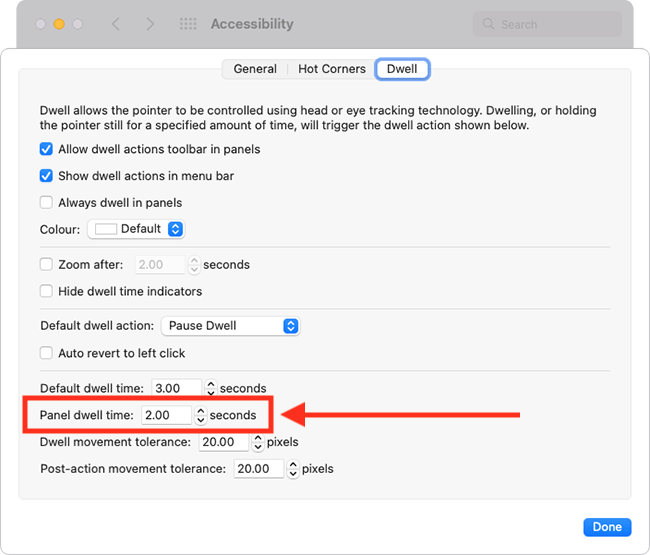
Change how long you need to dwell on items in panels
11. This is the amount of time the pointer needs to rest on an item in the Accessibility Keyboard or custom panels before a left click is performed. The default is two seconds. Use the arrows for Panel dwell time to increase or decrease the time.
Change dwell movement tolerance
12. This is the distance (in pixels) the pointer can move before a dwell action is cancelled. Use the arrows for Dwell movement tolerance to increase or decrease the number of pixels.

Change the post-action movement tolerance
13. This is the distance (in pixels) you need to move the pointer before the dwell countdown restarts after performing an action. Use the arrows for Post-action movement tolerance to increase or decrease the number of pixels.

Close System Preferences
14. When you are happy with your settings, click Done to close Dwell settings. Close the System Preferences window by clicking the Close button (red circle) in the top-left corner of the window or using the Cmd + W keyboard shortcut.
Use Hot Corners to switch Dwell actions
15. You can temporarily switch to a different Dwell action by resting the pointer on a corner of the screen. For more information on using Hot Corners, see out article How to use Hot Corners with the on-screen Accessibility Keyboard in macOS 12 Monterey.
Note: If this does not work it could be because your computer settings are managed by someone else (an IT department or administrator for example). If so, you will need to contact them to access these settings or for help.
Need some more help?
Call our helpline 0300 180 0028 or email enquiries@abilitynet.org.uk
Need free IT Support at Home?
If you are older or disabled and need IT support at home, you can book a free home visit.