In this article
How to open Live Transcribe
How to enable a shortcut to open Live transcribe
How to use Live Transcribe to turn speech into text
How to type replies
How to pause transcriptions
How to change the size of transcribed text
How to receive a vibration alert when a name is spoken
How to receive a vibration alert when speech resumes after a pause
How to use Live Transcribe with a second language
How to save transcriptions
How to use an external microphone with Live Transcribe
How to switch between the dark theme and light theme
How to receive notifications when important sounds are detected
How to open Live Transcribe
- To access the Accessibility features on your Android device open the Settings app
 .
. - In the Settings app, select Accessibility from the list.
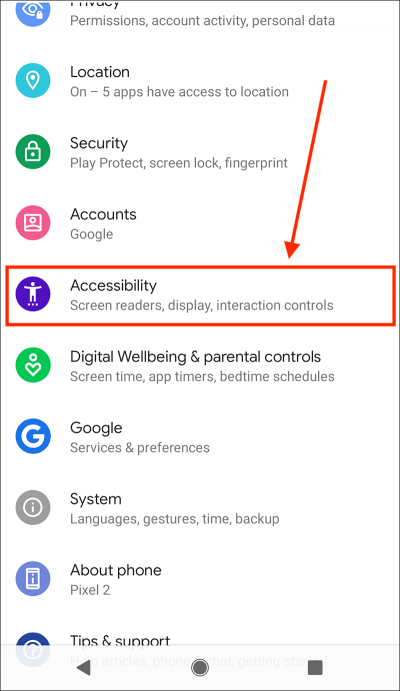
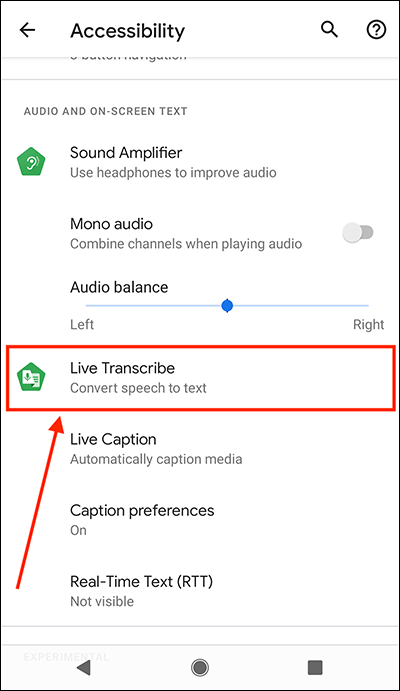
- On the Accessibility screen, scroll down to the Audio & on-screen text section and select Live Transcribe.
- On the next screen, select Open Live Transcribe.
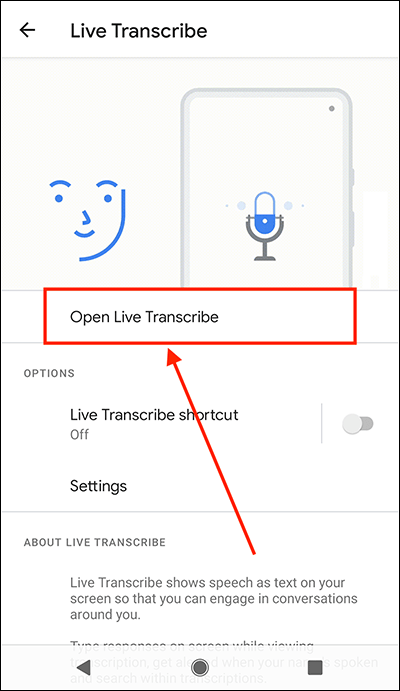
- The first time you open Sound notifications you’ll see a pop-up window informing you that this feature needs to control certain aspects of your device. Click Allow to continue.
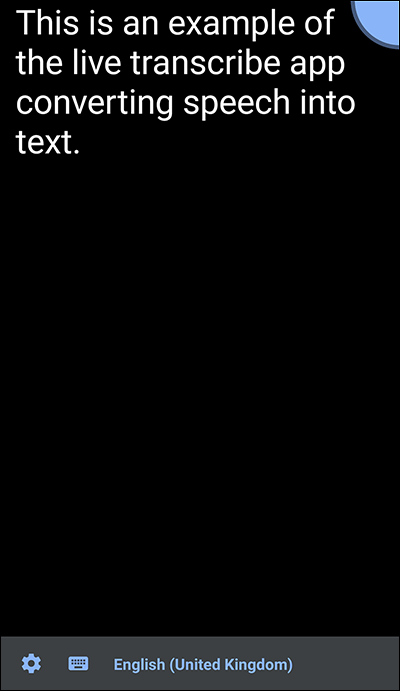
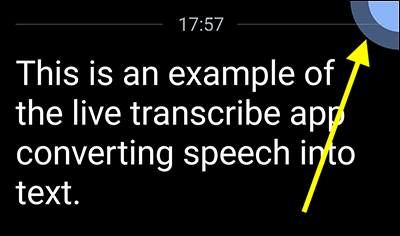
- The Live Transcript app will open and will start transcribing any speech it detects. You will see it appear as text on your screen (see our example, below).
How to enable a shortcut to open Live Transcribe
- o access the Accessibility features on your Android device open the Settings app .
- In the Settings app, select Accessibility from the list.
- On the Accessibility screen, scroll down to the Audio & on-screen text section and select Live Transcribe.
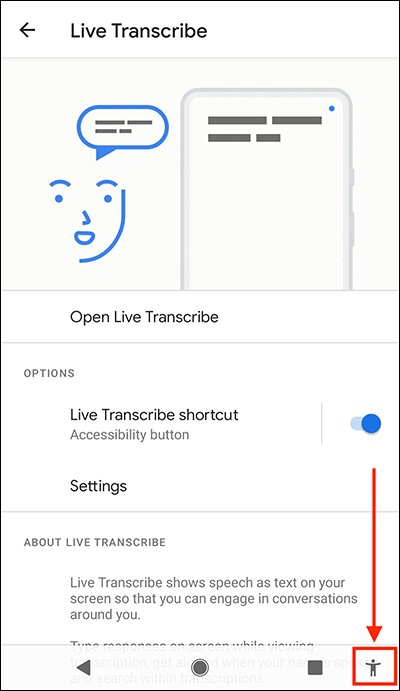
- On the Live Transcribe screen, set the toggle switch for Live Transcribe Shortcut to On.
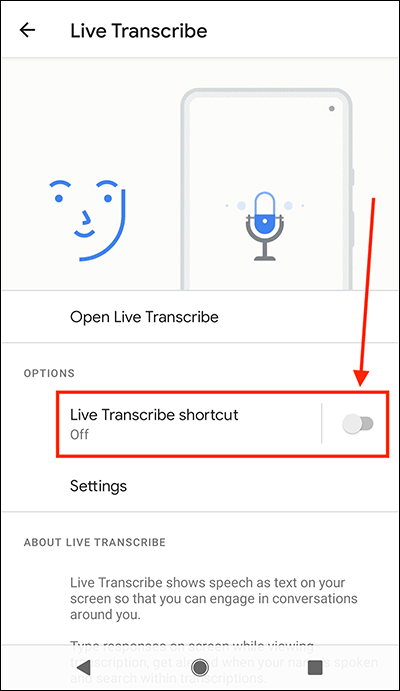
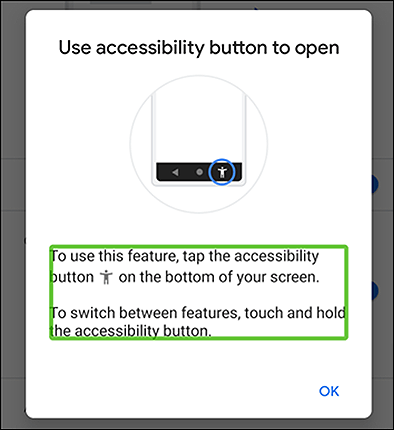
Note: You will see a pop-up notification explaining how to use the shortcut button (known as the Accessibility shortcut) to enable Live Transcribe. Select OK to continue.
Using the shortcut to open Live Transcribe
Depending on how you navigate your device there are different methods for using the Live Transcribe shortcut.
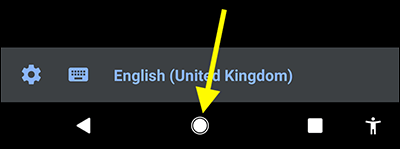
- If you use swipe gestures to navigate your device, swipe up from the bottom of the screen with two fingers to open Live Transcribe.
- If you use the navigation bar at the bottom of the screen, select the shortcut button
 to open Live Transcribe.
How to use Live Transcribe to turn speech into text
- Open Live Transcribe (see instructions above).
- As Live Transcribe transcribes speech, you will see it appear as text on the screen.
- Live Transcribe will also indicate when non-speech sounds are detected, such as laughing or knocking.
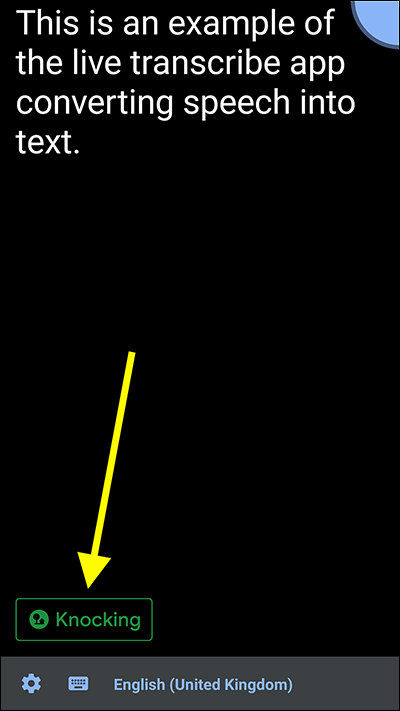
- The blue indicator in the top corner shows how well Live Transcribe is picking up sound. If the outer blue circle is small, move nearer to the subject you want to capture.
- You can scroll the screen to see previously transcribed speech.
- To stop Live Transcribe, select the Home button in the navigation bar at the bottom of the screen. Note: If the Accessibility button is not visible, swipe up from the bottom of the screen to reveal the navigation bar.
How to type replies
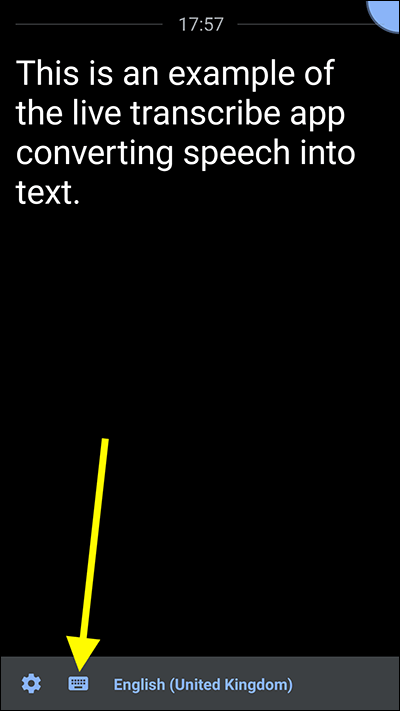
- Start Live Transcribe if it’s not already running.
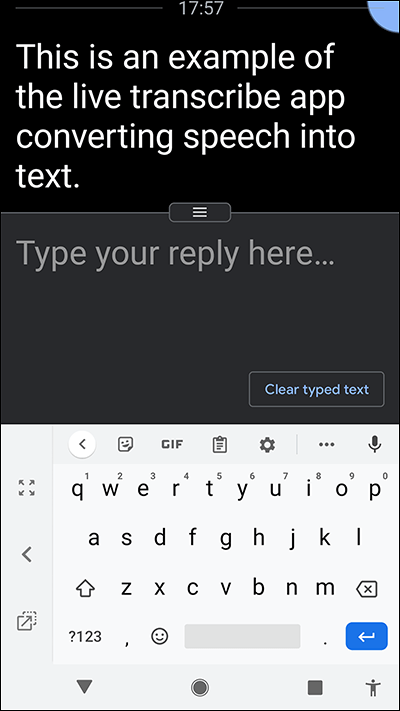
- To type a reply, select the keyboard icon and enter text using the on-screen keyboard. If the keyboard icon is hidden, touch the screen to reveal it.
- While the typing window is open you can still see newly transcribed text appear in the window above it. To hide the keyboard window, tap on the transcribing section at the top of the screen.
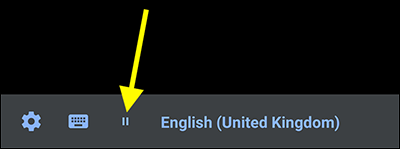
How to pause transcriptions
You can pause Live Transcribe so that you can catch up with your reading. When paused, Live Transcribe will carry on working in the background. You will see newly transcribed text when you un-pause.
To be able to pause Live Transcription you will first need to enable the Pause setting:
- Start Live Transcribe if it’s not already running.
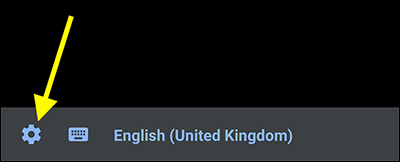
- Select the settings icon
 .
.
- Select More settings.
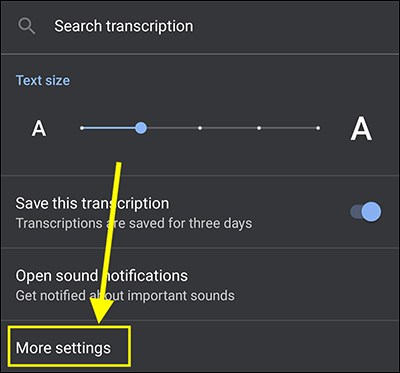
- On the Live Transcribe settings screen, scroll down and select Advanced.
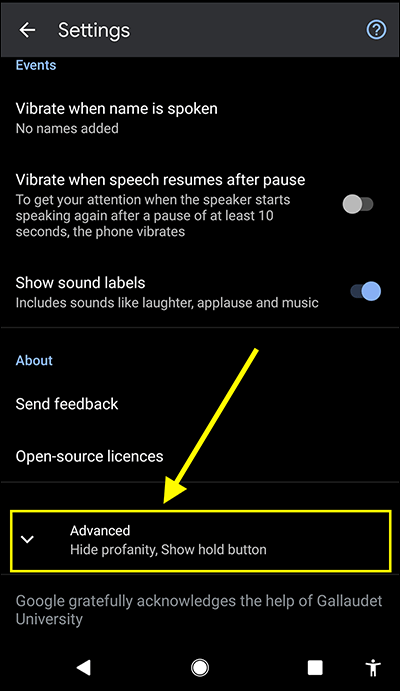
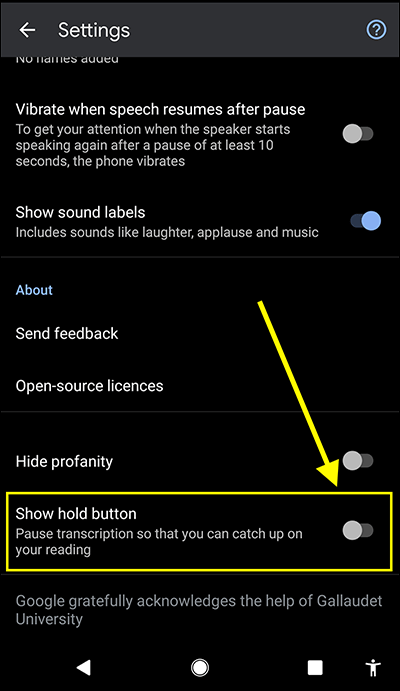
- On the next screen, set the toggle switch for Show hold button to On.
- Select the back button in the navigation bar to return to the Live Transcription screen.
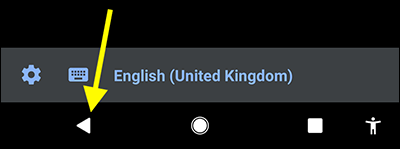
- Now you can select the pause button to pause transcription.
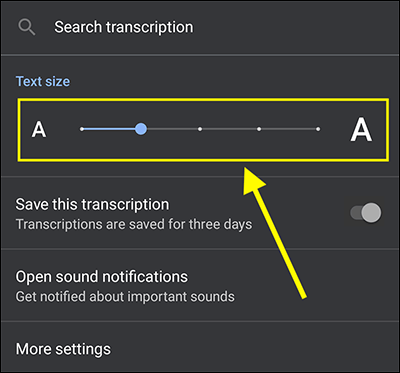
How to change the size of transcribed text
- Start Live Transcribe if it’s not already running.
- Select the settings icon .
- Adjust the slider for Text size to make the transcribed text larger or smaller.
How to receive a vibration alert when a name is spoken
You can set your device to vibrate when it detects a name has been spoken.
- Start Live Transcribe if it’s not already running.
- Select the settings icon .
- Select More settings.
- On the Live Transcribe settings screen, scroll down to the Events section and select Vibrate when name is spoken.
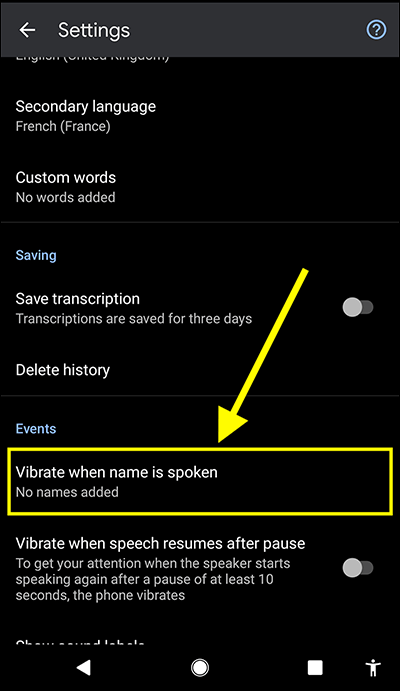
- On the next screen, add any names you want to be alerted for.
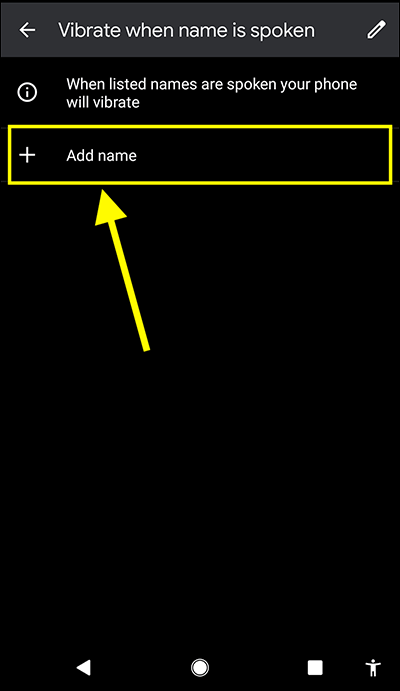
- Select the back button in the navigation bar to return to the Live Transcription screen.
How to receive a vibration alert when speech resumes after a pause
You can set your device to vibrate when speech resumes after a pause of 10 seconds or more.
- Start Live Transcribe if it’s not already running.
- Select the settings icon .
- Select More settings.
- On the Settings screen, scroll down to the Events section and set the toggle switch for Vibrate when speech resumes after pause to On.
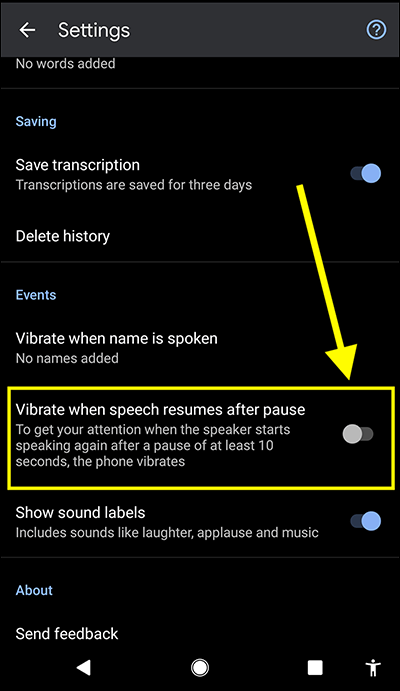
- Select the back button in the navigation bar to return to the Live Transcription screen.
How to use Live Transcribe with a second language
Live Transcribe can transcribe many languages. You can easily switch between two languages by tapping on the current language shown at the bottom of the live Transcribe window.
To add a second language:
- Start Live Transcribe if it’s not already running.
- Select the settings icon .
- Select More settings.
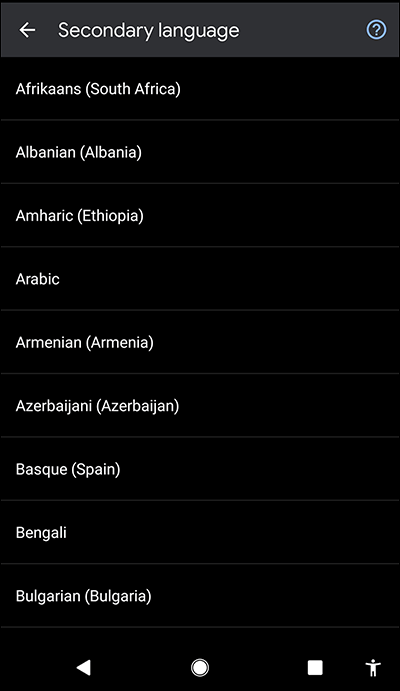
- On the Live Transcribe settings screen, select Secondary language. Note: You can also change the Primary language in the same way, just select Primary language at this step instead.
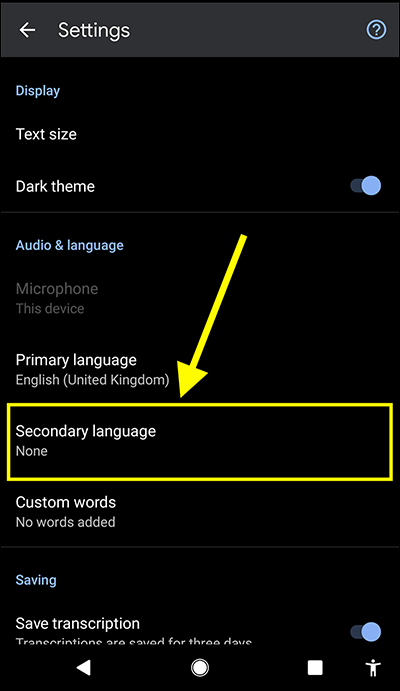
- Choose the language you wish to use.
- Select the back button in the navigation bar to return to the Live Transcription screen.
How to switch between languages
Select the current language at the bottom of the screen to switch to the other language you have set up.
![]()
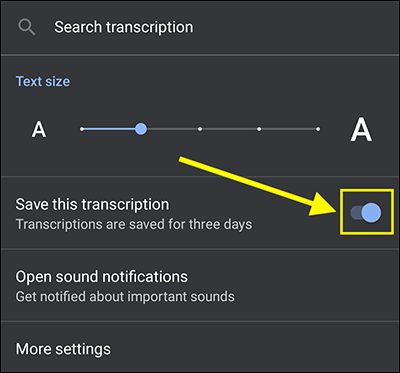
How to save transcriptions
You can save transcriptions for three days. You can scroll back up the transcription window to read them.
- Start Live Transcribe if it’s not already running.
- Select the settings icon .
- Set the toggle switch for Save this transcription to On.
How to delete your transcription history
- Start Live Transcribe if it’s not already running.
- Select the settings icon .
- Select More settings.
- On the Live Transcribe settings screen, scroll down to the Saving section and select Delete History.
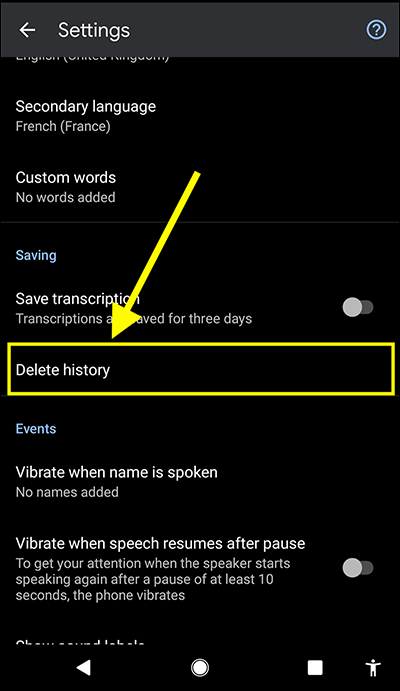
- Select the back button in the navigation bar to return to the Live Transcription screen.
How to use an external microphone with Live Transcribe
- Start Live Transcribe if it’s not already running.
- Select the settings icon .
- Select More settings.
- On the Live Transcribe settings screen, in the Microphone section, select your device from the list.

- Select the back button in the navigation bar to return to the Live Transcription screen.
How to switch between the dark theme and light theme
By default, Live Transcribe use a dark theme. If you would prefer to use a light theme:
- Start Live Transcribe if it’s not already running.
- Select the settings icon .
- Select More settings.
- On the Live Transcribe settings screen, set the toggle switch for Dark Theme to Off.
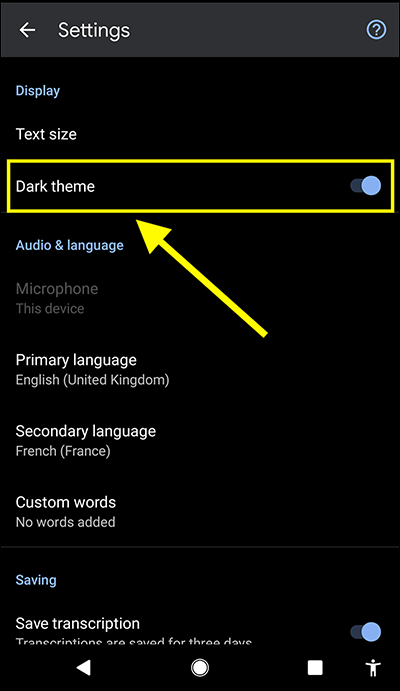
- Select the back button in the navigation bar to return to the Live Transcription screen.
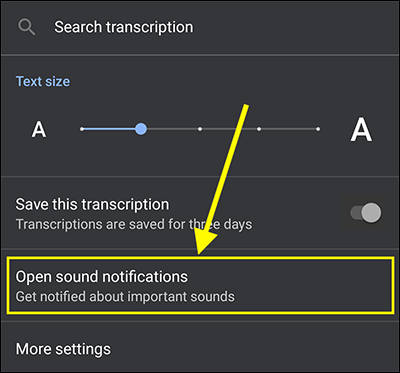
How to receive notifications when an important sound is detected
Live Transcribe can listen out for important sounds, such as smoke alarms, sirens, and doorbells. When one of these sounds is detected your device will vibrate and the camera flash will flash several times. Although this feature uses Live Transcribe, it is a standalone feature within Accessibility Settings. For more information, see our article How to receive alerts when important sounds are detected around you in Android 11.
You can start Sound notifications from within Live Transcribe.
- Start Live Transcribe if it’s not already running.
- Select the settings icon .
- Select Open sound notifications.
Note: We have written these instructions for devices running the standard version of the Android operating system. You may find some minor presentation differences if the manufacturer has customised the theme.
Need some more help?
Call our helpline 0300 180 0028 or email enquiries@abilitynet.org.uk
Need free IT Support at Home?
If you are older or disabled and need IT support at home, you can book a free home visit.